
Leather has a memory. Unlike woven fabric that forgives a misplaced stitch or a hurried seam, leather records every decision with permanence. That permanence is precisely what makes machine sewing leather so rewarding—and intimidating for beginners.
The good news is that creating professional-looking leather goods does not require an industrial workshop or decades of upholstery experience. With the correct needle, balanced machine settings, and a thoughtful understanding of material behavior, even a standard home sewing machine can produce refined, durable leather projects.
This guide walks through the entire process of machine sewing leather, from selecting the right tools and understanding leather weights to troubleshooting skipped stitches and mastering advanced techniques used by professional ateliers. Whether you are preparing your first leather pouch or refining high-end bag construction skills, the sections below are designed to help you sew cleaner seams, protect your machine, and achieve polished results.
Can You Sew Leather With a Regular Sewing Machine?
Many beginners assume leather requires an industrial sewing machine, but that is only partially true. Most domestic sewing machines can handle lightweight and medium-weight leather when properly configured. The limitation is not always the machine itself—it is usually the combination of leather thickness, incorrect needles, and improper tension settings.
A regular sewing machine can typically sew leather between 2 oz and 4 oz thickness without difficulty when paired with a leather needle, longer stitch length, and durable upholstery thread. Heavy-duty domestic models can sometimes manage layered 5 oz leather, especially for wallets, pouches, and soft bags. Once projects involve thick vegetable-tanned hides, dense layered seams, or upholstery-grade panels, industrial walking-foot machines become more appropriate.
Leather Thickness Compatibility Chart
| Leather Thickness | Suitable Machine Type | Common Projects |
| 1–2 oz | Standard domestic machine | Garments, lining, lightweight accessories |
| 2–4 oz | Domestic or heavy-duty machine | Wallets, pouches, soft totes |
| 4–6 oz | Heavy-duty domestic machine | Structured bags, belts |
| 6–8 oz | Industrial walking-foot machine | Saddlery, upholstery |
| 8 oz+ | Industrial leather machine | Heavy-duty leather goods |
One of the most overlooked realities in machine sewing leather is friction. Unlike cotton, leather does not glide easily beneath the presser foot. This resistance creates drag, skipped stitches, and inconsistent feed movement. A Teflon foot or walking foot often solves issues that beginners mistakenly attribute to machine power.
Another misconception is that speed equals strength. Professional leatherworkers frequently sew slower than beginners. Controlled stitching reduces heat buildup, protects the needle, and produces straighter seams. In luxury leather workshops, precision matters more than speed because every puncture remains visible.
A useful rule is this:
A domestic sewing machine succeeds with leather when the material bends comfortably beneath the presser foot without excessive force.
If the leather must be aggressively pushed, folded, or compressed, the machine is already outside its ideal operating range.
For beginners entering a leather crafting workshop environment, understanding machine limitations early prevents frustration, damaged motors, and wasted hides.
Essential Tools and Supplies for Sewing Leather
Leather sewing rewards preparation more than improvisation. The correct setup transforms a difficult material into one that feels surprisingly cooperative under the needle. In professional leather studios, the difference between amateur and refined results often comes down to the invisible details: thread composition, foot selection, stitch spacing, and stabilization tools.
Before starting any project, assemble tools designed specifically for leatherwork rather than adapting fabric-focused accessories.
Leather Sewing Setup Matrix
| Leather Type | Needle | Thread | Foot Type | Stitch Length |
| Faux leather | 90/14 leather needle | Polyester thread | Teflon foot | 3.0 mm |
| Soft lambskin | 80/12 leather needle | Lightweight polyester | Roller foot | 3.0–3.5 mm |
| Top-grain leather | 100/16 leather needle | Bonded nylon | Walking foot | 3.5–4.0 mm |
| Vegetable-tanned leather | 110/18 leather needle | Heavy upholstery thread | Walking foot | 4.0 mm |
Best Needles for Sewing Leather
Leather needles differ dramatically from universal sewing needles. Instead of piercing woven fibers, they cut through dense hide using a wedge-shaped point that slices cleanly into the material.
This design matters because leather behaves more like skin than fabric. A blunt or universal needle forces its way through the surface, creating excessive friction and irregular holes. Leather needles reduce stress on both the machine and the material while producing cleaner stitch definition.
For most beginner projects, sizes 90/14 and 100/16 work well. Lightweight garment leather may only require an 80/12 needle, while thicker bag panels often benefit from a stronger 110/18 option.
The most reliable approach is to match the needle not only to thickness but also to density. Chrome-tanned leather, for example, is softer and more forgiving than dense vegetable-tanned leather of similar weight.
A useful workshop principle is:
If the needle leaves visible tearing around the stitch hole, the size is too large or the stitch length is too short.
Choosing the Right Thread for Leather
Thread selection influences durability as much as appearance. Cotton thread is rarely recommended because leather projects experience tension, abrasion, and environmental exposure over time.
Bonded nylon thread remains a favorite for upholstery and heavy-duty leather goods because it resists fraying while maintaining excellent tensile strength. Polyester upholstery thread offers superior UV resistance and is ideal for handbags, outdoor accessories, and decorative topstitching.
Thread weight should complement both the leather and the machine. Heavy thread on a lightweight domestic machine often causes tension instability and skipped stitches. Many beginners achieve better results with medium upholstery thread before moving into industrial-weight options.
Luxury leather goods often use slightly thicker topstitching thread than interior seam thread. This creates subtle visual contrast without overwhelming the surface.
Must-Have Machine Attachments
Leather sewing becomes significantly easier with specialized presser feet. A standard metal foot can stick to leather surfaces, causing uneven feeding and crooked seams.
A Teflon foot minimizes friction and glides across smooth leather surfaces with far less resistance. Roller feet perform similarly while providing enhanced control around curves. Walking feet are especially valuable because they move the upper layer in sync with the feed dogs, preventing shifting and seam distortion.
Clips should replace pins whenever possible. Pins permanently puncture leather, leaving holes that cannot disappear. Professional leatherworkers often use removable adhesive tape or seam clips to secure layers instead.
An edge guide is another understated but transformative tool. Straight topstitching defines the visual quality of leather goods more than almost any decorative element. Consistent seam spacing immediately elevates the finished result.
Understanding Leather Types Before Sewing
Not all leather behaves the same under a sewing machine. Some hides feed smoothly with minimal resistance, while others cling, stretch, or compress unpredictably. Understanding those differences helps beginners choose suitable projects and avoid unnecessary machine strain.
Leather can generally be divided into natural hides and synthetic alternatives, but within those categories are important variations that affect stitching performance.
Full-Grain and Top-Grain Leather
Full-grain leather retains the outermost layer of the hide and develops a rich patina over time. It is durable and visually striking, but it can also be dense and less forgiving during sewing.
Top-grain leather is sanded and refined for a smoother finish. Because it is slightly more processed, it often feeds more consistently through domestic sewing machines.
For beginners in a leather crafting workshop setting, top-grain leather frequently offers the best balance between appearance and manageability.
Vegetable-Tanned vs Chrome-Tanned Leather
Vegetable-tanned leather is firm, structured, and ideal for belts, wallets, and rigid goods. However, its density can challenge smaller sewing machines.
Chrome-tanned leather is softer and more flexible, making it easier to sew in garments and bags. It also tends to tolerate gentle curves and folds more naturally.
One overlooked difference is surface drag. Vegetable-tanned leather often creates more friction beneath the presser foot, while chrome-tanned hides glide more easily.
Faux Leather and PU Leather
Synthetic leather alternatives are popular among beginners because they are affordable and easier to source. However, faux leather introduces its own sewing challenges.
The backing fabric beneath the synthetic surface can stretch differently than genuine hide, leading to puckering or waviness if tension settings are incorrect.
A longer stitch length becomes especially important with faux leather because dense perforations weaken the synthetic coating.
How Leather Type Affects Machine Tension
Different leather finishes compress differently beneath the presser foot. Softer hides absorb thread tension more easily, while firmer leather may expose imbalance through visible loops or puckering.
Smooth leather surfaces also amplify stitch visibility. Tiny inconsistencies that disappear in woven fabric become obvious on polished leather.
For this reason, professionals always test stitch settings on scrap pieces from the exact hide being used. Even hides from the same tannery can behave differently.
Leather sewing is less about forcing the material through the machine and more about learning how the hide wants to move.
That mindset often separates clean, elegant seams from uneven amateur results.
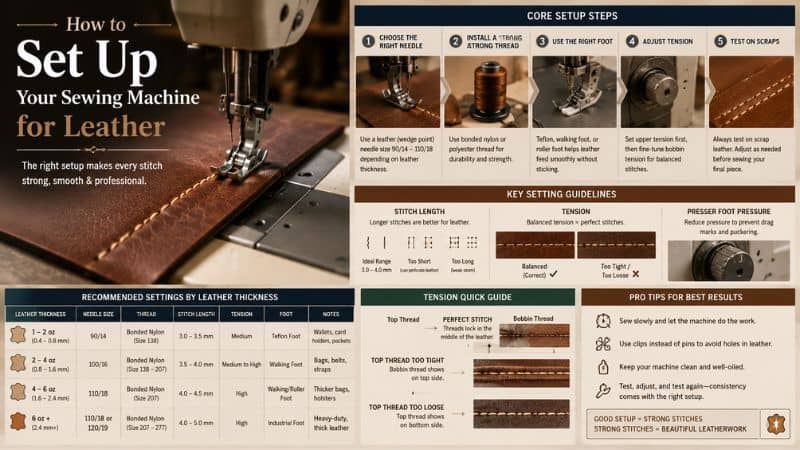
How to Set Up Your Sewing Machine for Leather
Machine setup determines whether sewing leather feels smooth and controlled or frustrating and inconsistent. Before the first stitch is sewn, every adjustment—from tension to stitch length—should work with the material rather than against it.
Professionals rarely begin stitching immediately. They prepare the machine with the same care a chef sharpens knives before service. Leather rewards that discipline.
Recommended Settings by Leather Thickness
| Leather Thickness | Needle Size | Stitch Length | Thread Type |
| 1–2 oz | 80/12 | 3.0 mm | Polyester |
| 2–4 oz | 90/14 | 3.5 mm | Upholstery polyester |
| 4–5 oz | 100/16 | 4.0 mm | Bonded nylon |
| 5 oz+ | 110/18 | 4.0–5.0 mm | Heavy-duty bonded nylon |
Ideal Stitch Length for Leather
Short stitches weaken leather because every needle puncture removes material. When stitches sit too closely together, the seam behaves like a perforated paper edge and may tear under stress.
Longer stitch lengths distribute tension more effectively while creating a cleaner visual rhythm. Most leather projects perform best between 3 mm and 4 mm.
Luxury leather goods frequently use slightly longer stitches not only for strength but also for aesthetics. The spacing feels deliberate and refined rather than compressed.
Tension Adjustments Explained
Balanced tension creates stitches that sit evenly without pulling the leather surface inward.
If the upper tension is too tight, the leather may pucker or ripple around the seam. If it is too loose, loops may appear underneath the project.
Common Tension Symptoms
| Problem | Likely Cause | Adjustment |
| Puckering | Upper tension too tight | Reduce upper tension |
| Loops underneath | Upper tension too loose | Increase upper tension |
| Thread shredding | Needle too small | Increase needle size |
| Skipped stitches | Incorrect needle or timing | Replace leather needle |
Testing is essential because leather thickness changes how thread seats inside the stitch hole.
Presser Foot Pressure and Speed
Reducing presser foot pressure often improves feeding consistency on delicate leather. Excess pressure leaves marks and increases drag.
Machine speed should also remain controlled. Sewing leather too quickly generates heat and friction, especially with bonded thread.
Professional leatherworkers often describe machine sewing as guiding rather than pushing. Let the feed dogs move the leather naturally while maintaining gentle directional control.
Preparing the Machine Before Sewing
Before starting a project:
- Install a fresh leather needle
- Clean lint from feed dogs and bobbin area
- Test tension on scrap leather
- Confirm stitch length
- Reduce speed settings if available
These simple steps prevent most beginner problems before they occur.
Clean setup creates clean stitches. Most leather sewing issues begin before the first seam is sewn.
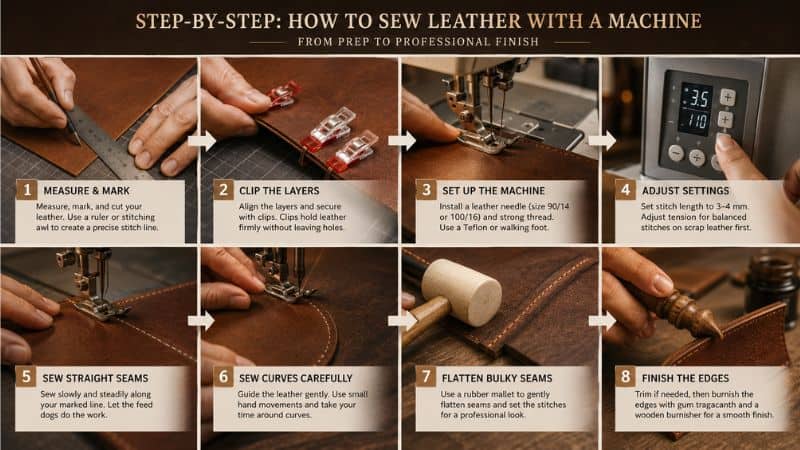
Step-by-Step: How to Sew Leather With a Machine
Leather sewing becomes dramatically easier when approached methodically. Unlike fabric construction, where seams can often be corrected or hidden, leather demands deliberate progression.
Professional workshops treat every stage—from marking to finishing—as part of the final visual result.
Preparing Leather Before Sewing
Begin by cutting clean, accurate panels using a rotary cutter or sharp utility blade. Jagged cuts become more noticeable in leather projects because edges remain visible.
Mark stitching lines lightly with a scratch awl or removable chalk marker. Avoid pens that may permanently stain the hide.
Pins should never be used on visible leather surfaces. Clips or low-tack tape preserve the integrity of the material.
Before sewing, test every setting on scrap leather from the same hide. This includes stitch length, tension, and presser foot behavior.
Sewing Straight and Curved Seams
Position the leather gently beneath the presser foot without stretching or forcing it.
Start sewing slowly, allowing the feed dogs to move the leather consistently. Sudden acceleration often creates uneven stitch spacing.
Straight seams benefit from an edge guide or marked reference line. In luxury bag construction, even slight waviness in topstitching can visually weaken the entire design.
Curved seams require patience rather than aggressive turning. Sew gradually and stop periodically with the needle down while repositioning the leather.
For tight curves, lightly trimming seam allowances reduces bulk and improves flexibility.
Professional Workflow Checklist
- Test stitch settings on scrap leather
- Mark seam lines carefully
- Use clips instead of pins
- Sew slowly and evenly
- Avoid excessive reverse stitching
- Hammer bulky seams lightly if needed
- Finish edges cleanly
Managing Seam Bulk
Layered leather seams can become difficult to feed evenly through domestic machines.
A common atelier technique is gently tapping bulky seam intersections with a rubber mallet to flatten thickness before sewing.
Some professionals also skive seam allowances by thinning the underside of the leather. This creates smoother transitions and reduces needle strain.
Finishing Seams Professionally
The finishing stage often determines whether a leather project looks handcrafted or commercially refined.
Topstitching should remain parallel and evenly spaced. Many luxury leather goods use decorative topstitching as a visual signature.
Raw edges can be burnished, painted, folded, or sealed depending on the project style.
Burnishing involves friction and moisture to compress fibers into a smooth edge. Edge paint creates a cleaner, modern appearance often seen in premium handbags.
Inside seams should also remain tidy. Loose thread tails and uneven allowances diminish the perceived quality of otherwise strong craftsmanship.
In leatherwork, refinement is rarely hidden. The smallest details are often the first things people notice.
Common Problems When Sewing Leather (And How to Fix Them)
Even experienced leatherworkers encounter stitching issues. The difference is that professionals diagnose problems systematically rather than adjusting settings randomly.
Most machine sewing issues come from friction imbalance, incorrect needle selection, or unsuitable stitch density.
Problem → Cause → Solution
| Problem | Cause | Solution |
| Skipped stitches | Wrong needle or dull point | Install fresh leather needle |
| Broken needle | Excessive thickness | Reduce layers or upgrade machine |
| Puckering | Tension imbalance | Lengthen stitch and reduce tension |
| Sticky feeding | Presser foot friction | Use Teflon or walking foot |
| Uneven stitches | Pulling leather while sewing | Let feed dogs guide material |
| Thread shredding | Needle eye too small | Use larger needle |
Skipped Stitches
Skipped stitches are among the most common beginner frustrations.
Leather requires a sharp wedge-point needle capable of creating a clean entry path for the thread. A dull or universal needle frequently fails to form a proper loop for the hook mechanism.
Replacing the needle often resolves the issue immediately.
Broken Needles
Needles typically break because the machine is being forced beyond its practical thickness limit.
Dense seam intersections create sudden resistance that can deflect the needle sideways. Sewing slowly and flattening bulky areas beforehand significantly reduces breakage.
Never pull leather aggressively from behind the machine while sewing. This can bend the needle and damage machine timing.
Puckering and Wavy Seams
Puckering usually results from overly tight tension or stitch lengths that are too short.
Leather should lie flat around the seam without visible distortion. Increasing stitch length to 3.5 mm or 4 mm often improves seam appearance immediately.
Soft faux leather may also stretch during feeding, particularly without a walking foot.
Sticky Feeding and Surface Marks
Glossy leather surfaces can cling to standard metal presser feet.
Teflon feet, roller feet, or even tissue paper placed temporarily between the leather and foot help reduce friction.
Presser foot pressure should also be lowered when visible surface marks appear.
Thread Shredding
Heavy upholstery thread requires sufficient space within the needle eye.
If the thread frays repeatedly, the needle may simply be too small.
Thread quality matters as well. Low-quality thread sheds fibers, increases lint accumulation, and produces inconsistent tension.
Machine Strain and Overheating
Domestic machines are not designed for continuous heavy leather sewing.
If the motor sounds strained, the handwheel becomes difficult to turn, or heat buildup increases noticeably, stop immediately.
Allowing the machine to rest protects both the motor and internal timing components.
A sewing machine should never sound like it is fighting the material. Smooth operation is usually a sign that the setup is correct.
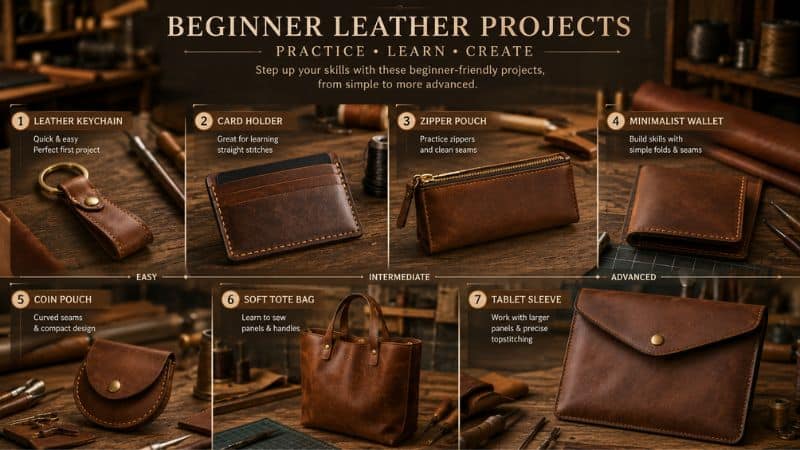
Beginner Leather Projects to Practice On
Skill development in leatherwork happens progressively. Starting with manageable projects builds confidence while teaching material behavior, seam control, and finishing techniques.
Beginners often improve faster by completing several small projects rather than attempting a complex bag immediately.
Easy Starter Projects
Leather keychains, card holders, and zip pouches provide excellent introductions to machine sewing leather.
These projects use relatively small panels, simple seams, and minimal structural complexity while still teaching important techniques such as topstitching and edge finishing.
Soft tote bags are another approachable option because they allow beginners to practice long straight seams without intricate shaping.
Intermediate Practice Projects
Once stitch consistency improves, structured wallets and tablet sleeves introduce layering and precision alignment.
These projects require more accurate seam allowances and often involve thicker intersections that test machine setup.
Learning how leather behaves around corners and folded edges becomes especially valuable at this stage.
Advanced Skill Progression
Complex handbags, leather jackets, and upholstery panels demand refined control over seam bulk, tension balance, and finishing consistency.
Professional leatherworkers often recommend mastering straight topstitching before progressing into curved luxury bag construction.
Skill Progression Path
| Skill Level | Recommended Project |
| Beginner | Keychain, pouch, card holder |
| Intermediate | Wallet, tote bag, tablet sleeve |
| Advanced | Structured handbag, upholstery, jackets |
Choosing projects strategically prevents discouragement and builds muscle memory naturally.
Advanced Leather Sewing Techniques Used by Professionals
Professional leather craftsmanship relies on subtle refinements rather than dramatic complexity. The cleanest luxury leather goods often appear deceptively simple because every detail has been carefully controlled.
As sewing skills improve, advanced techniques help projects achieve sharper structure, cleaner finishing, and greater durability.
Precision Topstitching
Topstitching functions almost like architectural detailing in premium leather goods. It frames edges, reinforces seams, and visually defines the silhouette.
Professionals often use edge guides and slower sewing speeds to maintain perfectly parallel stitch lines.
Thread color contrast also changes perception dramatically. Tone-on-tone stitching creates understated elegance, while contrasting thread emphasizes craftsmanship.
Seam Bulk Reduction
Layered seams can quickly become difficult to manage, especially in handbags and structured goods.
Skiving reduces thickness by thinning the underside of seam allowances. This creates smoother folds and cleaner topstitching.
Rubber mallets are also commonly used to flatten seams before stitching.
Sewing Thick Leather Cleanly
When sewing multiple leather layers, walking-foot machines distribute feeding pressure more evenly.
Professionals also adjust stitch length slightly longer on thicker material to maintain structural integrity.
Motor control becomes critical. Industrial servo motors allow extremely slow, controlled stitching for precise seam placement.
Decorative Edge Techniques
Luxury leather ateliers rarely leave raw edges untreated.
Burnished edges create a traditional artisan appearance, while edge paint produces a polished contemporary finish associated with premium handbags.
Multiple layers of sanding, painting, and sealing are often required to achieve smooth, glass-like edges.
Layered Construction and Piping
Advanced bag construction frequently incorporates piping for structure and visual definition.
Piping requires careful tension management because thickness changes rapidly around curves.
This is one reason experienced leatherworkers emphasize gradual speed control rather than aggressive stitching.
Professional leather sewing is not about forcing precision. It is about building systems that make precision repeatable.
What Are the Best Sewing Machines for Leather?
Choosing the right machine depends less on branding and more on project type, leather thickness, and long-term goals.
Many beginners overspend on industrial equipment before understanding their actual workflow. Others underestimate how much easier specialized machines make consistent leather sewing.
Best Beginner-Friendly Machine
Heavy-duty domestic machines such as the Singer Heavy Duty series remain popular because they offer stronger motors and improved needle penetration without requiring industrial space.
These machines work well for lightweight bags, wallets, and soft leather accessories.
Best Mid-Range Option
Janome HD and Juki domestic models provide smoother feeding systems and more refined stitch quality.
For hobbyists entering a leather crafting workshop environment regularly, these machines often deliver an excellent balance between durability and usability.
Best Industrial Machine
Consew and Juki walking-foot machines dominate professional leather workshops for good reason.
Their synchronized feeding systems reduce material shifting while handling thick seams far more comfortably than domestic models.
Industrial machines also support heavier bonded thread and prolonged daily operation.
Choosing by Project Type
| Project Type | Recommended Machine |
| Wallets and pouches | Heavy-duty domestic machine |
| Soft handbags | Mid-range walking-foot compatible machine |
| Structured luxury bags | Industrial walking-foot machine |
| Upholstery | Industrial cylinder-arm machine |
Budget Considerations
Beginners should prioritize machine compatibility over raw power.
A properly configured domestic machine with quality needles and thread often outperforms an industrial machine used incorrectly.
Accessories also matter. Walking feet, proper thread, and leather needles dramatically improve sewing performance.
What Professionals Look For
Experienced leatherworkers typically evaluate:
- Feeding consistency
- Motor smoothness
- Needle penetration power
- Thread compatibility
- Stitch quality at slow speeds
Luxury leather construction relies heavily on stitch consistency under controlled movement.
The best sewing machine for leather is the one that handles your typical project comfortably without forcing the material or the motor.
Safety and Machine Maintenance Tips
Leather sewing introduces unique strain on sewing machines. Dense material, heavy thread, and friction generate more stress than most fabric projects.
Regular maintenance protects both machine performance and stitch quality.
Cleaning After Leather Sewing
Leather dust and thread lint accumulate around feed dogs and bobbin systems surprisingly quickly.
Cleaning the machine after every major leather project helps prevent tension irregularities and premature wear.
Compressed air should be avoided because it can push debris deeper into internal components.
Oiling and Lubrication
Machines working with upholstery thread and dense material benefit from consistent lubrication.
Follow manufacturer guidelines carefully, especially around hook assemblies and moving metal parts.
A dry machine often sounds louder and feeds less smoothly.
Needle and Blade Safety
Leather needles remain extremely sharp even after use.
Dispose of damaged needles safely and never continue sewing with bent or partially dulled needles.
Preventing Motor Strain
If the machine struggles audibly or stalls repeatedly, reduce project thickness immediately.
Continuous strain shortens motor lifespan and can damage internal timing systems.
Professional workshops frequently rotate machines depending on material weight rather than forcing one machine to perform every task.
Expert Tips That Make Leather Sewing Easier
Experienced leatherworkers often rely on small procedural adjustments rather than expensive equipment upgrades.
These subtle habits improve stitch quality, reduce frustration, and create cleaner finished goods.
Use Scrap Leather Generously
Every hide behaves slightly differently.
Testing stitch settings on scraps before beginning prevents irreversible mistakes on finished panels.
Slow Speed Improves Precision
One of the most valuable leather sewing lessons is simple:
Slow speed creates cleaner stitches than extra machine power.
Controlled sewing improves seam accuracy and reduces needle deflection.
Let the Machine Feed Naturally
Pulling leather while sewing disrupts stitch formation and can damage machine timing.
Guide the material gently instead of forcing movement.
Use Longer Stitches for Better Appearance
Longer stitches not only strengthen seams but also create a more sophisticated visual rhythm.
This subtle spacing is common in luxury handbags and premium leather accessories.
Keep Topstitching Consistent
Uneven topstitching immediately draws attention.
Using edge guides, marked seam references, and slow stitching dramatically improves consistency.
In professional leather goods, clean topstitching often communicates quality more clearly than decorative hardware.
FAQs
Can a regular sewing machine sew leather?
Yes, most domestic sewing machines can sew lightweight and medium-weight leather when paired with the correct leather needle, longer stitch length, and upholstery thread. Thick vegetable-tanned leather or multi-layer projects usually require a heavy-duty or industrial walking-foot machine for consistent feeding and reduced motor strain.
What needle should I use for leather?
Leather sewing requires wedge-point leather needles rather than universal needles. Sizes 90/14 and 100/16 work well for most beginner projects, while thicker leather may require a 110/18 needle. Leather needles cut cleanly through hide, reducing skipped stitches, tearing, and excessive friction during sewing.
What stitch length is best for leather?
A stitch length between 3 mm and 4 mm is ideal for most leather projects. Short stitches weaken leather by creating closely spaced perforations that can tear under tension. Longer stitches improve durability, reduce puckering, and create the refined seam appearance commonly seen in premium leather goods.
Do you need a walking foot to sew leather?
A walking foot is not always required, but it significantly improves feeding consistency when sewing leather. It helps move the upper and lower layers evenly, reducing sticking, shifting, and uneven seams. Walking feet are especially useful for thicker leather, faux leather, and layered bag construction.
Why does my sewing machine skip stitches on leather?
Skipped stitches usually happen because of an incorrect or dull needle. Leather requires a sharp wedge-point needle capable of forming clean stitch holes. Improper tension, incompatible thread, or sewing overly thick material can also interrupt stitch formation and cause inconsistent seam quality.
Can you backstitch on leather?
Yes, but excessive backstitching should be avoided because leather permanently retains needle holes. Many professionals secure seams by shortening stitch length slightly or tying thread ends manually instead of repeatedly reversing over the same area. This approach creates cleaner-looking seams with less visible perforation damage.
What thread works best for leather sewing?
Bonded nylon and polyester upholstery threads are the best choices for leather sewing because they resist abrasion and tension stress. Polyester thread offers strong UV resistance, while bonded nylon provides excellent strength for bags and upholstery projects. Thread weight should always match the machine’s capabilities.
How thick of leather can a domestic sewing machine handle?
Most domestic sewing machines comfortably sew leather between 2 oz and 4 oz thickness. Heavy-duty home machines may manage layered 5 oz leather depending on seam bulk and motor strength. Projects involving thick vegetable-tanned leather usually require industrial walking-foot equipment for reliable performance.
Is faux leather easier to sew than genuine leather?
Faux leather is often easier for beginners because it is thinner and more flexible than many natural hides. However, synthetic backing materials can stretch unpredictably and create puckering if tension settings are incorrect. Using a longer stitch length and Teflon foot usually improves sewing performance.
What is the best beginner sewing machine for leather?
Heavy-duty domestic machines from brands like Singer, Janome, and Juki are excellent starting points for beginner leather projects. They provide stronger motors, improved needle penetration, and compatibility with upholstery thread while remaining more affordable and space-efficient than industrial leather sewing machines.
Final Thoughts
Machine sewing leather is ultimately about understanding material behavior rather than overpowering it.
The right combination of needle choice, stitch length, machine setup, and controlled technique transforms leather from an intimidating material into one capable of producing exceptionally refined goods.
Beginners often discover that success comes less from expensive equipment and more from thoughtful preparation. Testing scraps, sewing slowly, and respecting machine limitations produce cleaner seams and more durable projects.
Whether you are exploring leathercraft for the first time or refining advanced workshop techniques, patience remains one of the most valuable tools on the table. Leather remembers every stitch—but with the right approach, that permanence becomes part of its beauty.
