
A well-made leather card holder is the quiet embodiment of craftsmanship—minimal, purposeful, and enduring. In this guide, you’ll learn how to create one in just 30 minutes using beginner-friendly techniques, without sacrificing quality or aesthetic.
This isn’t just a quick project—it’s an entry point into leathercraft, where precision meets patience, and even a simple card holder can reflect artisan-level thinking.
What Is a Leather Card Holder? – Quick Definition
At its core, a leather card holder is a refined alternative to bulky wallets—designed for simplicity, portability, and essential carry.
A leather card holder is a slim wallet made from leather that holds a small number of cards and sometimes folded cash, prioritizing minimalism and compact design over storage capacity.
Unlike traditional wallets, which often accumulate clutter, a card holder enforces intentionality. It typically features two to four slots and is crafted from materials like full-grain or vegetable-tanned leather, both known for durability and aging beautifully over time.
From a design perspective, it aligns with the growing preference for front-pocket wallets and minimalist lifestyles. The reduced bulk not only enhances comfort but also preserves the structure of garments—something seasoned leather enthusiasts quietly appreciate.
For beginners, it’s also one of the most approachable leathercraft projects: small surface area, limited stitching, and fast results. Yet despite its simplicity, it teaches foundational skills like cutting, stitching, and edge finishing—skills that scale into more advanced creations.
Tools & Materials You Need – Beginner Setup
Before cutting your first piece of leather, assembling the right tools ensures both efficiency and quality. Think of this setup as your foundation—minimal, but intentionally chosen.
To make a DIY leather card holder, you’ll need a few essential leathercraft tools: a cutting tool (like a utility knife), stitching tools (such as an awl or stitching chisels), waxed thread, needles, and a suitable piece of leather.
Essential Materials
The most critical component is the leather itself. Vegetable-tanned leather is widely recommended for beginners because it’s firm, easy to shape, and responds well to finishing techniques. Aim for a thickness between 1.2mm and 1.6mm—thin enough to fold, yet durable enough to hold structure.
Waxed thread is preferred for stitching, as it reduces friction and strengthens seams. When paired with blunt-tip leather needles, it allows for smooth saddle stitching without damaging the material.
Core Tools (Minimal Setup)
A sharp cutting tool ensures clean edges—dull blades tear fibers and compromise finish. For stitching, a stitching chisel or pricking iron helps create evenly spaced holes, which directly impacts the final look.
An edge beveler, while optional, removes sharp corners from the leather edge, preparing it for burnishing. If you don’t have one, careful sanding can serve as a temporary substitute.
Budget vs Professional Setup
If you’re just starting, a basic kit can replace individual tools—many beginner leathercraft kits include chisels, needles, and thread at a lower cost. However, upgrading tools over time significantly improves precision and speed.
Professional artisans often use tools from suppliers like Tandy Leather or Weaver Leather Supply, known for consistent quality. While not essential for your first project, they set the benchmark for craftsmanship.
The key is balance: start simple, but understand where quality tools make a visible difference.
Step-by-Step: How to Make a Leather Card Holder in 30 Minutes
This process is designed for speed without sacrificing structure. Each step builds on the last, allowing you to move fluidly from raw material to finished product within half an hour.
Quick Summary: 30-Minute Workflow
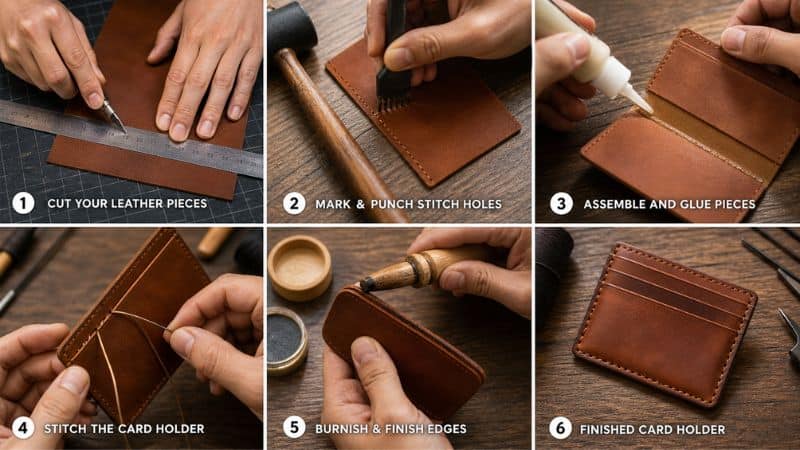
- Cutting leather pieces (5 minutes)
- Punching stitch holes (5 minutes)
- Gluing layers (5 minutes)
- Stitching (10 minutes)
- Edge finishing (5 minutes)
Step 1: Cut Your Leather Pieces
Start by marking your dimensions directly onto the leather using a ruler and scratch awl. A standard card holder typically uses two identical outer panels and one inner pocket layer.
Cut slowly and deliberately. Leather rewards precision—clean cuts reduce the need for correction later. Keep your blade vertical to avoid angled edges, which can create uneven seams.
Step 2: Mark & Punch Stitch Holes
Once your pieces are aligned, mark stitching lines approximately 3–4mm from the edge. This spacing ensures structural integrity while maintaining visual balance.
Using a stitching chisel, punch holes evenly along the marked line. Consistency here defines the final look—uneven spacing is one of the most noticeable beginner mistakes.
If chisels aren’t available, an awl can be used manually, though it requires more control and time.
Step 3: Assemble and Glue Pieces
Before stitching, apply a thin layer of leather glue between the layers. This isn’t for strength—it’s for alignment.
Press the pieces together carefully, ensuring edges are flush. Let the glue set briefly. This step stabilizes the structure, making stitching significantly easier and cleaner.
Step 4: Stitch the Card Holder
Saddle stitching is the preferred technique for leatherwork due to its durability and symmetry. Using two needles on a single thread, stitch through each hole from both sides.
This creates a locking stitch that won’t unravel easily, even if one section wears out. Maintain even tension throughout—too tight and the leather puckers, too loose and the seams look sloppy.
This step takes the most time but defines the craftsmanship. A well-executed stitch elevates even the simplest design.
Step 5: Burnish & Finish Edges
Edge finishing is where your project transitions from “DIY” to “refined.” Begin by lightly sanding the edges to smooth inconsistencies.
Apply a small amount of water or burnishing gum, then rub the edge vigorously with a cloth or wooden slicker. This compresses the fibers, creating a polished, sealed edge.
The result is subtle but powerful—smooth edges signal quality, even to an untrained eye.
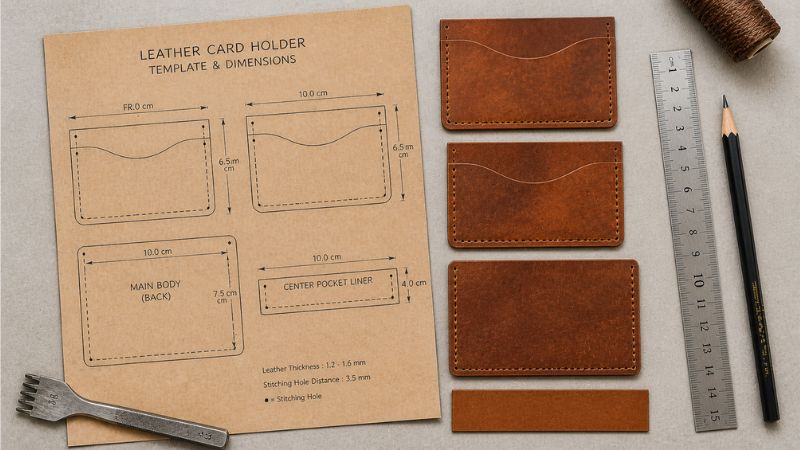
Free Template & Dimensions (Printable Pattern)
A well-designed template removes guesswork and ensures consistent results—especially important when working within a 30-minute timeframe.
For a standard leather card holder, each outer panel typically measures around 10 cm × 7 cm, with a slightly smaller inner pocket layer to allow for stacking without bulk. These proportions comfortably hold 2–4 cards per slot while maintaining a slim profile.
If you’re planning to repeat this project or refine your technique, using a printable leather card holder template is highly recommended. It standardizes your cuts, improves symmetry, and significantly reduces setup time.
From an efficiency standpoint, templates also enable batching—allowing you to produce multiple card holders with consistent quality, a useful step if you’re exploring handmade goods commercially.
For best results, transfer your template onto firm cardstock or acrylic. This creates a reusable pattern that maintains precision across multiple builds.
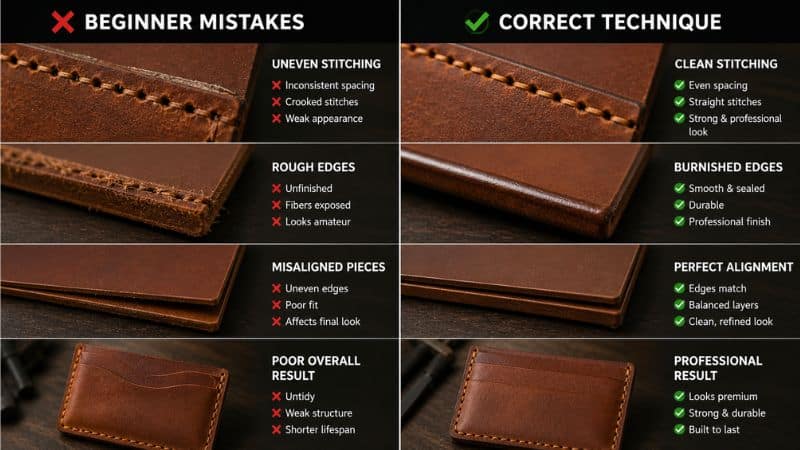
Common Mistakes Beginners Make (And How to Avoid Them)
Even a simple DIY leather card holder can quickly reveal gaps in technique. The good news is that most beginner mistakes are predictable—and once recognized, easy to correct.
Choosing the Wrong Leather Thickness
One of the most common issues in beginner leathercraft is selecting leather that doesn’t match the project. If the leather is too thick, folding becomes difficult and stitching looks bulky. If it’s too thin, the card holder loses structure and wears out faster.
For a leather card holder, the ideal thickness typically falls between 1.2mm and 1.6mm. This range allows for clean folds while maintaining durability and a refined profile.
Inconsistent Stitching and Poor Hole Spacing
Uneven stitching is often the first visible sign of inexperience. This usually comes from inconsistent hole spacing or uneven tension during saddle stitching.
Using stitching chisels or pricking irons ensures uniform spacing, which directly improves the visual symmetry of the piece. Equally important is maintaining consistent tension—tight enough to secure the seam, but not so tight that it distorts the leather.
Neglecting Edge Finishing
Raw edges are one of the fastest ways to make a handmade item look unfinished. Beginners often skip this step, assuming it’s purely aesthetic—but it’s both functional and visual.
Burnishing compresses the leather fibers, creating a smooth, sealed edge that resists wear. Even a quick edge finish can dramatically elevate the overall look of the card holder.
Overusing Glue During Assembly
Glue is meant to assist alignment—not replace stitching. Applying too much adhesive can cause seepage, staining the leather or interfering with clean stitching.
A thin, controlled layer is sufficient to hold pieces in place before stitching. Precision here prevents cleanup issues later.
Rushing the Process
Ironically, trying to complete a “30-minute leather card holder” too quickly often leads to mistakes that require rework. Leathercraft rewards deliberate movement.
Working with steady, controlled actions—especially during cutting and stitching—results in a cleaner, more professional outcome without significantly increasing total time.
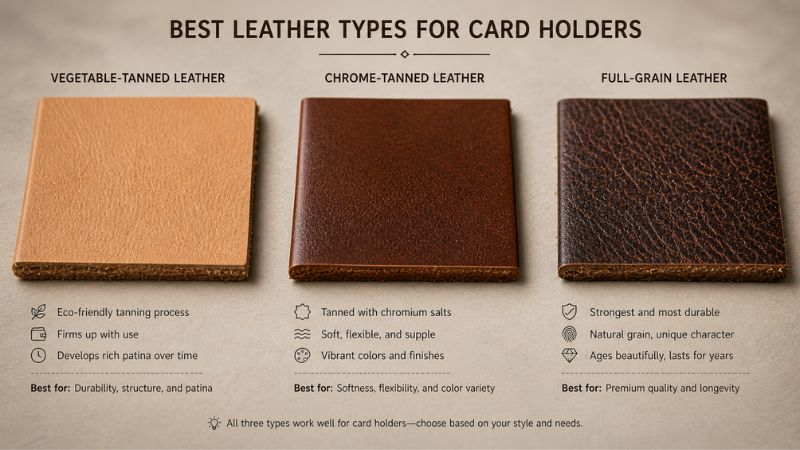
Best Leather Types for Card Holders
The leather you choose is the single most important factor in how your card holder performs, ages, and feels in daily use. Understanding leather types helps you move from a basic DIY result to something that genuinely feels premium.
Vegetable-Tanned Leather: Best for Structure and Aging
Vegetable-tanned leather is widely regarded as the best leather for wallets and card holders, particularly in handmade projects. It is firm, easy to shape, and responds exceptionally well to burnishing and finishing techniques.
Over time, it develops a patina—a natural darkening and soft sheen that reflects use. This aging process is one of the defining characteristics of high-quality leather goods.
Chrome-Tanned Leather: Flexible but Less Structured
Chrome-tanned leather offers a softer, more flexible feel, which can make it easier to handle initially. However, it lacks the rigidity needed for a structured minimalist wallet.
Edges are also harder to finish cleanly, and the leather does not develop the same patina as vegetable-tanned options. While usable, it’s not ideal for a refined leather card holder.
Full-Grain Leather: Premium Durability and Texture
Full-grain leather represents the highest quality tier. It retains the natural surface of the hide, including subtle textures and markings, which add character.
When combined with vegetable tanning, full-grain leather creates a card holder that is both durable and visually rich—capable of lasting for years while improving with age.
Choosing the Right Leather for Your Goal
If your priority is durability, structure, and long-term aesthetics, vegetable-tanned full-grain leather is the ideal choice. For experimentation or softer designs, chrome-tanned leather may be acceptable, but it sacrifices refinement.
In leathercraft, material selection is not just a starting point—it’s a long-term decision that defines the final product.

DIY vs Buying: Is It Worth Making Your Own?
Deciding between making a leather card holder yourself or buying one ready-made depends on what you value most: time, cost, customization, or experience.
Cost Comparison: Materials vs Retail Pricing
A DIY leather card holder is generally more affordable if you already own basic leathercraft tools. The cost of leather and thread is relatively low compared to purchasing a finished product.
However, if you’re buying tools specifically for one project, the initial investment may exceed the cost of a store-bought wallet.
Customization and Personal Control
One of the strongest advantages of DIY is control. You decide the leather type, thickness, stitching style, and dimensions.
This level of customization is rarely available in mass-produced card holders, where design is standardized for scale rather than individual preference.
Time and Convenience Trade-Off
Buying a leather card holder offers immediate results with consistent quality, especially from established brands.
DIY requires time—not just for making the item, but for learning the process. Even a 30-minute project involves preparation, focus, and a willingness to refine technique.
Experience and Long-Term Value
The real value of making your own leather card holder lies in the experience. It builds foundational leathercraft skills and creates a stronger connection to the finished product.
If you plan to explore leathercraft further—or even sell handmade leather goods—DIY becomes significantly more worthwhile over time.
Pro Tips to Make Your Card Holder Look Premium
Refinement in leathercraft comes from small, deliberate upgrades. These techniques transform a basic DIY leather card holder into something that feels professionally made.
- Burnish edges thoroughly using water or gum to create a smooth, sealed finish that signals quality
- Apply edge paint or wax after burnishing for a more polished, durable edge
- Maintain consistent stitch spacing and tension to achieve clean, symmetrical stitching
- Use high-quality waxed thread to improve both durability and visual appeal
- Lightly sand edges before finishing to remove inconsistencies and improve smoothness
- Condition the leather with a balm to enhance color depth and bring out natural grain
- Ensure precise alignment of all layers before stitching to avoid uneven edges
- Trim excess thread cleanly and tuck ends neatly for a refined finish
- Work on a stable surface to improve control during cutting and stitching
- Take time with final inspection—small corrections at the end significantly improve the overall look
In leathercraft, premium quality is rarely about adding more—it’s about executing each detail with intention.
Can You Sell Handmade Leather Card Holders?
What begins as a simple DIY leather card holder can quickly evolve into something more—especially when you realize there’s a consistent market for well-crafted, minimalist leather goods.
Market Demand for Handmade Leather Goods
Handmade leather products occupy a unique position between utility and craftsmanship. A leather card holder, in particular, appeals to buyers seeking durability, minimalism, and authenticity—qualities often missing in mass-produced alternatives.
Platforms like Etsy, Shopify, and local marketplaces have shown steady demand for slim wallets and card holders, especially those made from full-grain or vegetable-tanned leather. Buyers are not just purchasing a product; they’re investing in material quality and the story behind it.
Pricing and Profit Potential
From a cost perspective, a single leather card holder requires relatively little material. Once tools are accounted for, your primary expense becomes leather and thread.
Handmade card holders typically sell at a premium compared to factory-made versions, especially when positioned as artisanal or small-batch products. Pricing depends on craftsmanship, leather quality, and brand positioning—but even simple designs can generate healthy margins when executed well.
Scaling from Hobby to Small Business
The transition from hobbyist to seller often begins with consistency. Using templates, refining your process, and standardizing dimensions allow you to produce multiple units efficiently.
Over time, small improvements—cleaner stitching, better finishing, more refined edges—compound into a noticeable upgrade in quality. This is where repeat customers and word-of-mouth begin to emerge.
Differentiation in a Competitive Market
To stand out, focus on details others overlook: edge finishing, stitching precision, and leather selection. Offering customization—such as initials, color variations, or stitching styles—can further differentiate your products.
In a crowded market, craftsmanship becomes your signature. And with something as tactile as leather, customers can recognize quality almost immediately.
FAQs on DIY Leather Card Holder Answered
How long does it take to make a leather card holder?
A leather card holder can be made in about 30 minutes using a simple design and basic tools. This includes cutting, punching holes, stitching, and finishing edges. Beginners may take slightly longer at first, but the process becomes faster with practice and improved technique.
What is the best leather thickness for card holders?
The best leather thickness for a card holder is typically between 1.2mm and 1.6mm. This range provides enough flexibility for folding while maintaining durability and structure. Thicker leather can feel bulky, while thinner leather may lack long-term strength and shape retention.
Can beginners make leather wallets?
Yes, beginners can make leather wallets, especially simple designs like card holders. These projects require minimal tools and teach essential skills such as cutting, stitching, and edge finishing. Starting with a basic template helps reduce complexity and improves overall results.
Do you need special tools for leather crafting?
You don’t need advanced tools to start leather crafting, but a few essentials are required. A cutting tool, stitching chisels or an awl, needles, and waxed thread are enough for basic projects. Additional tools like edge bevelers improve quality but are optional for beginners.
How much does it cost to make one?
The cost to make a leather card holder depends on materials and tools. If tools are already available, materials may cost only a few dollars per piece. However, purchasing tools initially can increase costs, making the first project more expensive than buying a ready-made wallet.
Wrap Up
A DIY leather card holder is one of the fastest ways to experience real craftsmanship.
It combines simplicity with skill—just enough technique to be rewarding, without becoming overwhelming.
In 30 minutes, you move from raw material to something functional, durable, and entirely your own.
The process teaches precision.
The material teaches patience.
The result teaches value.
And once you’ve made one, the barrier to making better ones disappears.
Whether you keep it, gift it, or sell it—the real outcome isn’t just the card holder.
It’s the beginning of a skill that compounds.