
Leathercraft rewards precision, patience, and material awareness—but it is also a craft where small missteps can quietly undermine an entire project. Many beginners assume poor results come from lack of talent, when in reality they stem from avoidable leathercraft mistakes in technique, tools, or material choice.
The difference between amateur and professional work is rarely dramatic—it’s often found in the details: clean cuts, consistent stitching, properly finished edges. This guide breaks down the most common leatherworking errors and, more importantly, how to correct them with clarity and confidence.
Most leathercraft mistakes are not failures of skill—they are gaps in process, precision, or preparation.
By understanding where things go wrong and how to fix them, you can move from inconsistent results to work that feels intentional, refined, and built to last.
Why Most Leathercraft Projects Fail (Root Causes Explained)
Before diagnosing individual mistakes, it’s worth understanding why leathercraft projects fail at a foundational level. Most issues don’t come from lack of effort—they stem from misalignment between material, method, and expectation.
At its core, leatherworking is a material-sensitive craft. Leather is not uniform; it carries memory, tension, and variation from the hide it came from. When beginners treat it like synthetic fabric—cutting, stitching, or dyeing without regard for its structure—results quickly deteriorate. This is why many leatherworking problems, from uneven stitching to blotchy dye, are symptoms of deeper process gaps rather than isolated errors.

The Structural Causes Behind Common Leathercraft Mistakes
Most failed outcomes trace back to four recurring breakdowns: poor preparation, inconsistent precision, flawed process, and inadequate finishing. These aren’t just beginner leather mistakes—they’re systemic issues that compound across every stage of the craft.
Preparation errors often begin with material selection. Using chrome-tanned leather for tooling or low-grade hides for structured goods creates limitations that no technique can fully correct. Similarly, working with unconditioned or improperly stored leather affects flexibility and durability.
Precision is where many projects visibly falter. Leather demands controlled cuts, evenly spaced stitching, and consistent pressure. Without sharp tools or measured patterns, small inaccuracies accumulate—edges drift, seams misalign, and the final piece loses symmetry.
Process-related issues are more subtle but equally damaging. Skipping steps like casing leather before tooling or rushing adhesive curing times leads to weak structural integrity. Leatherworking is sequential; disrupting that sequence compromises the outcome.
Finally, protection—or finishing—is often underestimated. A well-constructed piece can still fail if it’s not sealed, burnished, or conditioned properly. Exposure to moisture, friction, and time will reveal any shortcuts taken in this stage.
The 4P Failure Model: A Practical Diagnostic Framework
To simplify troubleshooting, professional leathercrafters often think in systems rather than isolated mistakes. One useful lens is the 4P Failure Model:
- Preparation — Are you using the right leather, tools, and setup?
- Precision — Are your cuts, stitches, and measurements consistent?
- Process — Are you following the correct sequence of steps?
- Protection — Is the piece properly finished and sealed?
Most leathercraft mistakes can be traced back to a breakdown in one of these four areas.
This framework not only explains why leather projects fail but also provides a repeatable way to diagnose issues as they arise. Instead of guessing, you refine your craft systematically—much like a master workshop would.
15 Common Leathercraft Mistakes (With Fixes)
Even the most refined leatherworkers have made these mistakes at some point. The difference is not in avoiding them entirely, but in recognizing and correcting them early—before they become embedded in your process.
Below are the most common leathercraft mistakes, each paired with a practical correction grounded in professional technique.
1. Using the Wrong Type of Leather
Choosing the wrong leather is one of the most costly beginner leather mistakes. Vegetable-tanned leather, for example, is ideal for tooling and carving, while chrome-tanned leather is better suited for flexible goods like bags and garments. Using the wrong type leads to poor structure, weak tooling impressions, or dye inconsistencies.
A simple comparison clarifies the distinction:
| Feature | Vegetable-Tanned Leather | Chrome-Tanned Leather |
| Best for | Tooling, carving, belts | Bags, upholstery |
| Structure | Firm | Soft, flexible |
| Dye absorption | High | Moderate |
| Aging | Develops patina | Minimal change |
The fix lies in aligning your material with your project’s purpose. When in doubt, prioritize full-grain vegetable-tanned leather for structured beginner projects—it’s more forgiving and responsive to technique.
2. Cutting Without Proper Measurement or Pattern
Freehand cutting may feel intuitive, but leather punishes inconsistency. Without a defined pattern or template, edges become uneven, proportions drift, and symmetry is lost.
Professional leathercraft relies on precision before the blade ever touches the hide. Patterns—whether printed or hand-drawn—act as the blueprint for repeatable accuracy.
To correct this, always transfer your design onto the leather using a scratch awl or silver pen, and cut along a guided edge. Over time, this discipline transforms cutting from guesswork into controlled execution.
3. Dull or Incorrect Tools
Leather is dense and fibrous, and it responds poorly to dull tools. A blunt skiving knife tears rather than slices, while a poorly maintained awl distorts stitching holes instead of defining them.
This not only affects aesthetics but also compromises durability. Rough cuts weaken edges, and uneven holes lead to inconsistent tension in stitching.
Maintaining sharp tools is not optional—it is foundational. Regular stropping, proper storage, and investing in purpose-built tools elevate both efficiency and outcome.
4. Poor Stitching Technique
Stitching is where craftsmanship becomes visible. Uneven tension, inconsistent angles, or incorrect threading techniques result in seams that look amateur and wear out quickly.
The saddle stitch remains the gold standard in leatherworking because it distributes tension evenly across both sides of the seam. However, executing it properly requires rhythm and consistency.
A clean stitch line is not just aesthetic—it’s structural integrity made visible.
To improve, focus on maintaining equal tension with each pass and keeping your needle angles consistent. Practicing on scrap leather builds muscle memory without risking your final piece.
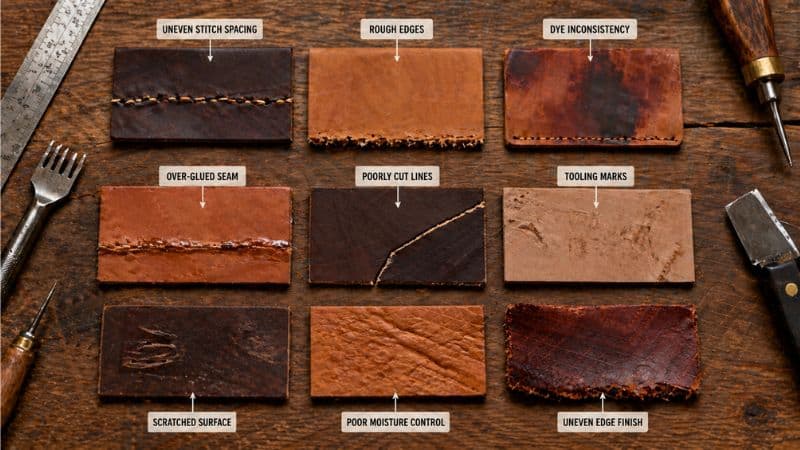
5. Uneven Stitch Spacing
Even when the stitching technique is correct, inconsistent spacing disrupts the visual flow of a piece. This often happens when holes are marked by eye rather than with proper tools.
Pricking irons or stitching chisels ensure uniform spacing and alignment. Without them, even slight variations become noticeable, especially in minimalist designs.
Correcting this is straightforward: mark all stitching holes before sewing, and use tools designed for consistent spacing. Precision at this stage defines the overall refinement of the piece.
6. Not Pre-Punching Holes
Attempting to force needles through untreated leather can stretch, distort, or even tear the material. This is a common leatherworking error that leads to uneven seams and damaged surfaces.
Pre-punching holes with an awl or chisel preserves the integrity of the leather while guiding the stitching path. It also reduces strain on both the material and your tools.
Think of it as preparing the path before laying the thread—without it, resistance works against you.
7. Over-Wetting or Under-Wetting Leather
Moisture control is one of the most misunderstood aspects of leathercraft. Leather that is too dry resists tooling and cracks under pressure, while overly wet leather loses structure and detail.
Proper casing—lightly moistening the leather to the right level—enhances flexibility without compromising firmness. It allows tools to glide while preserving crisp impressions.
Mastering this balance comes with experience, but a simple rule applies: the leather should feel cool and slightly damp, not soaked or limp.
8. Applying Dye Incorrectly
Dyeing is where many leather projects either come alive—or unravel visually. One of the most common leather dye mistakes is uneven application, resulting in blotches, streaks, or overly saturated patches that obscure the natural grain.
This usually stems from applying dye directly onto dry or unprepared leather. Without proper surface conditioning, the material absorbs pigment inconsistently, much like uneven terrain absorbing rain.
The correction lies in controlled layering. Lightly dampen the leather before dyeing, apply in thin, even coats using wool daubers or soft cloth, and allow each layer to dry before building depth. This approach preserves both color richness and grain visibility.
Professional dyeing is less about color application and more about absorption control.
9. Skipping Edge Finishing
Edges are often treated as an afterthought, yet they are one of the most defining features of a finished leather piece. Raw, unfinished edges fray over time, collect dirt, and diminish the overall refinement.
This mistake is particularly noticeable in minimalist designs where every detail is exposed. A poorly finished edge can undermine an otherwise well-crafted item.
Correcting this involves a multi-step process: beveling the edge, sanding it smooth, and then burnishing or sealing it. Whether using gum tragacanth or edge paint, the goal is to create a clean, sealed surface that complements the grain.
10. Using Too Much Glue
Adhesives are meant to assist structure—not dominate it. Applying excessive glue is a subtle but damaging leatherworking error that leads to stiffness, visible residue, and difficulty in stitching.
Too much adhesive can seep into unintended areas, affecting both flexibility and appearance. It also makes corrections nearly impossible once set.
The solution is restraint. Apply a thin, even layer of contact cement only where needed, and allow it to become tacky before bonding. In leathercraft, precision always outweighs excess.
11. Not Burnishing Edges Properly
While edge finishing and burnishing are related, they are not interchangeable. Burnishing specifically refers to the polishing and sealing of edges through friction, creating a smooth, glossy finish.
Skipping or rushing this step leaves edges rough and vulnerable to wear. Over time, these edges begin to separate or fuzz, especially in high-contact areas.
Proper burnishing requires patience. After applying a burnishing agent like gum tragacanth, edges should be worked repeatedly with an edge slicker until they compress and shine.
A well-burnished edge is the quiet signature of a skilled leatherworker.
12. Ignoring Grain Direction
Leather has a natural grain direction—an internal fiber alignment that influences how it stretches, bends, and holds shape. Ignoring this is a common beginner leather mistake that leads to warped or uneven pieces.
For example, cutting straps across the grain rather than along it can reduce strength and cause premature stretching. Similarly, panels cut without regard to grain alignment may behave inconsistently under tension.
The correction is observational discipline. Before cutting, examine the leather’s surface and fiber structure. Align your pattern with the grain direction to ensure stability and longevity.
13. Rushing the Process
Leathercraft rewards patience and penalizes haste. Rushing through steps—whether cutting, stitching, or finishing—introduces errors that compound quickly.
This is often driven by enthusiasm rather than negligence. However, leather does not respond well to urgency. Adhesives need time to cure, dyes require drying intervals, and stitching demands a consistent rhythm.
Slowing down is not inefficiency—it is precision. By allowing each step to fully settle before moving forward, you create conditions for accuracy and durability.
In leatherworking, time is not a constraint—it is a tool.
14. Poor Finishing and Sealing
Even a well-constructed piece can fail if finishing is neglected. Without proper sealing, leather remains vulnerable to moisture, stains, and environmental wear.
This mistake often appears as fading dye, surface cracking, or uneven sheen over time. It is not always immediate, but it becomes evident with use.
Correct finishing involves selecting the right sealant—such as resolene or natural conditioners—and applying it evenly. The goal is to protect the leather while preserving its texture and breathability.
15. Not Practicing on Scrap Leather
Perhaps the most avoidable mistake is working directly on your final piece without prior testing. Leather is unforgiving; once cut, dyed, or stitched, it rarely allows for reversal.
Practicing on scrap leather provides a low-risk environment to refine technique, test dye absorption, and adjust tool settings. It transforms uncertainty into controlled execution.
This habit is what separates consistent craftsmanship from repeated error. Every professional leatherworker relies on it, not as a fallback, but as part of their standard process.
Scrap leather is not waste—it is rehearsal material for precision.
Beginner vs Advanced Mistakes (What Changes as You Improve)
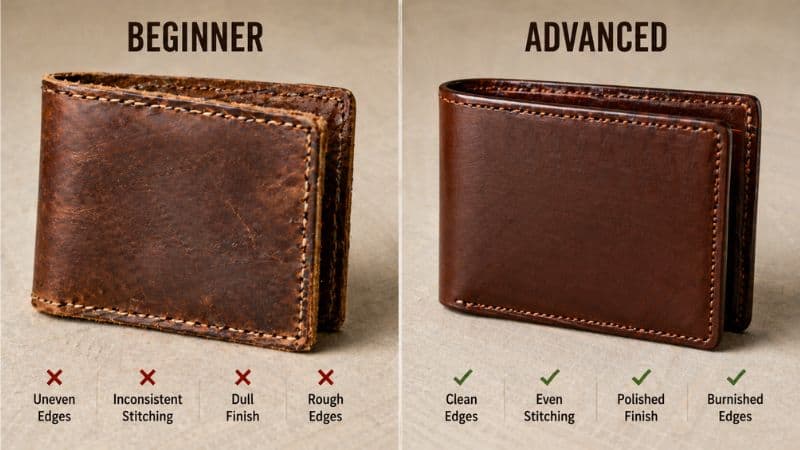
As your skills evolve, so do the types of mistakes you encounter. The early stage of leathercraft is defined by visible errors—uneven cuts, poor stitching, or incorrect materials. Over time, these give way to more nuanced issues that affect refinement rather than functionality.
Beginners tend to struggle with foundational control. Their mistakes are often tied to unfamiliarity with tools and materials. For example, inconsistent stitch lines or rough edges are common because the focus is still on execution rather than precision.
Advanced leatherworkers, on the other hand, face subtler challenges. Their work may be structurally sound but lack finesse—slight asymmetry, imperfect edge finishing, or minor dye inconsistencies. At this level, the margin for error narrows, and expectations rise accordingly.
Progression in Leathercraft Skill Development
| Stage | Common Mistakes | Focus Area |
| Beginner | Cutting errors, poor stitching, and wrong leather | Learning fundamentals |
| Intermediate | Inconsistent finishing, minor alignment issues | Improving precision |
| Advanced | Subtle aesthetic flaws, efficiency gaps | Refinement and mastery |
What changes most is awareness. Beginners often don’t see their mistakes until they’re pointed out. Experienced craftsmen, however, develop an internal standard—they notice imperfections immediately and adjust their process accordingly.
The evolution of leathercraft is not about eliminating mistakes, but about making finer ones—and correcting them faster.
This shift is what transforms leatherworking from a hobby into a disciplined craft.
How to Avoid Leathercraft Mistakes (Pro Workflow Checklist)
Avoiding mistakes in leathercraft is less about talent and more about consistency. Professionals rely on repeatable workflows that reduce variability and ensure each step supports the next.
At its essence, a strong workflow acts as a safeguard. It prevents rushed decisions, reinforces precision, and ensures that no critical step is overlooked.
Pre-Project Preparation
Before starting any project, clarity is essential. This includes selecting the correct type of leather, preparing tools, and confirming measurements.
- Choose leather suited to the project’s structure and purpose
- Sharpen and inspect all tools
- Finalize patterns and dimensions before cutting[/su_list]
Skipping preparation is one of the fastest ways to introduce avoidable errors.
Execution Discipline
During the build phase, consistency matters more than speed. Each action should follow a deliberate sequence.
- Mark and cut with guided precision
- Pre-punch stitching holes for alignment
- Maintain consistent tension while stitching
- Allow adhesives and finishes proper time to set
Rushing this stage often leads to compounded mistakes that are difficult to reverse.
Finishing and Protection
The final stage determines how the piece will age and perform over time. Proper finishing enhances both durability and appearance.
- Burnish edges until smooth and sealed
- Apply appropriate conditioners or sealants
- Inspect the piece for inconsistencies before completion
A well-finished leather piece is defined as much by its edges and surface as by its structure.
By following a disciplined workflow, many common leathercraft mistakes become preventable rather than inevitable.
Essential Tools & Materials to Prevent Mistakes
Many leathercraft mistakes come down to using the wrong tools or materials. Precision in leatherworking starts with having the right setup—without it, even good technique produces inconsistent results.
Core Tools That Directly Impact Accuracy
Some tools directly determine the quality of your outcome. If these are lacking or poorly maintained, mistakes become unavoidable.
A reliable setup should include:
- Sharp cutting tools (skiving knife, utility knife) for clean cuts
- Stitching chisels or pricking irons for even spacing
- Awl for guiding and refining holes
- Edge beveler for smooth edge transitions
- Burnishing tools for sealing edges
Tool maintenance is just as important:
- Strop blades regularly to keep them sharp
- Check tool alignment before use
- Store properly to prevent wear and rust
Material Selection: Where Many Mistakes Begin
Leather quality and type directly affect results. Using the wrong material creates problems that technique alone cannot fix.
To avoid common issues:
- Use vegetable-tanned leather for structured projects
- Match leather thickness to project needs
- Choose compatible adhesives and dyes
- Test materials on scrap before use
Budget vs Premium: What Actually Matters
Price matters less than precision. A well-maintained mid-range tool is often more effective than a neglected premium one.
Prioritize investment in:
- Cutting tools
- Stitching tools
- Edge finishing tools
Good tools don’t create skill—they remove obstacles to it.
Expert Tips from Professional Leathercrafters
Professional leathercraft is built on consistent habits rather than isolated techniques. Small, repeatable practices reduce mistakes and improve results over time.
Habits That Separate Professionals from Beginners
Experienced leatherworkers rely on disciplined workflows:
- Follow a fixed process for every project
- Measure before cutting—every time
- Practice on scrap leather first
- Maintain steady pressure in stitching and cutting
- Check work at each stage
Material Awareness and Adaptation
Leather varies, and professionals adjust accordingly:
- Cut along the grain direction
- Control moisture levels carefully
- Match finishes to leather type
- Adapt technique to density and texture
The Professional Mindset
Experts treat mistakes as part of refinement:
- Analyze errors instead of ignoring them
- Improve workflow after each project
- Focus on consistency over speed
- Build repeatable systems
Mastery comes from reducing variation, not chasing perfection.
FAQs About Leathercraft Mistakes
What is the most common mistake in leathercraft?
The most common leathercraft mistake is using the wrong type of leather for a project. Beginners often select chrome-tanned leather for tooling or structured items, which leads to poor results. Choosing the correct leather—typically vegetable-tanned for beginners—ensures better control, durability, and overall finish quality.
Why does my leather stitching look uneven?
Uneven stitching usually results from inconsistent spacing or tension. This often happens when holes are not pre-marked with stitching chisels or when thread tension varies during stitching. Using proper tools and maintaining a steady rhythm while saddle stitching significantly improves consistency and visual alignment.
How do I fix dye mistakes on leather?
Dye mistakes can often be corrected by applying additional coats to even out the color or by lightly sanding and reapplying dye. Using a deglazer before dyeing also helps achieve uniform absorption. Testing dye on scrap leather beforehand prevents most inconsistencies and reduces the need for correction.
Can you reuse leather after a mistake?
Yes, leather can often be reused depending on the mistake. Minor cutting or dye errors can be worked into smaller projects or hidden within design adjustments. However, structural damage such as deep cuts or torn stitching holes may limit reuse. Practicing on scrap leather reduces material waste.
What tools do beginners need for leatherworking?
Beginners need a core set of tools, including a sharp cutting knife, stitching chisels, an awl, needles, waxed thread, and an edge beveler. These tools enable accurate cutting, consistent stitching, and proper finishing. Investing in reliable, well-maintained tools helps prevent common leathercraft mistakes early on.
Why is my leather cracking?
Leather cracking usually occurs بسبب dryness or improper conditioning. When leather loses moisture, its fibers become brittle and prone to splitting. Applying a suitable leather conditioner and storing leather in controlled environments helps maintain flexibility and prevents long-term damage.
How do professionals avoid mistakes in leathercraft?
Professionals avoid mistakes by following consistent workflows, using proper tools, and understanding material behavior. They prepare thoroughly, measure accurately, and execute each step with discipline. Over time, they develop systems that reduce variability, making their work more precise, repeatable, and resistant to common errors.
Wrap Up
Leathercraft is a discipline where improvement is both visible and measurable. Each mistake—whether in cutting, stitching, or finishing—reveals something about your process. When approached deliberately, these errors become tools for refinement rather than setbacks.
The goal is not to eliminate mistakes, but to reduce their frequency, understand their causes, and correct them with confidence. As your awareness sharpens, so does your ability to produce consistent, high-quality work.
In leatherworking, progress is defined by fewer surprises and more control.
With the right tools, materials, and workflow, most common leathercraft mistakes become preventable. What remains is the craft itself—precise, intentional, and increasingly your own.
