
There’s something quietly powerful about working with leather. It resists you at first—stiff, unyielding—but once you understand how to guide it, shape it, and finish it, it begins to cooperate. That’s where beginners often fall in love with leathercraft: not because it’s easy, but because it rewards patience almost immediately.
Simple leather projects for beginners are small, low-cost items like keychains, cardholders, and bracelets that require only basic tools and techniques such as cutting, stitching, and edge finishing. They’re designed to help you build confidence, muscle memory, and an intuitive feel for the material without overwhelming complexity.
Think of your first few projects like your first miles on a bike—you’re not chasing speed yet, just balance. And once that balance clicks, everything else becomes possible.
Why Start with Simple Leather Projects?
Starting small in leathercraft isn’t about limiting your ambition—it’s about training your hands and instincts before scaling complexity. Just like conditioning a body after injury, you build resilience through controlled, repeatable movements rather than jumping into strain-heavy work.
Skill Conditioning Through Repetition
Simple projects create a loop of repetition that builds technical confidence faster than complex builds. When you cut, stitch, and finish a keychain or bracelet, you’re not just making an item—you’re training hand pressure, blade control, and stitch consistency. These micro-skills compound quickly, and unlike larger projects, mistakes here are low-cost but high-value in learning.
Psychological Momentum and Quick Wins
There’s a mental shift that happens when you complete something tangible within an hour. That small success rewires hesitation into momentum. Beginners often quit leathercraft not because it’s hard, but because early projects feel too big. Simple builds remove that friction, giving you a steady stream of “I can do this” moments.
Gateway to Monetization
Even the simplest leather items—keychains, cord wraps, minimalist wallets—are highly sellable. In fact, many profitable leather businesses started with exactly these products. Starting simple doesn’t just teach skill; it opens the door to a practical side hustle with surprisingly low startup risk.
Essential Tools & Materials for Beginners
Before you cut your first piece of leather, you need to understand something crucial: leathercraft isn’t about having the most tools—it’s about mastering a few essential ones deeply. Like training equipment, more doesn’t mean better if you don’t know how to use it efficiently.
Minimal Starter Kit (Budget-Friendly Setup)
A beginner doesn’t need a workshop full of tools. You need a controlled, functional setup that lets you execute clean cuts and consistent stitches.
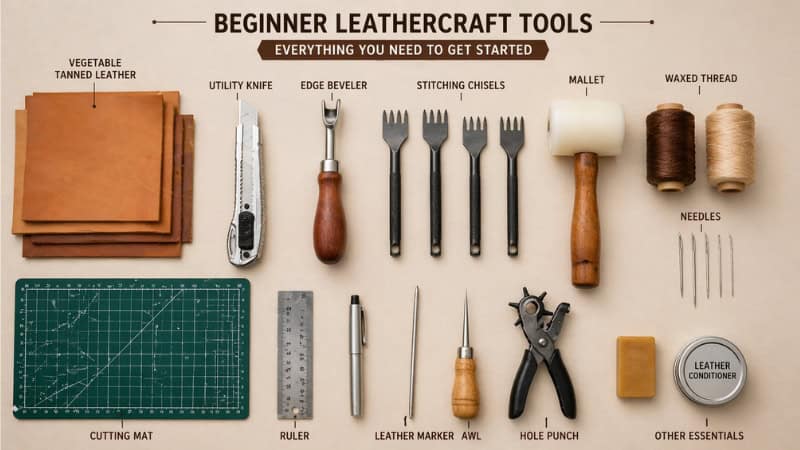
At minimum, your kit should include:
- A sharp utility knife (precision matters more than brand)
- Cutting mat (protects both blade and surface)
- Stitching chisels (for evenly spaced holes)
- Needles and waxed thread
- Edge beveler (optional but highly recommended)
- Vegetable-tanned leather (easy to work with and forgiving)
This setup can realistically cost under $50 if sourced carefully. The key is not perfection—it’s usability.
Optional Tools to Upgrade Later
Once your hands start recognizing the material, upgrades become meaningful rather than cosmetic.
Tools like:
- Burnishing tools for polished edges
- Mallets for cleaner chisel strikes
- Stitching pony for better control
These don’t just improve efficiency—they refine your output quality. But early on, they’re enhancements, not necessities.
Material Awareness: Choosing the Right Leather
Beginners often make the mistake of starting with the wrong type of leather. Vegetable-tanned leather is your best starting point—it holds shape, responds well to tooling, and teaches you how leather behaves under pressure. Chrome-tanned leather, while softer, can feel unpredictable and harder to control at first.
Think of your material like terrain: start on stable ground before attempting uneven paths.
12 Simple Leather Projects for Beginners
This is where your hands stop hesitating and start remembering. Each of these projects is like a controlled training session—focused, purposeful, and designed to build strength without burnout.
As a rider learns balance before speed, you’ll learn control before complexity. These builds are your foundation—each one sharpening a different edge of your craft.
1. Leather Keychain (Fast Skill Builder)
This is your first lap—short, controlled, and confidence-building. A leather keychain teaches you how to cut cleanly, punch holes, and assemble without overthinking.
- Difficulty: ⭐ (Very Easy)
- Time Estimate: 20–30 minutes
- Tools Needed: Utility knife, hole punch, rivets or snap fasteners, leather strip
- Monetization Potential 💰: High
- Sellability Score: 5/5
Even the simplest leather keychain DIY pieces sell well due to personalization. Add initials, stamps, or unique shapes—it turns a basic item into something meaningful.
2. Leather Bracelet (Control & Personalization)
Here’s where leather starts interacting with the body. Fit matters. Symmetry matters. Suddenly, your work isn’t just functional—it’s wearable.
- Difficulty: ⭐⭐
- Time Estimate: 30–45 minutes
- Tools Needed: Knife, ruler, hole punch, snaps, dyes (optional)
- Monetization Potential 💰: High
- Sellability Score: 5/5
A solid leather bracelet tutorial will show you structure—but personalization is where value grows. Names, patterns, or layered straps elevate a simple band into something customers connect with emotionally.
3. Card Holder Wallet (Minimalist Essential)
This is your first real “product.” Clean lines, tight stitching, and consistent edges start to matter more here.
- Difficulty: ⭐⭐⭐
- Time Estimate: 1–2 hours
- Tools Needed: Knife, stitching chisels, needles, thread, edge beveler
- Monetization Potential 💰: Very High
- Sellability Score: 5/5
The simple leather wallet pattern aligns perfectly with minimalist trends. People want slim, functional wallets—and beginners can produce them with surprisingly good margins once technique improves.

4. Cord Organizer (Everyday Utility)
This project feels small—but it solves a real problem. Tangled cables disappear, replaced by a neat wrap of leather.
- Difficulty: ⭐⭐
- Time Estimate: 20–40 minutes
- Tools Needed: Knife, snap setter, hole punch
- Monetization Potential 💰: High
- Sellability Score: 4/5
Leather cable holder DIY items thrive because they’re practical and giftable. They’re also perfect for batch production once you find your rhythm.
5. Leather Bookmark (Precision Practice)
Bookmarks look simple, but they demand accuracy. Uneven cuts or rough edges show immediately.
- Difficulty: ⭐
- Time Estimate: 15–25 minutes
- Tools Needed: Knife, ruler, edge burnisher
- Monetization Potential 💰: Medium
- Sellability Score: 3/5
Leather bookmark ideas shine when paired with embossing or quotes. It’s less about function, more about emotional appeal.
6. Coin Pouch (First Functional Build)
This is where structure begins. Folding, stitching, and closure systems come together in a compact design.
- Difficulty: ⭐⭐⭐
- Time Estimate: 1–2 hours
- Tools Needed: Knife, stitching tools, snaps or zipper
- Monetization Potential 💰: High
- Sellability Score: 4/5
A leather pouch beginner project teaches spatial awareness—how pieces come together in three dimensions.
7. Belt Loop Key Holder (Durability Focus)
Now you’re building something that takes daily stress. Strength matters more than appearance alone.
- Difficulty: ⭐⭐
- Time Estimate: 30–60 minutes
- Tools Needed: Knife, rivets, hole punch, thick leather
- Monetization Potential 💰: High
- Sellability Score: 4/5
This project trains durability. You’re not just crafting—you’re building something that survives daily wear.
8. Simple Tote Bag (Advanced Beginner)
This is your first endurance build. Longer cuts, more stitching, and heavier material—it tests both patience and consistency.
- Difficulty: ⭐⭐⭐⭐
- Time Estimate: 3–5 hours
- Tools Needed: Full basic kit + stitching pony (optional)
- Monetization Potential 💰: Very High
- Sellability Score: 5/5
A simple tote bag sits at the intersection of utility and style. It’s demanding—but the payoff is significant both in skill and potential earnings.
9. Leather Coasters (Batch Production Practice)
Repetition becomes your teacher here. You’ll make multiple pieces, refining consistency with each one.
- Difficulty: ⭐
- Time Estimate: 15–20 minutes each
- Tools Needed: Knife, template, burnishing tools
- Monetization Potential 💰: Medium
- Sellability Score: 4/5
Leather coasters are ideal for sets. They introduce you to scaling production while maintaining quality.
10. Knife Sheath (Basic Protection Build)
This project introduces form-fitting. You’re shaping leather to match another object precisely.
- Difficulty: ⭐⭐⭐
- Time Estimate: 1–2 hours
- Tools Needed: Knife, stitching tools, molding techniques
- Monetization Potential 💰: High
- Sellability Score: 4/5
Even a basic sheath teaches advanced awareness—alignment, tension, and structure all matter more here.
11. Glasses Case (Structured Design)
Now you’re combining protection with aesthetics. Fit must be accurate, and finishing must be clean.
- Difficulty: ⭐⭐⭐
- Time Estimate: 1.5–2.5 hours
- Tools Needed: Knife, stitching tools, edge finishing tools
- Monetization Potential 💰: High
- Sellability Score: 4/5
A glasses case is where beginners start thinking like designers, not just makers.
12. Dog Collar (Strength + Measurement)
This project demands precision and durability. It must fit well and withstand constant movement.
- Difficulty: ⭐⭐⭐
- Time Estimate: 1–2 hours
- Tools Needed: Knife, rivets, buckle hardware, hole punch
- Monetization Potential 💰: Very High
- Sellability Score: 5/5
Pet products sell exceptionally well. A well-made dog collar combines emotional appeal with everyday utility—making it one of the strongest beginner products to monetize.
Time vs Profit Matrix (Beginner Decision Tool)
Not all projects give the same return for your effort. Think of this like energy output versus recovery gain—where you invest your time matters.
- Fast + High Profit: Keychains, bracelets, cord organizers
- Moderate Time + High Profit: Cardholders, dog collars
- High Time + High Profit: Tote bags
- Low Time + Medium Profit: Bookmarks, coasters
This matrix keeps your progression intentional. You’re not just crafting randomly—you’re training with purpose.
Each of these projects is a step forward, not just in skill, but in identity. At first, you’re following instructions. Then suddenly, you’re making decisions. And that’s the turning point—when leather stops being material and starts becoming your medium.
Step-by-Step Beginner Techniques You Must Learn
Before moving into more complex projects, you need to build technical fluency. Think of these techniques as your core movements—the foundational exercises that everything else depends on.
Cutting Leather Properly
Cutting is where everything begins, and beginners often underestimate its importance. A clean cut doesn’t just look better—it affects how pieces align, stitch, and age over time.
Control matters more than force. Let the blade glide rather than push. When your cuts are consistent, your entire project becomes easier to assemble.
Basic Stitching (Saddle Stitch)
The saddle stitch is the backbone of leathercraft. Unlike machine stitching, it creates a durable, symmetrical seam that holds even if one thread breaks.
Learning this stitch is less about speed and more about rhythm. Once your hands understand the motion, it becomes almost meditative—like breathing in sync with your work.
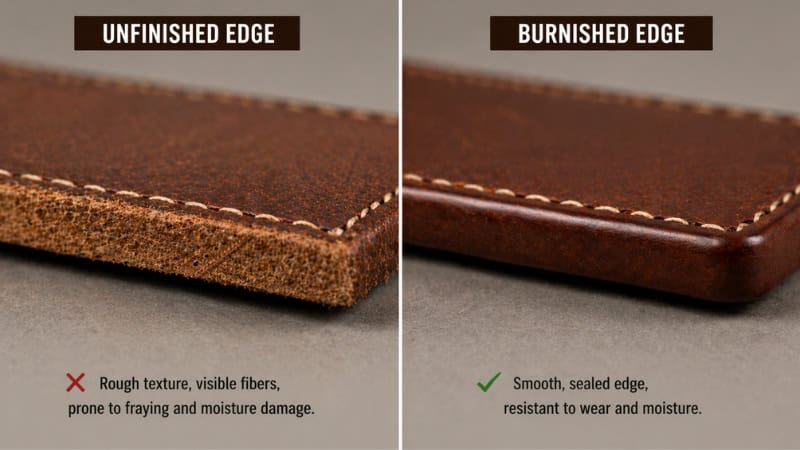
Edge Finishing Techniques
Raw edges are one of the fastest ways to make a project look unfinished. Edge finishing—through beveling and burnishing—transforms rough cuts into smooth, professional surfaces.
This is where craftsmanship becomes visible. A well-finished edge doesn’t just feel better—it signals care, patience, and attention to detail.
Common Beginner Mistakes (And How to Avoid Them)
Mistakes in leathercraft aren’t just errors—they’re feedback loops. Like overtraining a muscle or ignoring recovery signals, small missteps compound quickly if you don’t recognize and correct them early.
Using the Wrong Leather Type
Many beginners unknowingly start with leather that fights them at every step. Chrome-tanned leather, while soft, doesn’t hold structure well and can make cutting and stitching feel inconsistent. Vegetable-tanned leather, on the other hand, behaves predictably—it teaches you how leather should respond.
Rushing the Stitching Process
Stitching isn’t a race. Uneven spacing, loose tension, and misaligned holes often come from impatience. When you rush, the leather shows it. Slow, deliberate stitching builds muscle memory—and that rhythm becomes your biggest advantage over time.
Ignoring Edge Finishing
Skipping edge finishing is like leaving a workout halfway—it shows. Rough edges not only look unfinished but also wear out faster. A few extra minutes of burnishing can elevate a beginner piece into something that feels intentional and complete.
Overbuying Tools Too Early
There’s a common trap: believing better tools will fix beginner mistakes. In reality, tools amplify your skill—they don’t replace it. Start small, master the basics, then upgrade with purpose.
How Much Does It Cost to Start Leathercraft?
Starting leathercraft doesn’t require a massive investment—but it does require clarity. Like building a training plan, your budget should match your current level, not your future ambitions.
Budget Starter Setup (Under $50)
At the entry level, you can begin with a minimal toolkit and still produce quality work. A utility knife, stitching tools, thread, and a small piece of vegetable-tanned leather are enough to get you moving.
This stage is about exploration. You’re learning how leather behaves, not chasing perfection.
Mid-Range Setup ($50–$150)
As your confidence grows, you’ll start noticing friction points—edges that could be smoother, stitches that could be cleaner. This is where mid-range tools like edge bevelers, burnishers, and better chisels come in.
The difference isn’t dramatic at first glance, but in your hands, it feels like switching from rough terrain to a smoother track.
Return on Investment Potential
Even beginner projects can generate income. A simple leather keychain or cardholder can sell for several times its material cost. The real value, though, is in scalability—once your process improves, your efficiency increases, and profit margins expand naturally.
Can You Sell Beginner Leather Projects?
There’s a moment when your work shifts from “practice” to “product.” That moment usually comes sooner than expected. Even simple leather projects can carry real market value when executed cleanly.
Best Beginner Products to Sell
Items like keychains, bracelets, cardholders, and cord organizers are consistently in demand. They’re affordable, customizable, and easy to produce in small batches.
These products are the equivalent of foundational exercises—they may look simple, but they build strength and consistency while generating income.
Pricing Strategy for Beginners
Pricing isn’t just about covering costs—it’s about respecting your time and skill. Beginners often underprice their work, thinking simplicity equals low value. But clean craftsmanship, even in small items, deserves fair pricing.
Start by calculating material cost, then factor in time—even if your speed is still improving. As your efficiency increases, your effective hourly return rises.
Where to Sell Your Leather Projects
Platforms like Etsy, local craft markets, and social media marketplaces offer accessible entry points. Each has its own rhythm—Etsy rewards consistency, while local markets reward presentation and personal interaction.
Selling isn’t just about transactions—it’s feedback. Every sale teaches you what people value, what designs resonate, and where you can improve.
Best Leather Types for Beginners
Choosing the right leather is like choosing the right training surface—it determines how smoothly you progress. The wrong choice adds resistance; the right one builds confidence.
Vegetable-Tanned Leather (Best Starting Point)
Vegetable-tanned leather is the gold standard for beginners. It’s firm, predictable, and responds well to cutting, stitching, and finishing. It also ages beautifully, developing a patina that adds character over time.
This type of leather teaches you control. It doesn’t hide mistakes—but that’s exactly why it helps you improve faster.
Chrome-Tanned Leather (When to Use It)
Chrome-tanned leather is softer and more flexible, making it appealing at first glance. However, its flexibility can make precise work more challenging for beginners.
It’s better introduced later, once you’ve developed confidence with structure and stitching.
Thickness and Weight Considerations
Leather thickness plays a major role in how a project feels and functions. Thinner leather is easier to stitch but less durable, while thicker leather offers strength but requires more control.
For beginners, a medium weight (around 3–5 oz) strikes the right balance—manageable, yet durable enough to produce satisfying results.
How to Choose Your First Leather Project (Beginner Framework)
Choosing your first project isn’t about picking the easiest option—it’s about matching your current skill level with a build that teaches you just enough without overwhelming you. Like a structured recovery plan, the right progression prevents frustration while accelerating growth.
Difficulty Awareness: Don’t Skip the Foundation
Every leather project carries hidden demands—cut precision, stitch alignment, edge finishing. A keychain might look simple, but it quietly trains all three. Jumping straight into a wallet or bag without mastering these basics often leads to uneven results and discouragement.
Think in layers: start with flat, single-piece items before moving into folded or multi-layer designs.
Time vs. Reward Balance
Beginners benefit from projects that offer fast completion and visible results. When you finish something within an hour, the feedback loop tightens—you see what worked, what didn’t, and you improve immediately.
Longer projects have their place, but early on, short cycles build confidence faster than long, drawn-out builds.
The Beginner Project Matrix (Skill × Profit)
To guide your choices, think of projects across two axes: ease of execution and potential to sell.
- High Ease, High Profit: Keychains, cord organizers
- Medium Ease, High Profit: Cardholders, bracelets
- Higher Skill, Higher Profit: Tote bags, cases
This simple framework keeps you grounded. You’re not just crafting—you’re building a path that can evolve into something sustainable.
Expanding Your Skills Beyond the Basics
Once your hands stop hesitating and your cuts start landing where you intend, you’ll feel it—the shift from beginner to emerging craftsman. This stage isn’t about speed; it’s about refinement.
Developing Consistency in Stitching
At this level, stitching becomes less about “getting it done” and more about making it uniform. Consistent spacing, even tension, and straight lines transform a piece from handmade to professional.
It’s similar to refining form in physical training—small adjustments, repeated often, lead to noticeable improvements.
Understanding Leather Behavior
Leather isn’t static. It stretches, compresses, and reacts differently depending on thickness and treatment. Learning how it behaves under pressure—how it folds, how it absorbs moisture—gives you control.
This awareness turns guesswork into intention.
Improving Finishing Techniques
Finishing is where your craftsmanship becomes visible to others. Smooth edges, clean cuts, and polished surfaces communicate care without words.
Many beginners focus heavily on construction and overlook finishing—but in reality, finishing is what people notice first.
Recommended Sections Competitors Usually Miss
Most content around beginner leather projects stops at instructions. But what’s often missing is guidance that helps you progress, not just complete tasks. This is where you separate a helpful article from a truly valuable one.
Time-to-Completion Awareness
Beginners rarely know how long a project should take. Without that benchmark, it’s easy to feel slow or inefficient. Including realistic time estimates normalizes the learning curve and reduces unnecessary frustration.
Sellability Insights
Not all projects carry equal market value. A visually simple item like a minimalist wallet can outperform more complex designs in terms of demand. Understanding this early helps beginners focus their energy where it matters.
Tool Progression Roadmap
Instead of overwhelming beginners with a full tool list, a staged upgrade path makes learning more sustainable. Start small, identify friction points, then upgrade intentionally.
Mistake Recovery Mindset
Mistakes aren’t just inevitable—they’re essential. What beginners need isn’t perfection, but a mindset that treats errors as part of the process rather than signs of failure.
FAQs – Quick Answers That Help
What is the easiest leather project for beginners?
The easiest leather project for beginners is a keychain. It requires minimal tools, basic cutting, and simple assembly without complex stitching. Most keychains can be completed in under 30 minutes, making them ideal for building confidence while learning foundational leathercraft skills like hole placement and edge finishing.
How do I start leathercraft at home?
To start leathercraft at home, begin with a basic toolkit that includes a sharp knife, stitching chisels, needles, thread, and vegetable-tanned leather. Choose a small project like a keychain or bracelet, follow simple tutorials, and focus on mastering cutting and stitching before moving to more complex designs.
What tools do I need for leatherworking?
Beginners need a few essential tools: a cutting knife, stitching chisels, needles, waxed thread, and a cutting surface. Optional tools like an edge beveler and burnisher improve finishing quality but aren’t required initially. Starting with a minimal setup helps build skill before investing in advanced equipment.
Is leathercraft expensive to start?
Leathercraft is not expensive to start if you focus on essential tools and small projects. A beginner setup can cost under $50, covering basic tools and materials. As skills improve, you can gradually invest in better tools, making it a scalable hobby or business with controlled upfront costs.
Can beginners make money from leathercraft?
Yes, beginners can make money from leathercraft by creating simple, high-demand items like keychains, bracelets, and cardholders. These products are affordable to produce and easy to customize. Selling through platforms like Etsy or local markets allows beginners to test demand and improve profitability over time.
Conclusion
Leathercraft has a way of teaching patience without forcing it. You start with something small—a strip of leather, a simple cut—and before you realize it, you’re shaping something that didn’t exist before. That transformation, from raw material to finished piece, is what keeps people coming back.
Simple leather projects for beginners aren’t just practice—they’re your entry point into a craft that rewards effort, precision, and persistence. Start small, stay consistent, and let each project teach you something new. Over time, those small pieces won’t just build skill—they’ll build identity.
