
Leather restoration is often compared to refinishing hardwood floors: the beauty underneath only reveals itself once the protective layer is carefully removed. Whether you are preparing a luxury handbag for recoloring, restoring faded boots, or customizing sneakers with leather paint, surface preparation determines the final result more than the dye itself.
Deglazing leather is the process of removing factory finishes, waxes, oils, and protective topcoats so dyes, paints, and repair compounds can bond evenly with the material beneath. Done correctly, it improves absorption, adhesion, and finish longevity. Done carelessly, it can dry the hide, weaken the grain, or permanently alter texture.
This guide explains when leather prep is necessary, how professionals approach the process, which materials are safest, and how to avoid the common mistakes that ruin otherwise high-quality restoration projects.
What Does It Mean to Deglaze Leather?
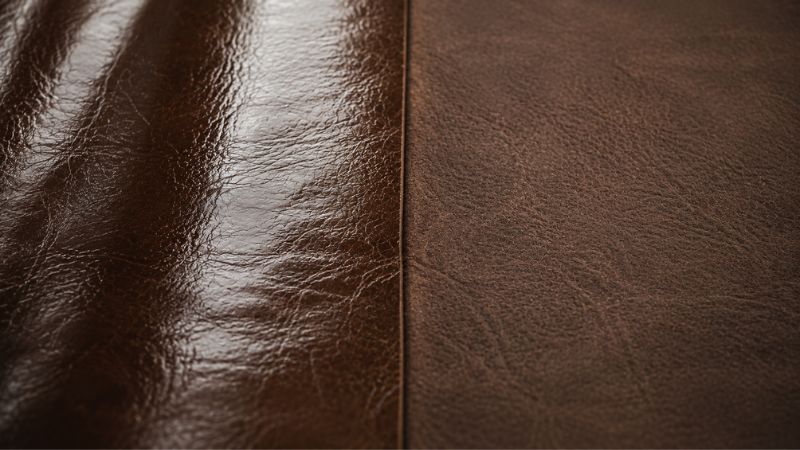
Most finished leather arrives with a surface barrier designed to resist moisture, stains, and abrasion. That coating may include acrylic finishes, waxes, pigments, or sealants that sit above the grain like a transparent shell. While beneficial for durability, those finishes also prevent dye and paint from penetrating evenly.
Removing that barrier creates what restorers call an “open surface.” The leather becomes more receptive to new color, conditioners, and repair compounds because its pores are no longer sealed.
This is where many DIY guides become misleading. Deglazing is not the same as cleaning. A leather cleaner removes dirt, body oils, and surface contaminants. A deglazer removes part of the finish itself. Stripping, by contrast, is a far more aggressive process that can completely remove pigment layers and significantly alter the hide.
| Process | Removes Dirt | Removes Finish | Suitable for Routine Maintenance |
| Cleaning | Yes | No | Yes |
| Deglazing | Yes | Partially | No |
| Stripping | Yes | Completely | Rarely |
The distinction matters because leather behaves differently once its protective coating has been altered. Think of the topcoat as the clear lacquer on fine furniture: removing too little limits adhesion, while removing too much exposes vulnerable fibers underneath.
When Should You Deglaze Leather?
Not every leather project requires finish removal. In fact, one of the clearest signs of professional experience is knowing when not to disturb the surface.
Before Dyeing Leather
If you plan to apply penetrating leather dye, especially alcohol-based or oil-based formulations, surface preparation is usually necessary. Factory coatings block absorption and often cause uneven coloration or streaking.
Vegetable-tanned and full-grain leathers respond particularly well because they retain natural porosity beneath the finish layer. Once opened correctly, they absorb pigment more evenly and develop richer tonal depth.
Before Painting Sneakers or Bags
Leather paints adhere differently than dyes. Rather than penetrating the hide, they bond to the surface itself. Deglazing improves that bond by removing oils, silicone residues, and slick acrylic finishes that can cause cracking or peeling later.
This is especially important for sneaker customization, where repeated flexing stresses the paint layer with every step.
Before Applying Leather Repair Products
Repair fillers, edge compounds, and recoloring balms require a stable surface to anchor properly. If old sealants remain intact, those products often sit on top instead of integrating with the grain.
A properly prepared surface creates better adhesion and smoother blending during restoration.
Cases Where You Should NOT Deglaze Leather
Delicate aniline leather, heavily cracked vintage leather, bonded leather, and certain luxury lambskins should generally be approached cautiously. These materials can dry out quickly once solvents disturb their finish.
Faux leather also presents risks. Because polyurethane and vinyl coatings sit above synthetic backing rather than natural fibers, aggressive solvents may melt, wrinkle, or separate the material entirely.
In many premium restoration workshops, restraint is treated as a craft skill. Sometimes preserving the patina matters more than chasing a perfectly fresh finish.
Tools and Materials Needed
The quality of your materials matters because leather reacts differently to solvents depending on grain structure, finish composition, and age.
Commercial leather deglazers remain the safest choice for most projects because they are formulated specifically for leather restoration. Products such as Angelus Leather Preparer & Deglazer and Fiebing’s Deglazer are designed to soften finishes without excessively drying the hide.
Alternative solvents like acetone, denatured alcohol, or isopropyl alcohol are sometimes used, but each behaves differently. Acetone evaporates rapidly and aggressively removes finishes, which makes it effective but risky. Isopropyl alcohol is milder but less effective against heavy acrylic coatings. Denatured alcohol sits somewhere between the two.
Professionals also rely on the right applicators. Soft cotton pads, lint-free microfiber cloths, nitrile gloves, and adequate ventilation are essential because many solvents release strong volatile organic compounds.
A restoration bench should feel controlled and deliberate, not improvised. Small details—such as using fresh cloth sections during application—often separate clean results from uneven finish removal.
How to Deglaze Leather Step by Step
Preparation determines whether the final finish appears refined or amateurish. The process itself is straightforward, but patience matters more than force.
Step 1 — Clean the Leather Surface
Before applying any solvent, remove surface dirt and oils using a dedicated leather cleaner or a lightly damp microfiber cloth. Dust particles and grime can smear across the surface during deglazing and create uneven absorption later.
Allow the leather to dry fully before moving forward.
Step 2 — Test a Hidden Area
Even experienced restorers test first. Leather chemistry varies widely between manufacturers, especially on luxury bags, coated furniture, and automotive upholstery.
Apply a small amount of deglazer to an inconspicuous section and observe:
- color transfer
- texture changes
- excessive dryness
- unexpected finish lifting
If the leather becomes tacky, rough, or brittle immediately, the solvent may be too aggressive.
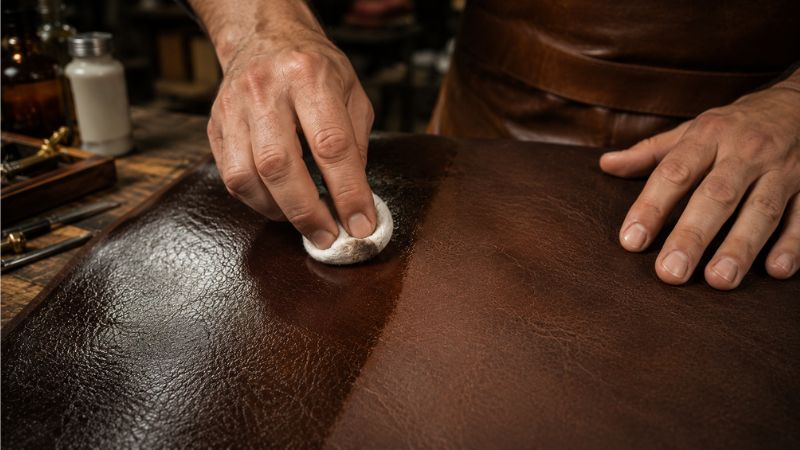
Step 3 — Apply the Deglazer Properly
Lightly dampen a cotton pad or microfiber cloth with the deglazer rather than soaking it. Work in controlled circular motions across small sections.
You are not trying to saturate the leather. The goal is to soften and lift the surface finish gradually.
As the coating begins to dissolve, you may notice slight pigment transfer onto the cloth. That is normal. What you want to avoid is aggressive rubbing that exposes raw fibers beneath the grain.
Professionals often describe successful deglazing as “opening the surface,” not stripping it bare.
Step 4 — Watch for Signs of Finish Removal
This stage is where visual awareness becomes more important than timing.
Indicators of successful finish removal include:
- reduced surface shine
- slightly matte appearance
- increased absorbency
- smoother dye penetration during testing
What you should not see:
- fuzzy fibers
- deep discoloration
- cracking
- peeling grain
Leather should look receptive, not damaged.
Dig deeper: Learn how to dye synthetic leather efficiently
Step 5 — Let the Leather Dry Fully
Solvents evaporate quickly, but deeper moisture balance takes longer to stabilize. Allow the leather to dry naturally for at least 20–30 minutes in a well-ventilated area.
Avoid direct heat sources such as hair dryers or heaters because rapid evaporation can stiffen the grain.
Humidity also affects drying. In humid environments, the surface may feel dry while residual solvent remains beneath the finish layer.
Step 6 — Condition or Dye Immediately
Once the surface is prepared, apply dye, paint, conditioner, or repair compounds without long delays. Open leather readily absorbs surrounding moisture and contaminants.
If you are dyeing the leather, thin layered applications produce more even results than heavy saturation. If conditioning instead, choose products formulated for post-restoration hydration rather than glossy cosmetic shine.
Common Mistakes That Damage Leather
Many damaged restoration projects come from overconfidence rather than lack of effort. Leather rewards subtlety.
Using Too Much Acetone
Acetone is effective precisely because it is aggressive. Excessive application can remove more than the finish layer and begin drying the leather’s internal fibers.
Once natural oils disappear, the material may stiffen permanently or develop micro-cracking around flex points.
Over-Scrubbing the Grain
Mechanical abrasion is often more damaging than the solvent itself. Scrubbing aggressively with rough cloths or brushes can disturb the grain pattern and create uneven texture.
This becomes especially noticeable after dyeing because pigment settles differently across damaged areas.
Deglazing Already Dry Leather
Older leather already suffers from reduced moisture retention. Applying strong solvents to a dehydrated hide can accelerate cracking.
Professionals frequently assess flexibility before restoration. If the material feels brittle before preparation even begins, conditioning may be necessary first.
Skipping Reconditioning
Once finishes and oils are partially removed, leather requires rebalancing. Many DIY projects fail because users apply dye successfully but never restore hydration afterward.
Conditioning is not cosmetic. It helps preserve flexibility and structural longevity.
Deglazing Faux Leather by Mistake
Synthetic leather behaves differently because its surface is often polyurethane rather than natural grain. Strong solvents may dissolve the coating unevenly, leading to bubbling, peeling, or permanent texture distortion.
If you are unsure whether a material is genuine leather, test cautiously before applying any solvent broadly.
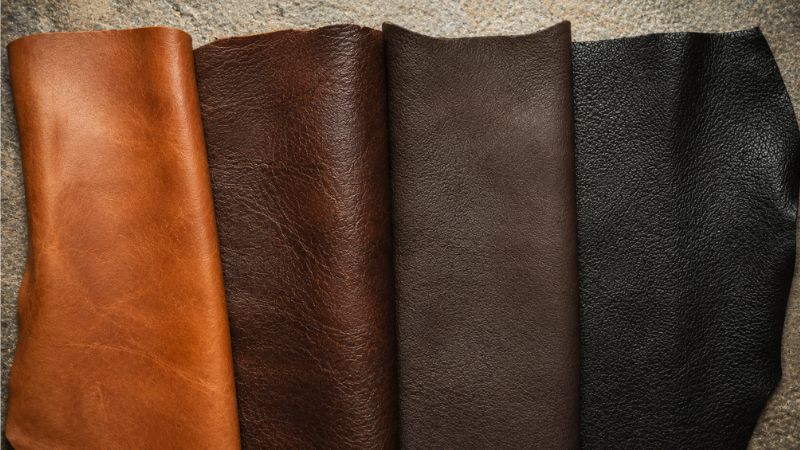
Best Leather Types for Deglazing
Different leather constructions respond differently to restoration work. Understanding the material itself often matters more than the solvent used.
Vegetable-Tanned Leather
Vegetable-tanned leather is among the best candidates because it absorbs dye naturally and develops character through use. Once the finish layer is softened, it accepts recoloring exceptionally well.
This is why many artisan workshops prefer vegetable-tanned hides for handcrafted restoration projects.
Full-Grain Leather
Full-grain leather retains the strongest fiber structure and typically tolerates controlled finish removal effectively. High-end boots, luxury belts, and premium bags often fall into this category.
However, expensive full-grain leather should still be approached conservatively because preserving natural grain variation is part of its appeal.
Corrected-Grain Leather
Corrected-grain leather contains more artificial surface treatment. While it can be prepared successfully, excessive solvent use may expose inconsistencies beneath the coating.
Results depend heavily on the thickness of the original finish layer.
Faux Leather and PU Leather
Synthetic leather generally reacts poorly to aggressive solvents. Since the material relies on bonded coatings rather than natural pores, deglazing rarely improves absorption the way it does with genuine leather.
In many cases, light surface preparation and adhesion promoters are safer alternatives.
What to Do After Deglazing Leather
Surface preparation is only one stage of restoration. What happens afterward determines durability and final appearance.
Dyeing the Leather
Apply dye gradually in thin coats rather than flooding the surface. Layering allows pigment to settle evenly while preserving texture.
Alcohol-based dyes penetrate quickly and produce vibrant results, while oil-based formulas often create richer depth with slightly softer transitions.
Reconditioning the Surface
Once dyeing or painting is complete, the leather needs hydration restored. Conditioners replenish flexibility lost during solvent exposure and help prevent stiffness over time.
Choose conditioners designed for restoration work rather than silicone-heavy shine products that sit artificially on the surface.
Applying a Protective Finish
Protective finishes lock in color and improve abrasion resistance. Acrylic finishers provide durability and water resistance, while wax-based topcoats create a softer, more natural aesthetic.
The final finish should complement the intended use. A luxury briefcase requires different protection than painted sneakers exposed to repeated flexing and moisture.
Professional Tips for Better Dye Absorption
The difference between amateur and professional results often comes down to restraint, timing, and environmental awareness.
Timing Matters
Leather absorbs dye best shortly after surface preparation because pores remain open and receptive. Waiting too long allows environmental oils and airborne contaminants to settle back onto the surface.
Many professionals move directly from preparation into dye application within the same working session.
Temperature and Humidity Affect Penetration
Warm, dry conditions generally improve solvent evaporation and dye consistency. High humidity can slow drying and create blotchy absorption patterns.
Experienced restorers often describe humidity as the invisible variable behind inconsistent results.
Thin Layers Create Richer Depth
Heavy dye application tends to produce flat coloration. Multiple thin passes create tonal variation that resembles naturally aged leather rather than painted plastic.
This layered approach becomes especially important on luxury goods where texture and grain visibility matter aesthetically.
Professionals Focus on Balance
The goal is not maximum solvent removal. It is controlled surface preparation that improves adhesion while preserving the leather’s integrity.
Well-restored leather should still feel alive beneath the finish—not chemically stripped.
FAQ on Deglazing Leather
Can you use acetone to deglaze leather?
Yes, acetone can remove leather finishes effectively, but it is much stronger than dedicated leather deglazers. Excessive use may dry the material, weaken the grain, or cause discoloration. Professionals typically use acetone sparingly and only on durable leather types such as full-grain or vegetable-tanned leather.
Does deglazing damage leather?
When performed correctly, controlled finish removal does not damage healthy leather. Problems usually occur when harsh solvents, excessive scrubbing, or repeated applications strip away natural oils and weaken the grain structure. Proper conditioning afterward helps restore flexibility and maintain long-term durability.
How long should leather dry after deglazing?
Most leather surfaces should dry for at least 20–30 minutes after deglazing before applying dye or paint. In humid environments or on heavily coated leather, longer drying times may be necessary to allow solvents to evaporate fully and stabilize the surface.
Do you need to deglaze leather before dyeing?
Not always. Leather with heavy acrylic finishes or protective coatings usually benefits from preparation because dyes struggle to penetrate sealed surfaces. However, unfinished vegetable-tanned leather may already absorb dye effectively without aggressive surface treatment.
Can you deglaze faux leather?
Faux leather generally reacts poorly to strong solvents because its surface relies on polyurethane or vinyl coatings rather than natural pores. Deglazing can cause peeling, bubbling, or texture distortion. Mild surface cleaning and adhesion promoters are typically safer alternatives for synthetic materials.
What’s the difference between leather cleaner and deglazer?
Leather cleaner removes dirt, oils, and contaminants from the surface while preserving the protective finish. A deglazer partially removes that finish itself to improve dye absorption or paint adhesion. The two products serve different purposes within leather restoration and preparation workflows.
Can you repaint leather without deglazing?
Yes, but paint adhesion may suffer if oils, waxes, or glossy finishes remain intact. Proper surface preparation improves durability and reduces the likelihood of peeling or cracking, especially on frequently flexed items like sneakers, wallets, or automotive upholstery.
How many times should you deglaze leather?
Most projects only require one controlled pass. Repeated applications increase the risk of drying or weakening the material unnecessarily. Professionals typically stop once the surface becomes slightly matte and receptive rather than continuing until the finish is completely stripped away.
Final Verdict: Is Deglazing Worth It?
For serious leather restoration, proper surface preparation is often the difference between a finish that lasts years and one that fails within weeks. Removing excess coatings allows dyes, paints, and repair products to bond more naturally with the material beneath.
At the same time, restraint remains essential. High-quality leather responds best to controlled preparation, not aggressive stripping. The objective is to improve absorbency while preserving the grain, flexibility, and character that make leather valuable in the first place.
When approached carefully—with the right solvent, proper conditioning, and realistic expectations—deglazing becomes less about removing a finish and more about revealing the material’s ability to evolve gracefully over time.
