
Your favorite leather purse is perfect until that dreaded snap. One second you’re carrying it like a style queen, and the next, your strap gives up mid-errand, leaving you clutching it awkwardly under your arm.
It’s not just about losing function — it’s about losing something you love.
The good news? A broken strap is rarely the end. Whether it’s a small crack, a popped stitch, or hardware that’s given up, there’s almost always a fix — and you can do it yourself at home with surprisingly little gear.
Let’s walk through the process.
Is Your Strap Actually Repairable?
Before you bust out the glue or needles, you need to figure out what you’re working with. A quick assessment will save you hours — and prevent you from pouring time into something that’s already beyond saving.
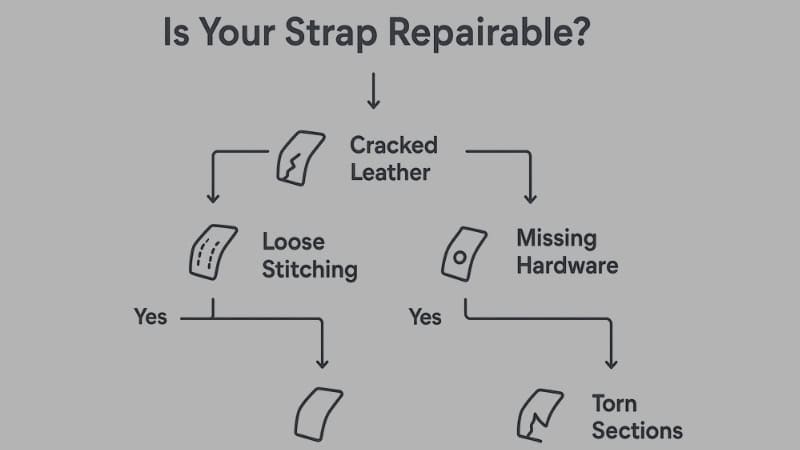
Here’s what to look for:
- Minor cracks or splits: These are usually just surface damage or separation in layered straps. They can be glued or stitched easily.
- Stitching coming loose: If the leather itself is intact but the stitches have unraveled, this is one of the easiest repairs — no new leather needed, just re-stitching.
- Loose or broken hardware: Things like D-rings, rivets, and clasps can be swapped out quickly. Often, the leather is fine, it’s just the metal that failed.
- Full tear with missing leather: If there’s an actual chunk of leather gone, this is a structural issue — you might need a replacement strap or a professional.
- Flaking bonded leather: Sadly, bonded leather tends to peel and degrade. You can make it look better with filler and paint, but you can’t make it strong again.
Pro Tip: If your bag is high-end or sentimental, get a quick quote from a leather repair shop. Sometimes it’s worth the investment to have a pro handle delicate work.
Recommended Read: The Ultimate Leatherworking Tools List for Everyone
Gather Your Repair Arsenal
Jumping into a repair without the right tools is like baking a cake without a mixing bowl — messy, frustrating, and unlikely to end well.
Here’s what you’ll want, organized by repair type:
For sewing repairs:
- Leather needles (stronger and thicker than fabric needles)
- Waxed thread (nylon or linen — wax helps prevent fraying)
- A thimble to push needles through tough leather
- An awl for punching clean, even stitch holes
- Small clamps or clips to hold pieces in place
Recommended Read: How to Glue Leather: A Comprehensive Guide
For glue repairs:
- Barge contact cement (or other strong leather-specific adhesive)
- Small brush or stick for precise application
- Clamps, binder clips, or even heavy books to hold pieces together
For hardware fixes:
- Replacement rivets, D-rings, swivel hooks, or snaps
- A rivet setter or screw-in rivets
- Leather punch for new holes
For edge and cosmetic repairs:
- Leather filler or edge paint
- Fine-grit sandpaper (600–1000)
- Burnishing tool for smoothing
Tip: You don’t have to buy everything at once — most repairs only need a couple of tools.
Prep Like a Pro
The actual fix starts before you touch the glue or needle. Skipping prep is the biggest rookie mistake in leather repair.
- Clean the strap — Dirt and oils interfere with glue bonds and stitching. Use a leather cleaner or a barely damp cloth, then wipe dry.
- Dry fully — Leather needs to be completely dry before you repair it. Even a little moisture can cause adhesives to fail.
- Measure and document — If you’re replacing hardware or making a new strap, jot down dimensions and hole placement. A quick phone photo works wonders for reference.
- Protect the bag — Tape off or cover the purse body so you don’t accidentally smear glue or scratch it with tools.

Repair Your Leather Purse Strap: 5 Efficient DIY Methods
You have gathered the right tools and prepared yourself like a pro. Now, with a little patience, you can tackle most strap problems right at home. Your broken purse strap doesn’t have to mean the end of your favorite bag.
Here are five proven DIY methods — from quick fixes to full strap replacements — to bring your bag back to life.
Recommended Read: What Glue Works on Leather? – Guide to Bonding Leather Like a Pro
Method A — Quick Glue Repair (Best for Small Splits)
Sometimes, your strap isn’t broken beyond hope — it’s just come apart at the seams, literally.
A little glue can work wonders for small splits or layer separations, and it’s one of the fastest fixes you can do at home. Done right, this repair can hold up for years without anyone ever knowing there was a problem.
Step-by-step:
- Open the split gently with your fingers so you can reach the full surface.
- Apply contact cement to both sides. A thin, even coat is best — too much glue will squeeze out and look messy.
- Let it get tacky — usually about 10–15 minutes. Don’t skip this; contact cement only works when it’s slightly dry to the touch before joining.
- Press firmly together and clamp. If you don’t have clamps, use binder clips with cardboard between the clip and leather to avoid marks.
- Leave it undisturbed for at least 6–8 hours (overnight is better).
- Optional reinforcement: Stitch over the repair if it’s a stress point.
- Finish the edges — sand lightly and burnish for a smooth look.
Why it works: Contact cement creates a flexible, durable bond that moves with the leather instead of cracking.
Method B — Hand-Stitching (Best for Strength)
When you need real strength — the kind that can handle a laptop or a tote full of books — stitching is your best friend. It’s slower than gluing, but it creates a flexible, lasting repair that moves naturally with the leather.
Plus, saddle stitching has a certain satisfaction to it — like you’re giving your bag a heartbeat again.
How to saddle stitch like a pro:
- Cut a length of waxed thread about 3× the length of the repair.
- Thread a needle on each end of the thread.
- If there are old stitch holes, reuse them. If not, punch evenly spaced holes with an awl (around 3–4 mm apart).
- Push the left needle through the first hole, then the right needle through from the other side. Pull both ends snug.
- Repeat through each hole, keeping tension even.
- At the end, double back through the last 2–3 holes to lock the stitch.
- Trim thread ends and press them into the stitch line with a fingernail or burnisher.
Bonus: Add a small leather backing patch behind the repair area to double the strength.
Method C — Hardware Replacement
Sometimes the problem isn’t the leather at all — it’s the metal that’s let you down. A broken D-ring, snap hook, or rivet can instantly turn a great bag into dead weight.
The fix? Swap it out for fresh hardware, and your strap can be good as new in minutes.
The fix:
- Use a small screwdriver, knife, or seam ripper to remove old hardware.
- Take the broken piece to a craft store (or check online) to match size and finish.
- Attach the new piece with a rivet setter or screw-in rivet.
- Make sure moving parts (like swivel clasps) operate smoothly before reattaching to the bag.
A fresh D-ring or clasp can instantly make a tired bag look expensive again.
Method D — Edge & Cosmetic Touch-Ups
Your strap might still be strong but looking a little worse for wear. Fraying edges, scuffs, or peeling finish can make even a sturdy bag feel shabby.
With a bit of edge paint, sanding, and burnishing, you can restore that sleek, polished look.
Steps:
- Sand the edge lightly with fine-grit paper to remove frays.
- Apply edge paint or filler with a small brush. Thin layers look cleaner.
- Let each coat dry fully before adding another.
- Burnish the edge by rubbing with a smooth tool — this compresses fibers and gives a professional finish.
- Condition the leather to keep it supple.
Even a worn-out strap can look boutique-fresh with this trick.
Method E — Replacing the Strap Completely
Sometimes the most practical repair is simply starting fresh. A replacement strap can save you the headache of patching and still give your bag the personality you love.
From pre-made options to fully custom designs, you can match the original — or reinvent your bag entirely.
- Buy a pre-made strap — easiest option, just match the width and attachment style.
- Make one from scratch — buy a leather strip, cut to length, punch holes, finish edges, and attach hardware.
- Go creative — replace with chain, woven fabric, or mix leather and metal for a new style.
Sometimes replacing the strap breathes new life into an older bag you thought you’d never use again.
When to Call in the Pros
If you’re dealing with a designer bag, antique leather, or severe damage, a pro is worth every penny. They can match thread color, replicate stitch patterns, and replace specialty hardware without guesswork.
Expect to pay:
- Minor stitch or glue jobs: $20–$40
- Hardware replacement: $25–$50
- Full strap rebuild: $60–$120+
Common DIY Mistakes to Avoid
Even the most enthusiastic DIY leather repairs can go sideways if you miss a few small but critical details. Avoid these common slip-ups so your hard work lasts more than a single grocery run.
- Using the wrong glue: School glue, hot glue, or super glue will either fail or make the leather brittle.
- Skipping surface prep: Dirt or oils will stop glue from bonding and cause stitches to pull through.
- Pulling stitches too tight: This can warp the strap and make it uncomfortable to wear.
- Ignoring conditioning: Dry leather will crack again, even after repair.
Final Thoughts
Repairing a leather purse strap isn’t just a fix — it’s a small act of love for something you value. It’s about giving your bag another chapter, not just tossing it aside for something new.
And here’s the best part. Once you do one repair, you’ll see just how approachable leatherwork can be. You might start mending belts, wallets, even those boots you thought were done for.
So pick your method, grab your tools, and bring that purse back to life. It’s been waiting for you.
