
Leatherwork has a way of pulling you in. You start with something small—and before you know it, you’re crafting gear that actually gets used. Spur straps are one of those projects. Simple in structure, but incredibly satisfying when done right.
If you ride, work around horses, or just appreciate well-made leather gear, you already know this—spur straps aren’t just accessories. They keep your spurs secure, positioned correctly, and comfortable over long use. Poorly made ones slip, wear out fast, or just don’t feel right. Good ones? You forget they’re even there.
This guide is built to help you make your own spur straps from scratch—clean, durable, and properly fitted. No fluff. Just the steps, tools, and small details that actually make a difference.
What Are Spur Straps? – Quick Definition & Use Case
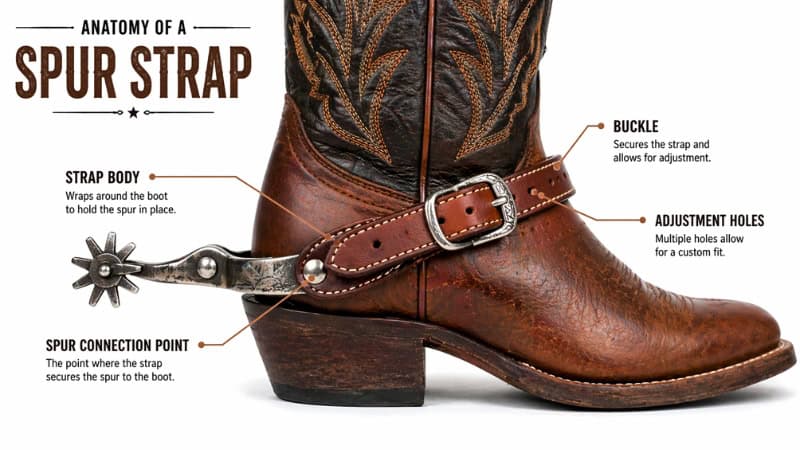
Spur straps are adjustable leather bands that secure spurs to your boots, keeping them stable and correctly positioned while riding or working. They wrap around the boot heel and connect through a buckle system, allowing for a snug, customizable fit.
At a glance, they look simple—but they do a few important jobs:
- Hold the spur in place so it doesn’t shift while you move
- Distribute pressure evenly around the boot
- Provide adjustability for comfort and different boot sizes
- Add durability, especially when made from quality leather
You’ll mostly see them used in western riding, ranch work, and equestrian setups—but they’ve also become a small craft niche for leatherworkers who care about both function and finish.
A well-made spur strap isn’t just about holding hardware together. It’s about balance—between flexibility and strength, fit and comfort, clean design and long-term wear.
Tools & Materials You’ll Need
Before you cut anything, get your setup right. You don’t need a full workshop, but using the right tools will save you frustration and give you a much cleaner result.
Core Materials
Start with the essentials:
- Vegetable-tanned leather (6–8 oz) – Strong, durable, and easy to work with
- Buckle set – Usually ½” to ¾” depending on strap width
- Chicago screws or rivets – For fastening the buckle
- Leather dye (optional) – For color customization
- Conditioner or finish – To protect and soften the leather
Beginner Tool Setup (Budget-Friendly)
If you’re just starting out, keep it simple. You can still get a solid result with minimal tools:
- Utility knife or sharp cutter
- Metal ruler (for straight cuts)
- Hole punch (rotary or basic punch set)
- Hammer or mallet
- Sandpaper (for edge smoothing)
This setup is enough to complete the entire project. The finish won’t be “artisan-level,” but it’ll be clean and functional.
Professional Tool Setup (Advanced Craft)
If you want that polished, shop-quality look, these tools make a big difference:
- Strap cutter (for consistent width)
- Edge beveler (rounds sharp edges)
- Stitching awl or pricking irons
- Burnishing tool (wood slicker or canvas)
- Wing divider (for clean marking lines)
- Edge dye or gum tragacanth
These aren’t just upgrades—they improve precision, consistency, and overall durability.
Quick Tip (Most Beginners Miss This)
Don’t overcomplicate your setup. Good leather and clean cuts matter more than having every tool in the catalog. Start simple, focus on accuracy, and upgrade only when you feel the limitations.
Choosing the Right Leather for Spur Straps
This is where most people either set themselves up for a long-lasting strap—or something that fails in a few weeks. Leather choice isn’t just about looks. It directly affects durability, flexibility, comfort, and how well your straps age over time.
Start with this rule: use vegetable-tanned leather, not chrome-tanned. Veg-tan is firmer, holds its shape, and responds well to cutting, edging, and finishing. Chrome-tan might feel softer at first, but it stretches too much and doesn’t finish cleanly for this kind of gear.
Leather Type (What Actually Works)
- Full-grain cowhide – The best overall choice. Tough, durable, and ages well.
- Top-grain leather – Slightly processed but still strong and workable.
- Split leather – Avoid for spur straps. It lacks strength and wears out faster.
If you want straps that hold their shape and don’t sag over time, stick with full-grain.
Leather Thickness (Critical Detail)
Thickness is measured in ounces (oz), and this is where many DIY builds go wrong.
- 6–7 oz → More flexible, easier for beginners, comfortable fit
- 7–8 oz → Ideal balance of strength and rigidity (recommended)
- 9 oz+ → Too stiff for most spur straps, harder to work with
👉 Sweet spot: 7–8 oz veg-tan leather
Too thin, and the strap feels weak. Too thick, and it becomes uncomfortable and difficult to shape around the boot.
Temper & Flexibility
Look for leather with a medium temper—not too stiff, not too floppy. You want it to:
- Bend naturally around the boot
- Hold its shape without collapsing
- Resist stretching over time
Surface & Finish
A smooth, clean grain side is easier to finish and dye. You can go:
- Natural (unfinished) → Best for full customization
- Pre-dyed → Saves time but limits finishing options
Quick Reality Check
Good leather costs more upfront—but it’s the difference between:
- A strap that lasts years, develops character, and feels better over time
- Or one that cracks, stretches, and needs replacing
If there’s one place not to cut corners, it’s here.
Spur Strap Measurements & Sizing (The Part Most People Get Wrong)
You can follow every step perfectly—but if your sizing is off, the straps won’t feel right. Too tight, and they dig into the boot. Too loose, and the spur shifts constantly.
This is where precision matters.
The Goal
A properly sized spur strap should:
- Sit securely around the heel
- Keep the spur aligned and stable
- Allow small adjustments for comfort
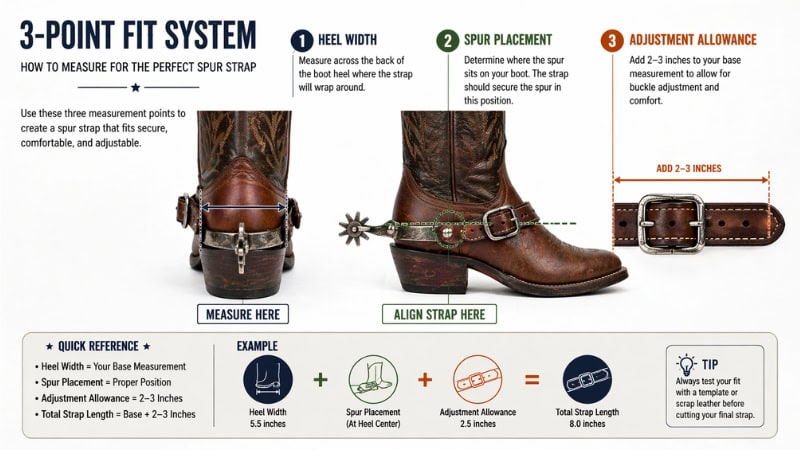
The 3-Point Fit System (Use This)
Instead of guessing length, use this simple system:
- Boot Width (Anchor Measurement)
Measure across the back of your boot heel where the strap will sit. This gives you your base length. - Spur Neck Position
Place your spur on the boot and note where the strap needs to connect. This affects where your holes and buckle placement go. - Adjustment Allowance
Add extra length (usually 2–3 inches) to allow for buckle adjustment and comfort changes.
Standard Measurement Range (Quick Reference)
- Total strap length: 18–22 inches (adjustable)
- Strap width: ½” to ¾” (match your buckle size)
- Hole spacing: ¾ inch apart (for clean adjustment steps)
These aren’t fixed rules—but they’re a reliable starting point.
Hole Placement Strategy (Small Detail, Big Impact)
Don’t just punch holes randomly. Plan them:
- Start holes about 2 inches from the tip
- Keep even spacing (¾ inch works best)
- Ensure the middle hole gives your ideal fit
This way, you can tighten or loosen without running out of range.
Common Sizing Mistakes
- Making straps too short (no adjustment room)
- Ignoring spur placement before cutting
- Uneven hole spacing (looks bad and fits worse)
Quick Tip
Always test-fit with a scrap strip or paper template before cutting your final leather. It takes 5 minutes and can save your entire build.
Step-by-Step: How to Make Spur Straps
This is where everything comes together. If your leather is right and your measurements are solid, the build itself is straightforward—but the details matter. Clean cuts, accurate spacing, and proper finishing are what separate a rough DIY strap from something that actually looks and feels professional.
Take your time with each step. Rushing is where most mistakes happen.
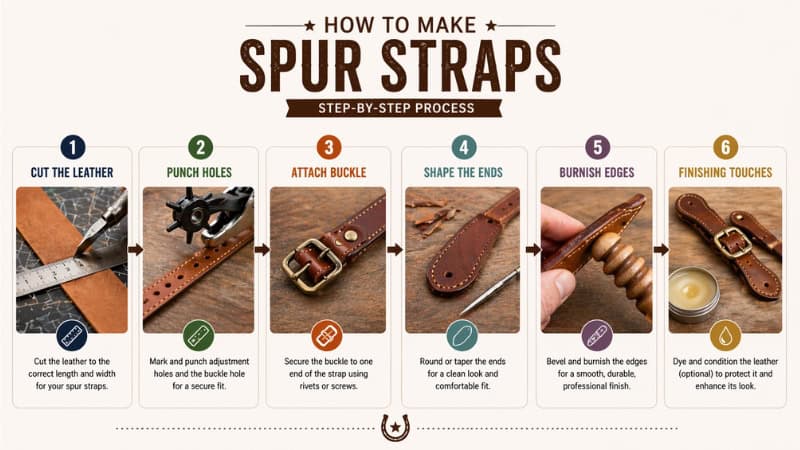
Step 1 – Cutting the Leather Strips
Start by cutting your straps to size based on your measurements.
- Use a metal ruler and sharp knife for straight, clean cuts
- Keep your strap width consistent (usually ½”–¾”)
- Cut along the grain direction (this helps reduce stretching over time)
If you have a strap cutter, use it. It makes this step faster and more precise.
What to watch for:
Jagged edges or uneven width will show up later—especially during finishing.
Step 2 – Marking and Punching Holes
Now mark where your buckle and adjustment holes will go.
- Use a wing divider or ruler to mark a straight centerline
- Mark holes evenly (¾ inch spacing)
- Punch holes cleanly using a rotary punch or drive punch
For the buckle end:
- Punch a slot or hole for the buckle tongue
- Add two smaller holes for rivets or stitching
Precision tip:
Misaligned holes are one of the fastest ways to make your straps look amateur. Take an extra minute to line everything up.
Step 3 – Attaching the Buckle
Secure your buckle to one end of the strap.
- Fold the leather over the buckle bar
- Use Chicago screws (removable) or rivets (permanent)
- Make sure the fold is tight but not restrictive
If you want a more traditional finish, you can stitch this section instead of using hardware.
What matters here:
The buckle should sit flat, move freely, and feel solid under tension.
Step 4 – Shaping the Strap Ends
This step is small—but it makes a big visual difference.
- Round off the tip using a template or by hand
- Keep both straps symmetrical
- Smooth the shape before moving to finishing
Common styles:
- Rounded tip (clean and classic)
- Pointed tip (more decorative)
Step 5 – Edge Beveling and Burnishing
This is where your straps start to look finished.
- Use an edge beveler to remove sharp corners
- Lightly sand edges if needed
- Apply water or gum tragacanth
- Burnish using a wood slicker or cloth
What you’re aiming for:
- Smooth, slightly glossy edges
- No rough fibers sticking out
This step alone can make your straps look store-bought.
Step 6 – Dyeing and Conditioning (Optional but Recommended)
If you’re using natural leather, now’s the time to finish it.
- Apply leather dye evenly using a cloth or dauber
- Let it dry fully before handling
- Finish with a conditioner or sealant
Benefits:
- Improves durability
- Adds water resistance
- Gives a richer, more professional look
Final Check
Before calling it done:
- Test fit on your boots
- Adjust buckle tightness
- Check hole alignment and comfort
A well-made spur strap should feel secure, balanced, and natural—no shifting, no awkward tension.
Common Mistakes to Avoid (This Is Where Most Builds Fail)
You can follow every step and still end up with straps that feel off. Not because you don’t know the process—but because of a few small mistakes that compound quickly.
Here are the ones that actually matter in real builds:
Using the Wrong Leather
- Too thin → stretches, loses shape, feels weak
- Too thick → stiff, uncomfortable, hard to work with
- Chrome-tanned → won’t hold structure or finish well
👉 Fix: Stick to 7–8 oz veg-tan with medium temper.
Poor Hole Alignment
This is one of the fastest ways to ruin both function and appearance.
- Crooked holes → uneven tension
- Misplaced buckle holes → awkward fit
- Inconsistent spacing → looks sloppy
👉 Fix: Always mark a centerline first, then measure spacing before punching.
Cutting Without Planning
Jumping straight into leather without testing fit leads to wasted material.
- Strap too short → no adjustment range
- Strap too long → bulky and awkward
- Wrong width → doesn’t match buckle
Fix: Use a paper or scrap template before final cuts.
Skipping Edge Finishing
This is the difference between “DIY” and “done right.”
- Raw edges fray over time
- Rough feel against boots
- Cheap-looking finish
Fix: Always bevel + burnish, even if you keep everything else simple.
Weak Hardware Attachment
Loose rivets or poorly set screws will fail under tension.
Fix:
- Double-check tightness
- Use proper hole size
- Avoid over-punching (loose fit)
Rushing the Process
Most mistakes don’t come from lack of skill—they come from rushing.
Fix: Slow down at:
- Measuring
- Hole marking
- Finishing
Those are the three points where quality is decided.
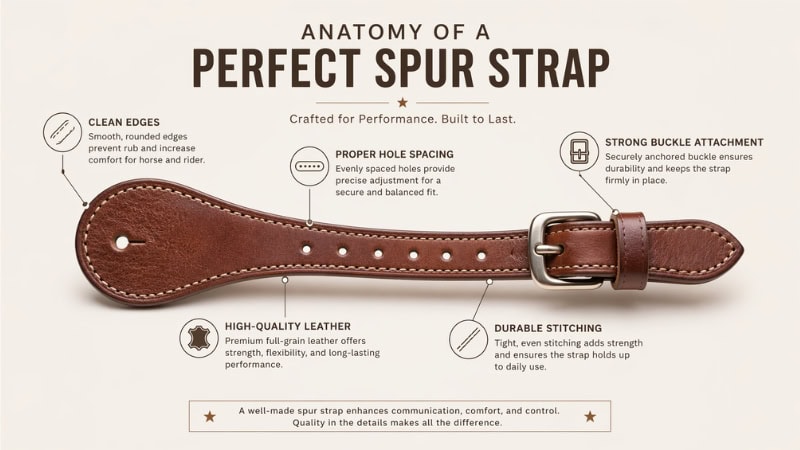
How to Make Spur Straps Look Professional
Function gets the job done. But small details are what make your straps look like they came out of a workshop—not a quick DIY session.
Think of this as your upgrade layer.
Clean Edges = Clean Work
- Proper beveling removes sharp corners
- Burnishing seals and smooths the edge
- Consistent finish across both straps matters
If your edges look good, your whole project looks better.
Symmetry Is Everything
Even if each strap looks fine on its own, mismatched pairs stand out immediately.
Check:
- Length
- Hole spacing
- Tip shape
- Buckle alignment
Always compare both straps side-by-side before finishing.
Consistent Hole Spacing
Uniform spacing creates a subtle but professional look.
- Use measuring tools—not guesswork
- Keep spacing consistent across both straps
- Align holes cleanly along the centerline
Controlled Dye Application
If you’re dyeing:
- Apply evenly—no blotches
- Let each coat dry fully
- Buff after drying for a smooth finish
Uneven dye is one of the easiest ways to make good leather look bad.
Pro Finish Checklist
Before you call it done, run through this:
- Edges smooth and slightly glossy
- Holes clean and aligned
- Buckle sits flat and moves freely
- Straps match in size and shape
- Leather conditioned (not dry or rough)
If all five check out, you’re in solid territory.
Cost Breakdown: DIY vs Buying Spur Straps
Let’s be practical for a second. Is making your own spur straps actually worth it?
DIY Cost (Approximate)
- Leather (small piece): moderate one-time cost
- Buckle + hardware: low cost
- Basic tools: low to moderate (reusable)
First pair might feel expensive due to tools—but after that, cost drops significantly.
Store-Bought Spur Straps
- Budget options → cheaper upfront, lower quality
- Mid-range → decent quality, limited customization
- Premium → expensive, but well-finished
The Real Difference
DIY gives you:
- Custom fit
- Control over materials
- Long-term cost savings
- Skill development
Buying gives you:
- Convenience
- Immediate use
- No learning curve
Bottom Line
If you’re making just one pair for quick use, buying might make sense.
But if you care about fit, durability, or plan to make more leather gear—DIY quickly becomes the better investment.
Can Beginners Make Spur Straps?
Yes—and this is actually one of the better beginner projects in leatherwork.
Why?
- Straight cuts (no complex patterns)
- Minimal stitching required
- Small material requirement
- Clear, repeatable steps
That said, your first pair won’t be perfect—and that’s fine.
Expect:
- Slightly uneven edges
- Minor alignment issues
- Learning curve with tools
What matters is getting the fundamentals right:
- Accurate measurement
- Clean cuts
- Proper finishing
Once those click, your second pair will already look significantly better.
FAQs – Quick Answers That Actually Help
How long does it take to make spur straps?
For a beginner, around 1.5 to 3 hours from start to finish. With experience, you can complete a pair in under an hour.
What leather thickness is best for spur straps?
7–8 oz vegetable-tanned leather is the sweet spot. It balances durability, flexibility, and comfort.
Can you make spur straps without stitching?
Yes. You can use Chicago screws or rivets to attach the buckle. Stitching adds strength, but it’s not required for a solid build.
How do you soften leather straps?
Apply a leather conditioner or oil, then flex the strap gently by hand. Avoid over-softening—it should still hold shape.
Are handmade spur straps durable?
Yes—if made with proper leather and construction, they can last years, often longer than cheaper store-bought options.
What tools are absolutely necessary?
At minimum:
- Sharp knife
- Hole punch
- Ruler
- Hammer
Everything else improves finish, not function.
Can I use synthetic leather instead?
You can—but it won’t perform the same. Synthetic materials lack the durability, aging quality, and finish of real leather.
Conclusion
Making your own spur straps is one of those projects that sits right in the sweet spot—simple enough to start, but detailed enough to feel rewarding when done right.
You’re not just cutting leather and adding a buckle. You’re building something that needs to fit well, hold up under use, and actually feel right every time you wear it.
Get the fundamentals right—leather choice, sizing, clean cuts—and everything else starts to fall into place. The finishing touches? That’s where your work starts to look professional.
If this is your first build, keep it simple. Focus on accuracy over perfection. Once you’ve done one pair, the second will come together faster—and better.
And that’s where it really starts to click.
")