
Leather armor has been used for centuries by warriors, hunters, and soldiers who needed protection without sacrificing mobility. Today, leather armor remains popular among LARP participants, historical reenactors, cosplayers, and bushcraft enthusiasts who value durable, handcrafted gear. Unlike metal armor, leather is lighter, easier to shape, and accessible to beginners willing to learn basic leatherworking techniques.
Crafting your own leather armor lets you customize the fit, design, and protection level while developing practical leatherworking skills. With the right materials, tools, and preparation, even beginners can produce functional and visually impressive armor pieces. This guide walks you through the entire process—from understanding leather armor and selecting materials to designing patterns and preparing tools—so you can confidently begin crafting your own set.
What Leather Armor Is and How It Works
Leather armor is protective gear made from thick animal hide, typically cowhide, that has been shaped, hardened, and assembled into armor components such as cuirasses, bracers, pauldrons, and greaves. Historically, leather armor served as a lighter alternative to metal armor, providing a balance between protection, flexibility, and affordability.
In many cultures, hardened leather—often produced using the cuir bouilli process—was used to create rigid armor plates. This process involved soaking leather in hot water and shaping it as it hardened, resulting in durable protective panels that resist cuts and minor impacts. While leather armor cannot match the protection of full steel plate armor, it can effectively absorb shock and reduce injury during combat simulations or reenactments.
The effectiveness of leather armor depends largely on hide thickness, which is typically measured in ounces in leatherworking. Armor-grade leather usually ranges from 6 oz to 10 oz in thickness, providing enough rigidity for protective equipment while remaining workable.
Today, leather armor can be both functional and decorative, depending on its design, hardening, and assembly.
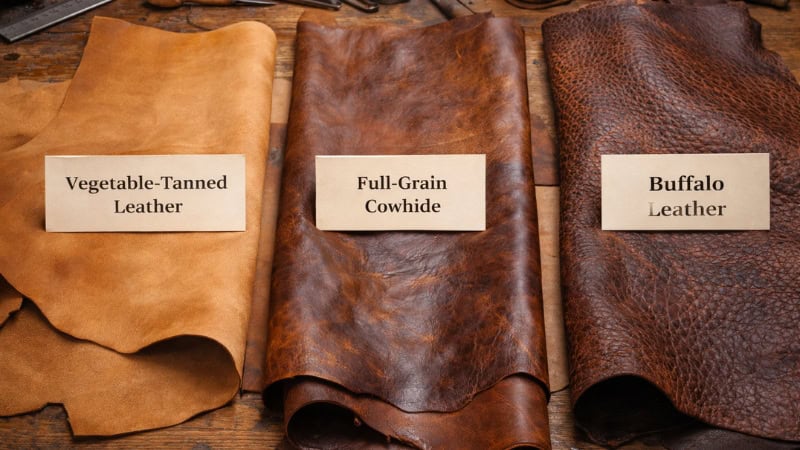
Leather Types Suitable for Armor
Selecting the correct leather is essential when crafting durable armor. The leather must be thick enough to provide structure, yet workable enough to cut, shape, and harden. Most armor makers rely on vegetable-tanned leather, which responds well to molding and traditional hardening techniques.
Vegetable-tanned leather, often called veg-tan leather, is processed using natural plant tannins. This tanning method preserves the leather’s ability to absorb water and hold shape during the cuir bouilli hardening process. In contrast, chrome-tanned leather is chemically treated and remains too soft and flexible for structural armor pieces.
When choosing leather for armor, consider the following materials:
Recommended leather materials
- Vegetable-tanned leather (veg-tan) – Best choice for shaping and hardening armor pieces
- Full-grain cowhide – Durable and strong, commonly used in armor crafting
- Buffalo leather – Slightly thicker and tougher, suitable for heavy armor components
- 6–10 oz leather thickness – Ideal range for most armor plates
- Leather straps or lace – Used for connecting armor sections
Many leatherworkers purchase these materials from suppliers such as Tandy Leather, local leatherworking shops, or specialty online retailers that sell armor-grade hides.
Essential Tools for Leather Armor Crafting
Before beginning the leatherworking process, gather the basic tools required. These tools allow you to cut, shape, punch, and assemble armor pieces accurately. While professional leatherworkers may use specialized equipment, beginners can complete most armor projects with a small set of reliable hand tools.
Essential tools for leather armor crafting
- Utility knife or leather cutting knife – Used to cut leather pieces along pattern lines with precision. A sharp blade ensures clean edges.
- Cutting mat – Protects your work surface and helps guide accurate cuts.
- Leather punch or hole punch set – Creates evenly spaced holes for stitching, rivets, and straps.
- Stitching awl – Used to widen holes and guide thread through thick leather layers.
- Rivet setter – Secures metal rivets that hold armor plates and straps together.
- Mallet or leatherworking hammer – Used to strike punches and set rivets without damaging tools.
- Edge beveler – Rounds off sharp leather edges for a clean finish and improved comfort.
- Stitching pony or clamp – Holds leather steady during hand stitching.
With these tools prepared, you can begin designing and constructing the armor pieces.
Designing Your Leather Armor Pattern
A well-designed pattern ensures that leather armor fits properly and allows for comfortable movement. Before cutting any leather, plan the armor’s shape, measurements, and connection points.
Begin by taking accurate body measurements, focusing on areas where armor pieces will sit. For example, measure the chest for a cuirass, the forearm for bracers, the shoulders for pauldrons, and the lower leg for greaves. These measurements will determine the dimensions of each armor plate.
Next, sketch the armor design on paper or cardboard templates. Templates allow you to test proportions and make adjustments before committing to leather. Many armor makers also study historical references or LARP armor designs for inspiration and structural ideas.
Mobility should be a priority during the design phase. Armor plates should overlap or connect with straps in ways that allow natural movement of the arms, shoulders, and torso. Areas around joints—such as elbows and shoulders—often require smaller segmented plates.
Before transferring patterns to leather, test the templates by taping or holding them against your body. This quick-fitting process helps identify sizing or flexibility issues and ensures the final armor is functional and comfortable to wear.
Dig Deeper: Cutting leather flawlessly
Cutting the Leather Pieces
Once the armor pattern is finalized, the next step is transferring the design onto the leather and carefully cutting each piece. Precision at this stage ensures the armor components align properly during assembly.
Place the pattern templates on the leather surface and trace their outlines using a pencil, stylus, or leather marking tool. Position the templates effectively to minimize material waste while preserving the hide’s natural grain direction.
Use a sharp utility knife or leather cutting knife to cut along the marked lines. Clean, controlled cuts are essential because uneven edges can affect how armor pieces fit together. Always cut on a stable cutting mat and apply steady pressure rather than forcing the blade through the leather.
Work slowly around curved edges and detailed sections of the pattern. For tighter curves, small controlled cuts can help maintain accuracy.
After cutting all pieces, inspect each component for rough edges or irregular shapes. At this stage, minor adjustments can still be made before shaping and hardening the leather in the next step of the armor crafting process.
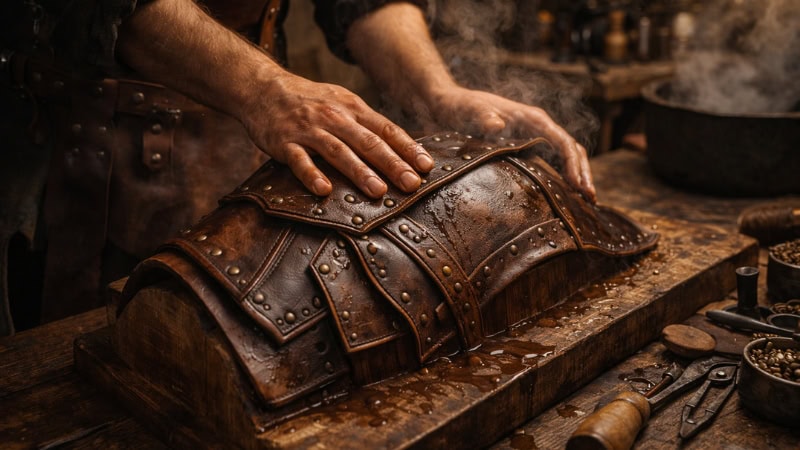
Shaping and Hardening the Leather
After cutting the leather pieces, the next step is to shape and harden them so they can serve as protective armor plates. One of the most traditional methods used by armor makers is cuir bouilli, a historical leather hardening technique that increases rigidity while allowing the leather to hold complex shapes.
The cuir bouilli process begins by soaking the vegetable-tanned leather in warm water for a short period. As the leather absorbs water, it becomes flexible and easier to mold. Once softened, the leather pieces can be shaped over forms, molds, or even directly on body-safe templates to create the curves needed for armor components such as chest plates, shoulder guards, and bracers.
After shaping, controlled heat is applied to help the leather harden. This can be done using warm air, moderate oven heat, or natural drying in a well-ventilated area. As the leather dries, it stiffens and retains the molded form, producing a rigid armor plate.
When shaping armor, it is important to work gradually. Overheated leather can cause excessive shrinking or cracking, which weakens the material. Many armor makers also apply gentle pressure during drying to maintain smooth curves and defined edges.
Once fully hardened, the leather becomes significantly stronger and ready for punching, stitching, and final assembly.
Punching Holes and Assembling the Armor
Once the leather has hardened and retained its shape, the individual pieces can be prepared for assembly. Proper hole placement and secure fasteners ensure the armor remains durable during movement and repeated use.
Begin by marking stitch lines and connection points using a ruler or leather marking tool. Consistent hole spacing improves both the appearance and the structural integrity of the armor.
Next, use a leather punch or hole punch set to create holes along the marked lines. These holes will be used for stitching, attaching rivets, or securing straps and buckles. A mallet is typically used to drive the punch cleanly through thick armor-grade leather.
Armor pieces can be connected using two common methods:
Common armor assembly methods
- Saddle stitching – A strong hand-stitching technique using two needles that creates durable seams.
- Copper or brass rivets – Metal fasteners that permanently secure overlapping armor plates.
- Leather straps and buckles – Allow armor pieces to be worn and adjusted comfortably.
- Lacing – Flexible leather cord used to connect segmented armor sections.
During assembly, ensure that moving areas such as shoulders or elbows retain flexibility. Proper spacing between plates helps the armor remain protective while still allowing natural movement.
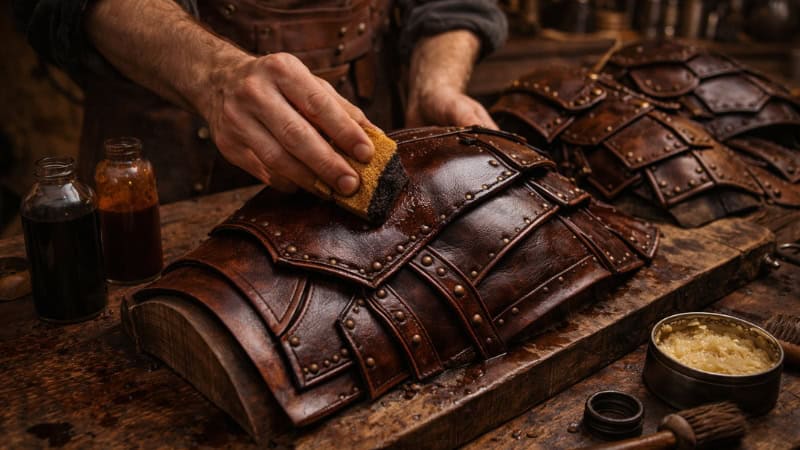
Dyeing and Sealing the Leather Armor
After the armor pieces are assembled, finishing the leather improves both appearance and durability. Dyeing and sealing the leather protects it from moisture, wear, and environmental damage.
Leather armor can be colored using oil-based or water-based leather dyes. Oil-based dyes typically penetrate deeper and produce richer colors, while water-based dyes are easier to control and clean. Popular products such as Fiebing’s Leather Dye are commonly used by leatherworkers because they provide consistent coverage and long-lasting color.
Apply dye using a sponge, cloth, or wool dauber, working evenly across the surface. Multiple light coats often produce a smoother, more natural finish than a single heavy coat.
Once the dye has dried, the leather should be sealed and conditioned. Finishing treatments help maintain flexibility while protecting the surface from cracking.
Common leather finishing treatments
- Beeswax finish – Adds water resistance and a subtle sheen
- Leather conditioner – Restores natural oils and prevents drying
- Protective leather sealant – Helps preserve color and surface durability
A proper finish ensures the armor remains both attractive and functional over time.
Fitting and Adjusting the Armor
A proper fit ensures leather armor provides both protection and mobility. After assembling the armor, take time to test how it sits and moves on your body before using it in any activity.
Initial Fit Check
Wear the full armor set and observe how it rests on the shoulders, chest, and arms. The armor should feel secure without sliding or shifting. Pay particular attention to areas around the shoulders, elbows, and waist, where unrestricted movement is essential.
Strap and Buckle Adjustments
Most leather armor uses straps, buckles, or lacing systems to control fit. Adjust these gradually until the armor sits firmly against the body without feeling restrictive. Balanced strap tension keeps armor plates aligned and prevents uneven pressure.
Comfort and Reinforcement
If certain areas create pressure points, add soft padding or leather lining beneath the armor. Reinforcing stress points—especially where straps attach—using additional rivets or stitching can also improve durability and overall fit stability.
Maintaining Leather Armor for Longevity
Leather armor can last for many years when it is cleaned, conditioned, and stored properly. Regular care prevents cracking, mold growth, and structural weakening.
Routine Cleaning
After use, wipe the armor with a soft dry cloth to remove dust, sweat, or dirt. For deeper cleaning, use a slightly damp cloth or a mild leather cleaner. Avoid soaking the leather or using harsh chemicals that may damage its surface.
Conditioning the Leather
Leather naturally loses oils over time, which can lead to dryness and cracking. Apply leather conditioner or leather balm occasionally to restore moisture and maintain flexibility. Conditioning also helps preserve the armor’s finish and color.
Proper Storage
Store leather armor in a cool, dry environment away from direct sunlight and humidity. Hanging armor pieces or placing them on padded surfaces helps them retain their shape. Periodically inspect straps, rivets, and stitching to catch small repairs early.
Frequently Asked Questions About Crafting Leather Armor
How long does leather armor last?
Well-maintained leather armor can last many years or even decades. Durability depends on leather quality, proper hardening, and routine maintenance such as conditioning and correct storage.
What type of leather is best for making armor?
Vegetable-tanned leather is the best choice for armor crafting. It responds well to shaping, tooling, and hardening techniques, such as the cuir bouilli process. Most armor makers use leather between 6 oz and 10 oz in thickness, which provides a good balance of rigidity and workability.
Is leather armor actually protective?
Leather armor offers moderate protection against cuts, scrapes, and light impacts. While it cannot match the strength of steel plate armor, properly hardened leather can absorb shock and reduce injury during activities like LARP, stage combat, or reenactments.
Can beginners craft leather armor at home?
Yes. Many beginners successfully create simple armor pieces such as bracers, belts, or shoulder guards with basic leatherworking tools. Starting with smaller projects helps develop skills before attempting complex armor like cuirasses.
Do you need to harden leather for armor?
Hardening is recommended for structural armor pieces. The cuir bouilli method increases stiffness and helps leather maintain a protective shape.
Final Thoughts on Crafting Your Own Leather Armor
Crafting leather armor is both a practical skill and a creative craft. By understanding leather types, gathering the right tools, designing accurate patterns, and carefully shaping and assembling each component, you can produce armor that is durable, functional, and visually impressive.
The process also allows for extensive customization. Armor makers often experiment with decorative tooling, dye patterns, embossing, and layered designs to create unique pieces suited to their specific needs. Over time, experience improves precision and efficiency, making it easier to tackle more complex armor sets.
Whether you are building gear for LARP, cosplay, reenactment, or personal craftsmanship, handmade leather armor offers a rewarding project that combines history, craftsmanship, and creativity. With patience and consistent practice, each project will sharpen your leatherworking skills and produce armor built to last.
