
Creating a leather key holder is a simple yet rewarding leathercraft project that blends functionality with craftsmanship.
A DIY leather key holder is more than just a practical accessory—it is an introduction to the world of leatherworking and handmade everyday carry items. Many people struggle with loose keys that create noise, pocket bulk, and even damage to phones or wallets. A compact leather key holder solves this by organizing keys neatly while adding durability and style.
For beginners, this project offers an easy starting point that requires minimal materials and basic tools. For hobbyists, it opens the door to experimenting with leather types, hardware, stitching techniques, and finishes. Over time, a well-made leather accessory develops a natural patina, making it uniquely personal. By crafting your own key holder, you not only gain useful leathercraft skills but also create a long-lasting everyday carry item that reflects both practicality and handmade quality.
What Is a Leather Key Holder?
A leather key holder is a compact organizer that keeps keys secure, quiet, and pocket-friendly.
Definition and Core Function
A leather key holder is a small leather accessory used to organize and protect keys. Instead of letting keys hang loosely on a traditional key ring, the holder keeps them aligned or enclosed within a leather structure. This helps reduce noise, prevents scratching inside pockets, and keeps keys easier to access.
Leather key holders are commonly used in minimalist everyday carry (EDC) setups because they streamline how keys are stored and carried.
Related Key Organization Accessories
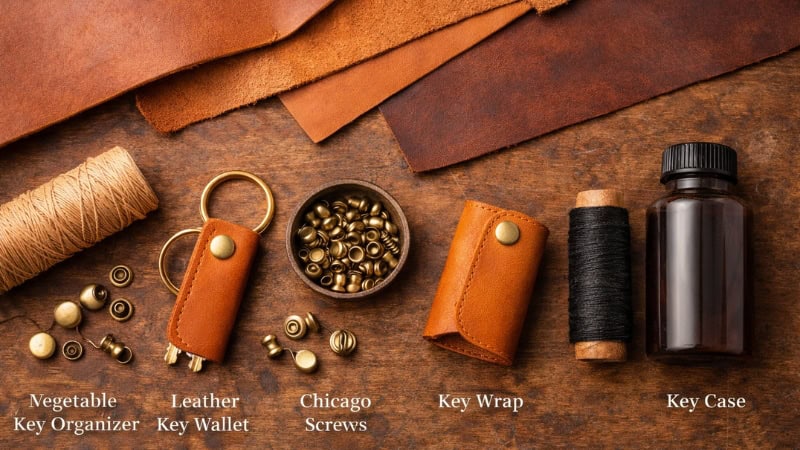
Several accessories fall within the same category as leather key holders. These include:
- Key organizer – stacks keys neatly using screws or rivets
- Key wallet – encloses keys inside a small leather pouch
- Key case – often includes snap closures and internal hooks
- Key wrap – folds leather around keys to reduce bulk
A leather key holder typically combines the simplicity of a key organizer with the protection of a small leather case.
Why Leather Is Ideal for Key Holders
Leather remains one of the most preferred materials for handmade accessories because of its durability and visual appeal. Full-grain leather and vegetable-tanned leather are especially popular in leathercraft because they resist wear and age beautifully.
When paired with hardware such as brass key rings, Chicago screws, or stainless steel rivets, a leather key holder becomes a long-lasting accessory that improves in appearance over time.
Benefits of Making Your Own Leather Key Holder
Crafting your own leather key holder offers personalization, durability, and a chance to develop practical leatherworking skills.
Personalization and Design Freedom
DIY leathercraft allows you to create an accessory that fits your personal style. You can choose the leather type, thickness, color, stitching pattern, and hardware finish. Whether you prefer a minimalist key organizer, a foldable key wrap, or a snap-closure key case, the design possibilities are flexible.
Customization also allows you to match the key holder with other handmade leather items such as wallets, belts, or bags.
Durability and Quality Control
Many factory-made key organizers use synthetic materials or thin leather layers. When making your own key holder, you can select full-grain leather, vegetable-tanned leather, and solid brass hardware, which significantly increases durability.
A well-crafted leather key holder can withstand daily use while maintaining its structure and strength.
Learning Valuable Leathercraft Skills
This project introduces several core leatherworking techniques, including:
- Measuring and cutting leather
- Punching holes for hardware
- Installing rivets or Chicago screws
- Basic leather edge finishing
- Optional saddle stitching
Because it is a small project, mistakes are manageable and learning is quick. For many beginners, a DIY leather key holder becomes the first step into the broader craft of handmade leather goods.
Essential Tools for DIY Leathercraft (Leather Key Holder Project)
A few basic leatherworking tools are enough to complete a durable and professional-looking leather key holder.
Basic Cutting and Measuring Tools
Before starting any leather project, accurate measurement and clean cuts are essential. Proper cutting tools help prevent uneven edges and wasted material.
Common tools include:
- Utility knife or rotary cutter – used for precise leather cutting
- Steel ruler – ensures straight cuts and accurate measurements
- Self-healing cutting mat – protects work surfaces and improves cutting control
These tools allow you to shape your leather template and prepare the pieces needed for the key holder.
Hole Punching and Assembly Tools
Since a leather key holder requires hardware such as rivets or screws, holes must be punched cleanly through the leather.
Common punching tools include:
- Rotary leather punch – adjustable punch for different hole sizes
- Leather hole punch set – used with a mallet for precise holes
- Rubber or wooden mallet – provides controlled force when punching leather
Clean holes ensure proper alignment when installing hardware like Chicago screws or rivets.
Stitching and Finishing Tools
While some key holders rely only on hardware, others include stitching for additional strength and style.
Helpful stitching and finishing tools include:
- Leather stitching needles – blunt needles designed for thick materials
- Waxed thread – strong thread used for saddle stitching
- Edge beveler – rounds off sharp leather edges
- Burnishing tool – smooths and polishes the leather edges
These tools help elevate a simple DIY project into a well-crafted leather accessory.
Materials Required for a Leather Key Holder
Selecting the right leather and hardware ensures the key holder remains durable, attractive, and functional.
Leather Material
The most important component is the leather itself. Small accessories typically require thin yet sturdy leather that folds easily while maintaining strength.
Recommended options include:
- Vegetable-tanned leather – ideal for crafting and easy to shape
- Full-grain leather – strongest and most durable leather type
- Top-grain leather – smoother surface with good durability
For most key holders, leather thickness between 2 oz and 4 oz (0.8–1.6 mm) works best because it balances flexibility and strength.
Hardware Components
Hardware keeps the keys secure and determines how the key holder opens or closes.
Common hardware pieces include:
- Brass key ring – holds the keys securely
- Chicago screws – allow keys to rotate or stack neatly
- Rivets – permanent hardware used for simple designs
- Snap buttons – create foldable key holder closures
Solid brass or stainless steel hardware is preferred because it resists rust and maintains strength over time.
Leather Finishing Supplies
Finishing materials improve the appearance and lifespan of the leather.
Useful finishing supplies include:
- Leather dye – adds color and customization
- Leather conditioner – prevents dryness and cracking
- Beeswax or Tokonole – used for edge burnishing and polishing
These materials help protect the leather and give the final key holder a refined look.
Understanding Leather Types for Key Holders
Choosing the right leather type ensures your key holder remains durable, functional, and visually appealing over time.
Full-Grain Leather
Full-grain leather is considered the highest quality leather because it comes from the top layer of the hide and retains the natural grain. This structure gives it exceptional durability and strength, making it ideal for everyday accessories like key holders.
One of the defining characteristics of full-grain leather is its ability to develop a patina. With regular use, the leather gradually darkens and gains a rich, unique character that reflects how the item is handled and carried. Because of this aging quality, full-grain leather is widely used in premium handmade leather goods.
Top-Grain Leather
Top-grain leather is the second-highest quality grade and is slightly processed to remove surface imperfections. The outermost layer of the hide is sanded and refined, creating a smoother and more uniform appearance.
While it does not develop patina as dramatically as full-grain leather, top-grain leather still offers strong durability and a clean aesthetic. This balance between appearance, strength, and affordability makes it a common choice for smaller leather accessories and beginner leathercraft projects.
Vegetable-Tanned vs Chrome-Tanned Leather
Leather can also be categorized by the tanning process used to treat the hide. The two most common methods are vegetable tanning and chrome tanning.
Vegetable-tanned leather is processed using natural plant tannins and is highly favored in traditional leathercraft. It is firm, easy to cut, and responds well to techniques like stamping, burnishing, and molding. Over time, it develops a warm patina that adds character to handmade accessories.
Chrome-tanned leather, on the other hand, is treated with chromium salts during the tanning process. This produces a softer and more flexible material that is commonly used in clothing and upholstery. While comfortable and pliable, chrome-tanned leather can be harder to shape and finish during small leathercraft projects.
For a DIY leather key holder, vegetable-tanned leather is typically the best choice because it offers better structure, easier craftsmanship, and a more attractive aging process.
Step-by-Step Guide to Making a DIY Leather Key Holder
This step-by-step process walks you through designing, assembling, and finishing a durable handmade leather key holder.
Step 1: Designing the Pattern
Before cutting the leather, start by creating a simple pattern that defines the size and layout of your key holder. Most minimalist key holders use a rectangular strip of leather that folds over the keys or holds them around a central screw.
Use a paper template or cardboard pattern first. This allows you to test measurements and key spacing before working with leather. Typically, a leather strip between 3–4 inches long and about 1 inch wide works well for compact key organizers.
Mark the locations where holes will be punched for hardware such as Chicago screws, rivets, or snap buttons. Proper spacing ensures the keys rotate smoothly and the holder stays balanced when closed.
Step 2: Cutting the Leather
Once the template is finalized, place it on the leather and trace the outline using a scratch awl or light marking tool.
Cut the leather carefully using a utility knife or rotary cutter along a metal ruler. Clean, straight cuts are important because uneven edges become more noticeable after finishing.
Cut slowly with controlled pressure rather than forcing the blade. If necessary, make multiple light passes to maintain precision. After cutting, check the edges and trim any rough areas to keep the shape symmetrical.
Step 3: Punching the Holes
Next, create the holes required for hardware installation. Accurate hole placement ensures the keys align properly and rotate smoothly within the holder.
Place the leather on a cutting mat or punching surface and use a rotary punch or leather hole punch to create the holes you marked earlier. A mallet may be used with traditional punch tools for clean results.
Ensure the hole size matches the hardware you plan to use, whether it is a Chicago screw, rivet, or snap fastener. Misaligned holes can cause the keys to sit unevenly, so double-check placement before punching.
Step 4: Installing the Hardware
With the holes prepared, install the hardware that will hold the keys together.
Slide the keys onto the Chicago screw post or rivet, placing them between the leather layers if your design folds over. Then secure the screw cap or rivet to lock the keys in place.
Chicago screws are popular because they allow the keys to pivot smoothly and can be adjusted later if needed. Rivets create a more permanent connection and are often used in simpler designs.
Ensure the hardware is tightened properly so the keys remain secure but still rotate comfortably.
Step 5: Stitching (Optional)
Some leather key holder designs include stitching to strengthen the structure or add decorative detail.
If stitching is required, punch evenly spaced holes along the stitching line using a stitching chisel or awl. Then sew the leather using saddle stitching with waxed thread, which is one of the strongest traditional leathercraft stitching methods.
Saddle stitching uses two needles that pass through each hole from opposite sides, creating a durable stitch that remains intact even if one thread segment breaks.
While optional for simple designs, stitching can enhance both durability and visual appeal.
Step 6: Finishing the Leather
The final step is finishing the leather edges and surface to give the key holder a polished appearance.
Start by lightly beveling the edges using an edge beveler, which removes sharp corners and creates a rounded profile. Next, apply a small amount of water, beeswax, or burnishing gum such as Tokonole to the edges.
Rub the edges with a burnishing tool or cloth until they become smooth and glossy. This process seals the leather fibers and improves durability.
You can also apply leather dye or conditioner to enhance color and protect the material. Once finished, your DIY leather key holder is ready for everyday use and will gradually develop character as it ages.
Design Variations of Leather Key Holders
Different design styles allow you to tailor a leather key holder to your everyday carry needs and personal aesthetic.
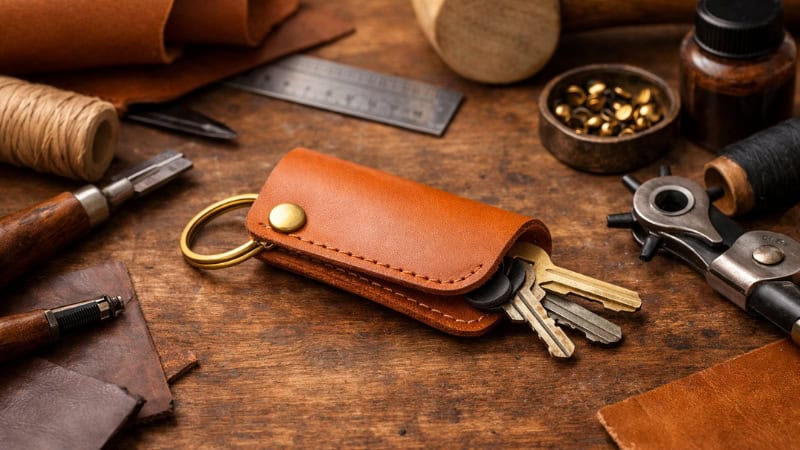
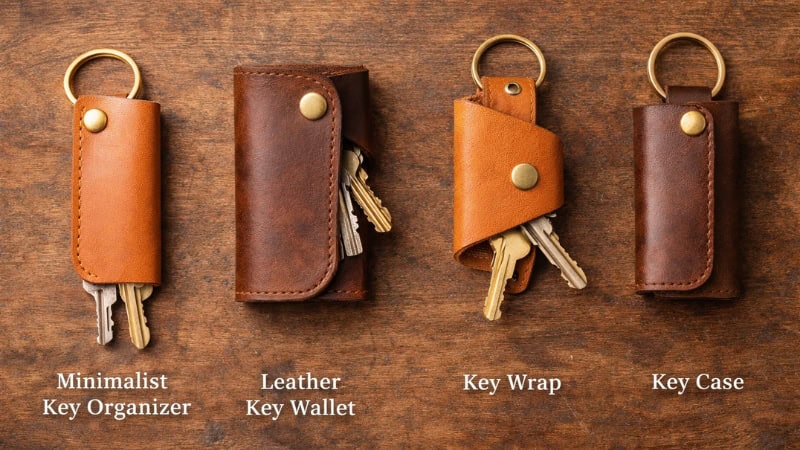
Minimalist Key Organizer
The minimalist key organizer is one of the most common designs used in DIY leathercraft. It typically consists of a small strip of leather secured with a Chicago screw or rivet that holds the keys together in a stacked arrangement. This design keeps keys compact and prevents them from jangling inside a pocket.
Because of its simple construction, the minimalist organizer is ideal for beginners. It requires fewer materials and can be completed quickly while still producing a sleek and durable accessory.
Foldable Key Holder
A foldable leather key holder uses a larger leather piece that wraps or folds around the keys. This style helps conceal the keys and prevents them from scratching items such as phones or wallets in your pocket.
Most foldable designs use snap buttons or small brass hardware to keep the leather securely closed. The extra coverage also gives the accessory a refined, wallet-like appearance.
Key Wrap or Loop Design
Another popular variation is the leather key wrap, which uses a flexible leather strip that loops around the keys. Instead of stacking the keys on a central screw, this design allows the leather to hold them together while still keeping them easy to access.
Key wraps are often used in minimal everyday carry setups because they reduce bulk while maintaining a natural leather aesthetic.
Leather Key Holder Maintenance & Care
Proper maintenance keeps a leather key holder durable, flexible, and visually appealing for years.
Cleaning the Leather
Leather accessories collect dust, oils, and everyday grime over time. Cleaning should be done gently to avoid damaging the natural fibers.
Use a soft dry cloth or lightly damp cloth to wipe the surface of the leather. Avoid soaking the leather in water, as excessive moisture can weaken the material and cause stiffness.
For deeper cleaning, a small amount of specialized leather cleaner can help remove dirt without stripping natural oils.
Conditioning and Protection
Leather needs occasional conditioning to maintain flexibility and prevent cracking. Applying a leather conditioner or balm every few months helps restore moisture and keep the leather supple.
Natural products such as beeswax-based leather conditioners are commonly used in leathercraft because they nourish the material while adding a slight protective layer.
Preserving Patina and Longevity
One of the most appealing features of leather accessories is their ability to develop patina, a natural aging effect that enhances the color and character of the leather.
Regular use, light conditioning, and avoiding excessive moisture help preserve this aging process. With proper care, a well-made leather key holder can remain functional and attractive for many years.
Common Mistakes Beginners Make
When making a DIY leather key holder, beginners often overlook small details that affect durability and finish quality.
Avoiding these common mistakes can significantly improve the outcome of your leathercraft project.
- Using leather that is too thick or too thin
Leather that is too thick can make folding difficult, while overly thin leather may lack durability. For key holders, leather around 2–4 oz thickness works best. - Misaligned hole punching
If holes are punched unevenly, the hardware may sit crooked and the keys may not rotate smoothly. Always measure and mark hole positions carefully before punching. - Skipping edge finishing
Raw leather edges can look rough and wear down quickly. Burnishing the edges improves durability and gives the accessory a polished appearance. - Overtightening hardware
Chicago screws or rivets should be secure but not overly tight. Excessive tightening can prevent keys from rotating comfortably within the holder.
Expert Tips from Leathercraft Professionals
Experienced leather artisans often rely on a few proven techniques that greatly improve the quality and longevity of handmade leather accessories.
Applying these practical tips can help beginners produce a cleaner, more durable DIY leather key holder.
- Choose quality leather from the start
Professionals often recommend vegetable-tanned full-grain leather for small leather goods. It is easier to cut, shape, and burnish while developing a rich patina with use. - Use sharp cutting tools
A sharp utility knife or rotary cutter creates smoother edges and reduces the need for heavy trimming later. Dull blades tend to stretch or tear leather fibers. - Mark measurements carefully before punching
Leathercraft experts always measure and mark hole placements with precision tools like a steel ruler or wing divider. This prevents uneven hardware placement and improves symmetry. - Practice saddle stitching for durability
When stitching is required, saddle stitching with waxed thread creates one of the strongest seams in leathercraft. It is widely used in traditional handmade leather goods. - Finish edges for a professional look
Burnishing with beeswax or Tokonole smooths the edges and protects the leather fibers, giving the accessory a refined and long-lasting finish.
Craft Your Own Leather Key Holder and Elevate Your Everyday Carry
Making a DIY leather key holder is a practical way to learn leathercraft while creating a durable everyday accessory.
This small project introduces essential leatherworking skills such as cutting, hole punching, hardware installation, and edge finishing. With the right tools, materials, and techniques, even beginners can craft a compact leather key organizer that keeps keys secure and pocket-friendly.
Beyond functionality, handmade leather accessories carry a sense of craftsmanship and individuality. As the leather ages and develops a natural patina, the key holder becomes uniquely personal. By mastering this beginner project, you also build a strong foundation for exploring more advanced leathercraft creations in the future.
