
Of course, it’s satisfying to take a worn-out, damaged item and bring it back to life. My leather steering wheel was a prime example of this. After years of daily use, it had accumulated some visible cracks, fading, and minor scratches.
I decided to fix it myself and did it successfully. And today, I’m going to share the process step-by-step, so you can restore your own leather steering wheel.

Why Leather Steering Wheels Wear Out
Leather is a beautiful material but also quite vulnerable to damage, especially when exposed to daily wear and tear. Over time, I noticed my leather steering wheel getting cracked and faded, and it wasn’t just the age of the car that caused it.
It was a combination of factors – the sun, constant friction from my hands, and even the moisture from my palms – all contributed to its condition. If you’ve noticed similar signs of wear, you’ll understand the frustration of seeing your leather start to deteriorate.
The Common Issues I Faced
The first signs of damage I noticed were small scuffs and scratches, which gradually turned into cracks. The leather started to feel dry and stiff, and the color seemed to fade in some areas, especially where my hands usually rested.
It became clear that repairing it was necessary to restore both the appearance and the comfort of the wheel.
Essential Tools and Materials for Leather Steering Wheel Repair
Before diving into the repair process, I made sure I had all the necessary tools at hand. It’s important not to skip any steps, as using the right materials can make a huge difference in the quality of the repair.
Tools I Used
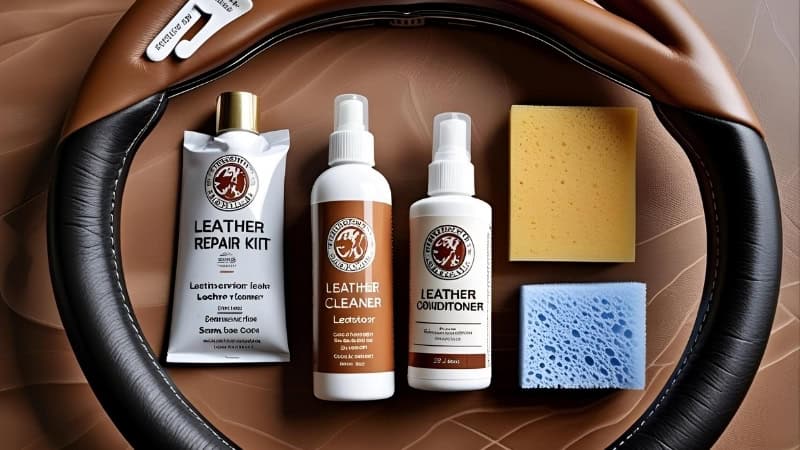
Here’s what I gathered to get started:
- Leather Repair Kit: Most kits come with filler, dye, and sometimes even patches to cover larger damage. It’s a great way to have everything you need in one package.
- Leather Cleaner: This was essential for prepping the surface. Without cleaning the leather thoroughly, the repair wouldn’t adhere properly.
- Leather Dye: For color restoration. I picked a dye that matched my steering wheel’s original color.
- Sponge or Soft Cloth: For applying cleaners and dyes without damaging the surface.
- Leather Conditioner: To protect the steering wheel after the repair is done.
Once I had everything ready, I felt confident to get started.
Step-by-Step Guide to Repairing a Leather Steering Wheel
Here’s how I repaired my leather steering wheel. It took time and patience, but the results were worth it. I’ll walk you through each step in detail.
Step 1: Assessing the Damage
Before jumping into repairs, it was important to first assess the damage. This gave me a better idea of what tools and techniques would work best.
I looked at the leather closely, checking for deep cracks, fading, and any other significant damage. I could see that some of the cracks were shallow enough to be repaired with filler, while others were deeper and would require a more intricate solution, like using leather patches.
Dig Deeper: Best Way to Clean Leather: The Ultimate Leather Cleaning Guide
Step 2: Cleaning the Leather Steering Wheel
The cleaning process was crucial. I used a leather cleaner to remove any dirt, oils, or grime that had built up over the years. If you skip this step, any dirt left on the surface could interfere with the repair materials sticking properly.
I sprayed the cleaner onto a soft cloth and gently wiped down the entire steering wheel. I paid close attention to the areas that showed signs of wear, making sure they were extra clean.
After cleaning, I let the steering wheel air dry for about 20-30 minutes to ensure the surface was completely dry before proceeding to the next step.
Recommended Read: How to Get Black Scuff Marks Off White Shoes
Step 3: Repairing Small Scratches and Scuffs
Once the steering wheel was clean, I moved on to repairing the smaller scratches and scuffs. For this, I used a leather filler, which is typically included in most leather repair kits.
I applied the filler using a small spatula, gently filling in the scratches and smoothing the surface. The key here is to apply the filler in thin layers, allowing each layer to dry before applying the next. If you apply too much at once, it could create a lumpy surface that’s harder to work with.
Once the filler dried completely, I gently sanded the area with a fine-grit sandpaper to smooth it out and ensure a seamless finish.
Step 4: Fixing Cracks in the Leather
Next, I tackled the deeper cracks. These were more challenging but not impossible to fix. I began by applying a leather adhesive along the cracks, ensuring that it seeped into the damaged areas.
For the larger cracks, I used a leather patch that came with my repair kit. I carefully cut the patch to fit the size of the crack and adhered it using the leather glue.
After the glue dried, I used a soft cloth to smooth out the patch, blending the edges with the surrounding leather. This made the patch almost invisible once the repair was finished.

Step 5: Dyeing and Color Restoration
One of the most satisfying parts of the repair process was dyeing the leather. Over time, the color had faded in certain areas, especially where I held the wheel most often.
I used a leather dye that matched the original color of the steering wheel. To apply it, I used a sponge, gently dabbing it onto the surface in small sections. I let each layer of dye dry before applying a second one. This process helped to ensure even coverage and a smooth finish.
Recommended Read: Non-Toxic Leather Conditioner: Safe, Natural, and Effective Leather Care
Step 6: Sealing and Protecting the Leather
After all the repairs were done, I wanted to make sure the leather stayed protected for the long term. I applied a leather conditioner to nourish the leather and keep it soft.
Finally, I used a leather sealer to lock in the color and ensure the repairs wouldn’t wear away quickly. The sealer added a nice finish and a layer of protection against future damage.
How to Prevent Future Damage to Your Leather Steering Wheel
Once the repairs were completed, I didn’t want to go through the process again any time soon. So, I took a few extra precautions to ensure the leather stays in good condition.
Protecting Your Leather Steering Wheel
- Regular Cleaning and Conditioning: I’ve found that cleaning the steering wheel regularly and conditioning it every few months prevents the leather from drying out.
- Using a Steering Wheel Cover: A cover adds an extra layer of protection against the sun and moisture, which are two of the biggest culprits in leather damage.
- Avoiding Direct Sunlight: Leather can crack and fade when exposed to too much sunlight. Whenever possible, I try to park in shaded areas or use a sunshade on the windshield.
When to Seek Professional Help
There were times when I considered taking my steering wheel to a professional. Some of the cracks were deeper than I anticipated, and I wasn’t sure if my DIY methods would be enough to restore the wheel. If you’re in a similar situation, it might be worth getting a professional’s opinion.
If the damage is extensive or you simply don’t have the time or patience to complete the repairs, a professional leather restoration service can offer a more permanent solution.
FAQs on Leather Steering Wheel Repair
Can leather steering wheels be repaired if they’re deeply cracked?
Yes, even deeply cracked leather can be repaired, but it may require additional tools like leather patches or more specialized adhesives. For smaller cracks, leather filler and dye might suffice. If the cracks are too extensive, seeking professional help is recommended for a more permanent fix.
How long does a leather steering wheel repair last?
With proper care, a well-executed repair can last for several years. However, regular cleaning and conditioning are essential to prevent further damage. The longevity of the repair depends on how much wear the steering wheel undergoes after it’s fixed.
Is it worth repairing a damaged leather steering wheel, or should I replace it?
If the damage is minor or moderate, repairing your leather steering wheel is often the most cost-effective and practical solution. In cases of severe damage or structural issues, replacing the wheel may be the better option.
Can I repair the leather myself, or should I hire a professional?
If the damage is relatively small, you can repair the leather yourself using a repair kit. For larger or more complicated damage, like deep cracks or tears, it may be best to consult a professional to ensure the repair is done properly.
How much does it cost to repair a leather steering wheel?
DIY repair kits can cost anywhere from $20 to $50, depending on the brand and the contents. If you hire a professional, the cost can range from $100 to $250, depending on the extent of the damage and the type of service. Professional repair is usually more expensive, but it ensures a high-quality, long-lasting result.
Will repairing my leather steering wheel affect the vehicle’s resale value?
A well-done repair can actually increase the resale value of your vehicle by restoring its appearance and maintaining its condition. On the other hand, an unkempt, damaged steering wheel could decrease the car’s appeal to potential buyers. If you plan to sell your vehicle, repairing visible wear and tear is a smart move.
Give the leather Its Original Beauty Back
Repairing my leather steering wheel was an incredibly rewarding experience. It took a bit of time and effort, but now, my steering wheel looks as good as new. From cleaning and repairing small scratches to dyeing and conditioning, I was able to restore the leather to its original beauty.
If you have a leather steering wheel that’s showing signs of wear, I highly recommend giving it a try. With the right tools, a little patience, and these step-by-step instructions, you can bring your steering wheel back to life.
