
Leather boots are built to last, but daily wear often leaves them scuffed and dull. Whether it’s from rough pavements, accidental scrapes, or harsh weather, scuffs are almost inevitable over time.
The good news is that most scuffed leather boots don’t need replacing. With the right approach, they can be restored to look nearly new while preserving their character.
Learning how to repair scuffed leather boots not only saves money but also extends the life of footwear you already love.
In this guide, you’ll learn practical, step-by-step methods to fix both light and deep scuffs at home.
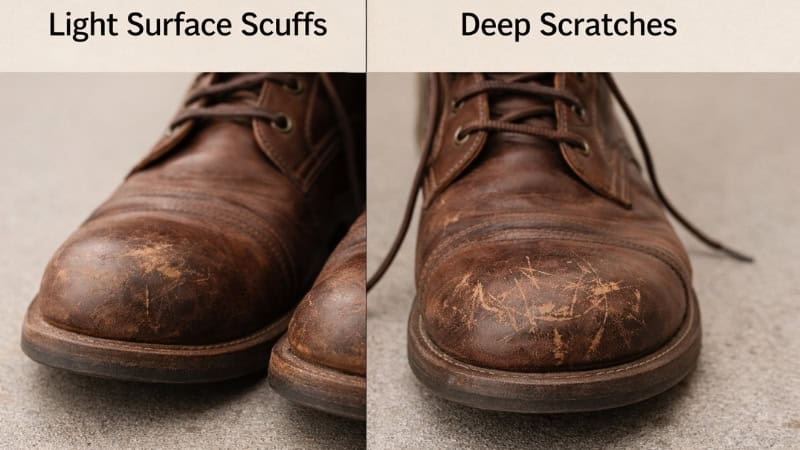
Understanding Leather Scuffs
Scuffs vary in severity, and understanding the type of damage is key before attempting any repair. Not all scuffs require the same solution, and applying the wrong method can worsen the problem.
- Surface scuffs: These are light marks that affect only the top finish of the leather. They usually appear lighter in color and can often be fixed with conditioning or polishing.
- Deep scuffs or scratches: These penetrate the leather’s surface and may feel rough to the touch. Repairing them often requires filler or repair cream.
- Leather type matters: Full-grain and top-grain leather respond well to repairs, while suede or nubuck need specialized care.
- Repair vs. replacement: If the leather is torn or cracked deeply, professional repair is often the better option.
By identifying the scuff type early, you can choose the safest and most effective repair method before moving on to cleaning.
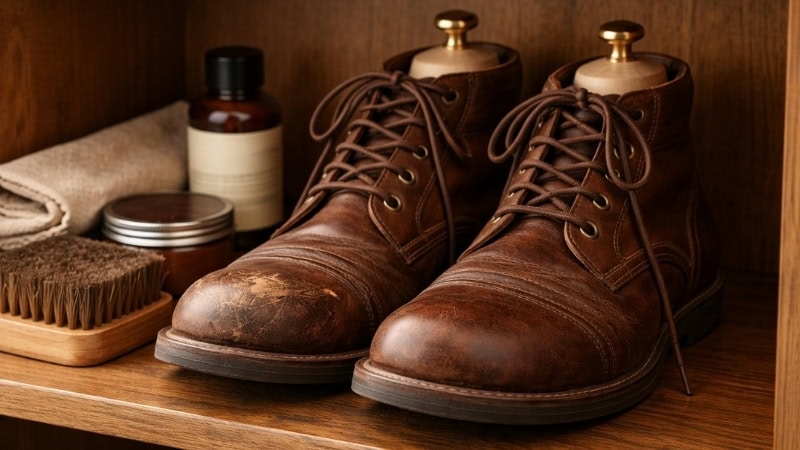
Tools and Materials You’ll Need
Proper tools ensure a smoother repair process and better final results. Using makeshift or harsh products can damage leather permanently.
- Soft microfiber cloths: These prevent scratching during cleaning and buffing.
- Leather cleaner or mild soap: Removes dirt without stripping natural oils.
- Leather conditioner: Restores moisture and flexibility to scuffed areas.
- Matching leather polish or cream: Helps blend color and restore shine.
- Cotton swabs or applicator brush: Useful for precise application on small scuffs.
- Optional fine-grit sandpaper: Only for deep scuffs that require smoothing.
Gathering everything beforehand avoids interruptions and reduces the risk of overworking the leather. Once prepared, the first hands-on step is thoroughly cleaning your boots.
Step 1: Clean the Boots Thoroughly
Cleaning is the foundation of any successful leather repair. Dirt and grime can hide scuffs and interfere with repair products.
- Remove loose debris: Use a dry cloth or soft brush to clear dust and grit.
- Apply leather cleaner: Work gently in circular motions to lift embedded dirt.
- Focus on scuffed areas: Clean them carefully without soaking the leather.
- Dry naturally: Allow boots to air-dry away from direct heat sources.
Skipping this step can cause uneven results or trap dirt under repair products. Once the leather is clean and dry, you can clearly assess the extent of the damage.
Step 2: Assess the Damage
A careful inspection helps determine how aggressive your repair needs to be. Rushing this step often leads to mismatched color or texture.
- Check depth: Run a finger over the scuff to feel if it’s superficial or deep.
- Look for discoloration: Lighter patches often indicate worn finish rather than damaged leather.
- Test a hidden spot: Apply a small amount of product to ensure compatibility.
- Decide on repair method: Light scuffs need conditioning, deeper ones need filler.
Understanding the damage prevents unnecessary sanding or overuse of repair compounds. With a clear plan in place, you can begin restoring lighter scuffs safely.
Step 3: Repair Light Scuffs
Light scuffs are the easiest to fix and often disappear with minimal effort. These repairs focus on restoring moisture and finish.
- Apply leather conditioner: Use a soft cloth and massage it into the scuffed area.
- Let it absorb: Give the leather time to regain its natural oils.
- Buff gently: Circular motions help blend the scuff into surrounding leather.
- Add polish if needed: Match the boot’s color to even out appearance.
Many light scuffs fade completely at this stage, making further repair unnecessary. If marks remain visible or textured, it’s time to address deeper damage.
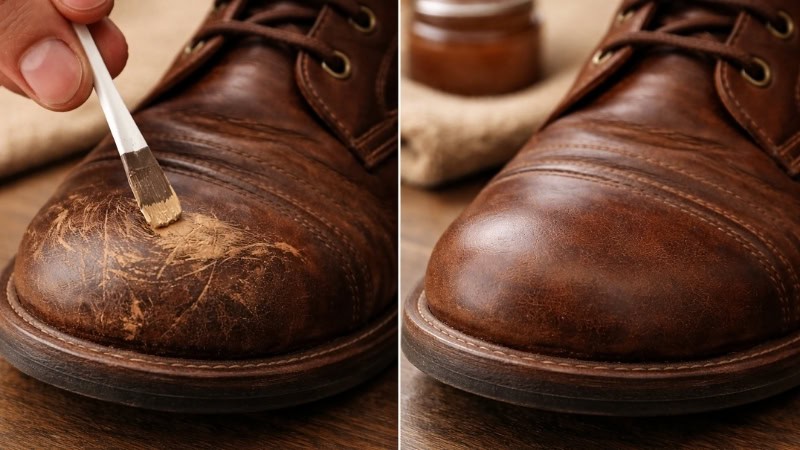
Step 4: Repair Deeper Scuffs and Scratches
Deeper scuffs require more precision and patience. The goal is to rebuild the leather’s surface without creating noticeable patches.
- Light sanding: Use fine-grit sandpaper to smooth raised edges carefully.
- Apply leather repair compound: Spread thin layers using a small applicator.
- Let layers dry: Multiple thin coats work better than one thick layer.
- Blend color: Use polish or cream to match the surrounding leather.
Rushing this step can leave uneven textures or visible repair marks. Once the surface feels smooth and looks even, the final step is restoring shine and protection.
Step 5: Buff and Protect the Leather
Protection ensures your repairs last and helps prevent future scuffs. This step enhances both appearance and durability.
- Buff the entire boot: This creates a uniform finish.
- Apply polish or wax: Adds shine while sealing the leather.
- Allow curing time: Let products set before wearing the boots.
- Optional waterproof spray: Adds extra defense against moisture and dirt.
A proper finish not only improves aesthetics but also strengthens the leather surface. With repairs complete, maintaining your boots becomes the next priority.
Preventing Future Scuffs
Preventive care reduces the frequency and severity of future damage. Small habits can make a noticeable difference.
- Regular cleaning: Prevents grit from acting like sandpaper.
- Condition monthly: Keeps leather supple and resistant to cracking.
- Use shoe trees: Maintains shape and reduces creasing.
- Store properly: Keep boots away from heat and moisture.
Consistent care preserves both comfort and appearance over time. Even with prevention, some scuffs are unavoidable, which raises common questions.
Frequently Asked Questions
Can scuffed leather boots look new again?
Yes, many scuffs can be nearly invisible after proper cleaning and conditioning. Deep scratches may still show slightly but can be greatly improved.
Is leather polish enough to fix scuffs?
For light scuffs, polish can be sufficient and effective. It helps restore color and shine while masking minor abrasions. However, deeper damage usually requires conditioner or repair compound before polishing to ensure the surface is smooth and evenly blended.
Can I use household oils on leather boots?
Household oils may darken or weaken leather over time. It’s best to use products specifically designed for leather care.
How often should I condition leather boots?
Conditioning once every four to six weeks is ideal for regularly worn boots. This keeps leather flexible and resistant to scuffing.
Do scuffs damage the structure of leather boots?
Most scuffs are cosmetic and don’t affect structural integrity. They usually impact only the surface finish of the leather. Deep cuts, however, may weaken leather fibers if left untreated, potentially leading to cracking or tearing over time.
Is professional repair worth it for expensive boots?
Yes, professional repair is often worthwhile for high-end or sentimental boots. Cobblers have specialized tools, dyes, and fillers that achieve more seamless results. This is especially valuable for deep scuffs, color mismatches, or luxury leather that requires expert handling.
Bring Your Boots Back to Life
Scuffed leather boots don’t signal the end of their lifespan—they mark the start of restoration. With patience and the right techniques, even worn boots can regain their character and polish.
Regular care turns repairs into simple maintenance rather than major fixes. Each small effort protects your investment and keeps your boots looking sharp.
Treat your leather well, and it will return the favor for years to come.
