
Fake leather—also called faux, PU, or bonded leather—can look great, but it’s prone to peeling, cracking, and surface wear. The good news? Most minor damage can be repaired with simple tools.
Before you toss out a chair or replace a handbag, it’s worth knowing what can realistically be fixed. Many scratches, flakes, and small tears respond well to fillers, patches, and flexible coatings.
In this guide, you’ll learn how to assess the damage, choose the right repair method, and restore worn areas to a smooth, durable finish. With the right steps, faux leather can look refreshed and last much longer.
Understanding Fake Leather Damage
Fake leather doesn’t age the same way real leather does, so the type of damage you see often reveals the repair method you’ll need. Before grabbing a filler or patch, it helps to recognize what’s actually happening on the surface. This section breaks down common issues and how to judge whether a fix is practical.
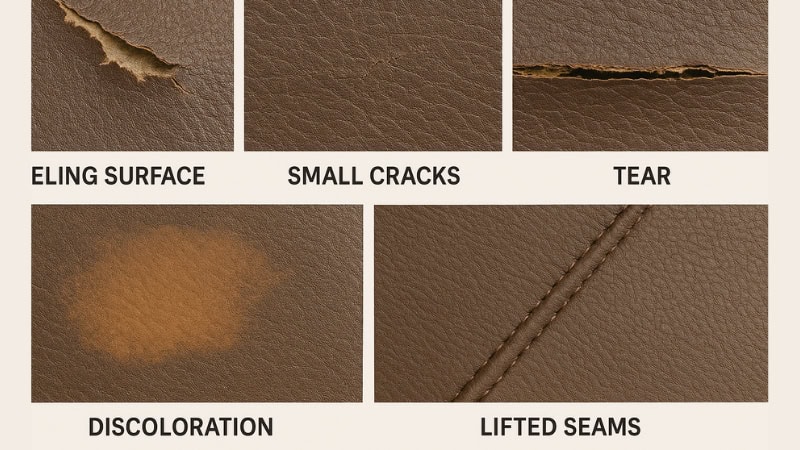
Types of Damage
Different problems require different approaches, so it’s important to identify the damage correctly.
Peeling or flaking topcoat: This happens when the polyurethane layer breaks down, lifting away in thin sheets. The fabric beneath is usually intact, making the surface rebuildable with filler or coating. Left untreated, peeling spreads quickly because the remaining topcoat has already weakened, so early repair prevents further deterioration.
Small cracks: These tiny lines appear when the material dries out or flexes repeatedly. They can often be filled and blended without major reconstruction.
Large tears or punctures: Sharp objects, pets, or stress points can create openings that expose the backing fabric. These usually require a sub-patch and adhesive reinforcement.
Surface discoloration: Sunlight, oils, and friction can fade or darken faux leather unevenly. Color restoration or repainting is the primary fix here.
Lifting seams or edges: Adhesive failure or tension can cause edges to curl or separate. Re-gluing with a flexible adhesive typically restores stability. If ignored, lifting edges often widen and destabilize nearby material, making a once-simple re-glue job much more complex.
Assessing Repairability
Before repairing, decide whether the material can realistically be restored.
Base fabric condition: If the underlying mesh or cloth is still solid, repairs will adhere well. Weak or crumbling backing often means the item is near the end of its lifespan. A strong foundation is essential because all fillers, coatings, and patches depend on the backing to grip properly and stay durable over time.
Patching vs. filling: Cracks and flakes respond well to filler, while holes or gaps need structural support from a patch. Matching the method to the damage ensures a cleaner finish. Choosing the correct technique prevents visible seams, premature cracking, and failures that occur when the repair material can’t properly support or blend with the damaged area.
Knowing when to replace: When peeling covers more than half the surface or the backing is exposed across large areas, repairs may only be temporary. In these cases, reupholstery or replacement is usually the smarter, longer-lasting option.
Tools and Materials You May Need
Before starting any repair, it helps to gather the right tools so the process goes smoothly. Faux leather responds best to flexible, fabric-safe products, and using the proper materials can dramatically improve your final results.
- Faux leather repair kits — pre-packaged sets containing fillers, colorants, and texturing tools designed specifically for PU surfaces
- Leather filler or compound — a flexible paste used to rebuild lost material and smooth over cracks or worn spots
- Fabric glue or flexible adhesive — strong, bendable bonding agents ideal for reattaching lifted edges or securing backing patches
- Fine-grit sandpaper — lightly abrasive paper for leveling filler and feathering rough edges without damaging the base fabric
- Scissors or a utility knife — for trimming loose flakes, shaping patches, and creating clean repair lines
- Color-matching repair paint — water-based pigments formulated to bond with faux leather and restore a uniform finish
- Heat tools (optional) — low-heat devices included in some kits to help cure filler or imprint texture
- Patch fabric (vinyl or PU) — thin, flexible material placed behind or over tears to reinforce structure
- Cleaning supplies (mild soap, isopropyl alcohol, microfiber cloth) — gentle cleaners that remove oils and debris to ensure adhesives and fillers bond properly
Step-by-Step Repair Methods
Faux leather repair is most successful when you match the technique to the type of damage. Each issue—peeling, cracking, tearing, or general wear—requires a slightly different approach to ensure the repair blends smoothly. The following methods break down the best practices for restoring structure, color, and durability.
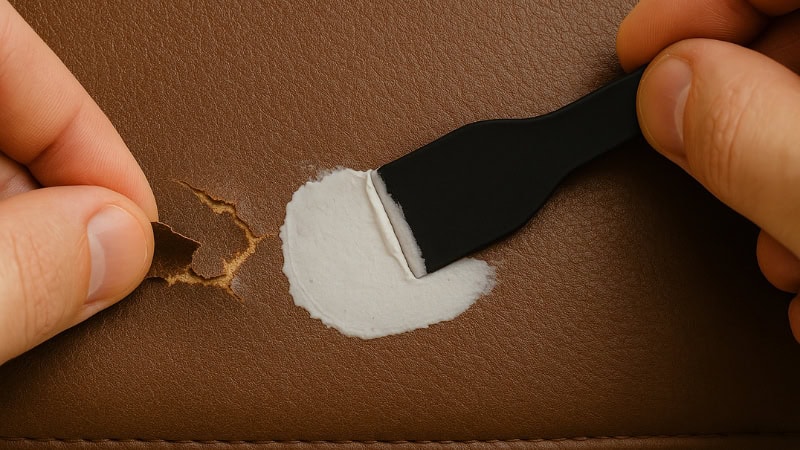
How to Repair Peeling or Flaking Fake Leather
Peeling happens when the top polyurethane coating lifts away, so the goal is to remove loose material and rebuild a smooth surface that bonds securely.
Cracks show where the synthetic coating has stressed or dried, and filling them prevents spreading while restoring a clean, cohesive surface. Tears compromise the fabric layer beneath the coating, so a backing patch is essential to restore stability before cosmetic repairs. Bald spots occur when friction erodes the topcoat, so rebuilding the coating and recoloring the area helps restore a uniform look. When damage covers a wide area or the material feels brittle, repairs become less about spot-fixing and more about structural restoration. In these cases, you may need to consider broader solutions that balance cost, appearance, and long-term durability. Large panels that are peeling in multiple places or have deep cracks often can’t be restored convincingly because the synthetic coating is failing across the surface. Replacing just the affected panel—such as a seat cushion or backrest—can provide a clean, uniform look without replacing the entire piece. If the faux leather is deteriorating everywhere, reupholstering may be the most practical long-term fix, especially for valuable furniture. A professional can remove the old material, repair padding or structure if needed, and apply new vinyl or faux leather for a like-new result. For budget-friendly or temporary solutions, slipcovers or adhesive vinyl wraps can cover extensive damage without major work. These options hide imperfections quickly and can extend the use of an item while avoiding the cost of full reupholstery. A smooth, natural-looking repair comes down to patience, thin layers, and attention to detail, all of which help the restored area blend into the original faux leather. Long-term care is essential because faux leather relies on a delicate synthetic coating that can break down quickly without the right maintenance habits. Avoiding these frequent errors can drastically improve repair outcomes and help your faux leather last longer without repeated fixes. When deciding whether to repair or replace faux leatherf, understanding the cost differences helps you make a choice that fits both your budget and expectations. Prices vary widely depending on damage severity, materials, and whether you choose DIY or professional services. DIY repair is typically the most affordable route, with most faux leather repair kits costing between $10 and $30 and additional fillers, patches, or colorants keeping the total under $50. This makes DIY ideal for smaller issues like cracks, surface peeling, or minor tears, especially if you’re willing to invest the time needed for careful layering and blending. Professional repairs usually range from $60 to $150 for small sections and can exceed $200 for extensive refinishing, reflecting the specialized tools and expertise involved. This option is best when you need a high-quality, seamless finish or when the repaired area must match surrounding panels perfectly. Replacing individual faux leather panels typically costs between $150 and $400, depending on size and material, making it more appropriate for large, heavily damaged areas. Entire reupholstery jobs can reach several hundred dollars to over a thousand, especially for complex furniture or high-grade vinyl. Replacement becomes the better option when deterioration is widespread, making spot repairs impractical. In these cases, replacing the material ensures consistency and longevity that repairs alone can’t achieve. DIY is ideal when the damage is limited, the base fabric is intact, and you’re comfortable taking the time to blend color and texture. It’s also the best option for inexpensive items where professional repairs would exceed the value of the piece. However, if a large area is peeling, the coating feels brittle, or the furniture holds sentimental or high monetary value, professional work or replacement may offer better long-term results. Ultimately, the decision depends on how much time, money, and effort you want to invest—and how perfect you need the final look to be. This recap gives you a fast, scannable summary of the most important lessons from the guide. Use it as a quick reference whenever you need to troubleshoot damage or decide on the right repair approach. Repairing fake leather isn’t just possible—it’s often surprisingly effective. With the right tools and a little patience, even peeling or cracked surfaces can be restored to a smoother, cleaner finish. Small cracks and worn spots respond well to DIY methods, making quick fixes both affordable and accessible for beginners. These minor repairs often extend the life of furniture, bags, and car interiors without major investment. For bigger jobs, professional services or full replacement may be the smarter long-term move. When the material is failing across large areas, restoring the entire panel or reupholstering ensures durability and a uniform appearance. Ultimately, the best option depends on your budget, expectations, and how much effort you’re willing to invest. With a clear understanding of repair methods and limitations, you can confidently choose the path that brings your faux leather back to life.
How to Fix Small Cracks
How to Repair Tears or Holes
How to Restore Worn or Bald Spots

Repairing Large-Scale or Severe Damage
When to Replace Entire Panels
Reupholstery Options
Using Slipcovers or Vinyl Wraps as Alternatives
Tips for Achieving a Seamless Finish
Preventing Fake Leather From Peeling Again
Common Mistakes to Avoid
Cost Comparison: Repair vs. Replace
DIY Repair Costs
Professional Repair Costs
Full Replacement Costs
When DIY is Worth It—and When It Isn’t
Quick Recap: What You Learned About Repairing Fake Leather
The Final Verdict: Your Faux Leather Can Look New Again
