
There’s a point in every rider’s journey when reins stop being equipment and start becoming communication.
Split reins—a staple of Western riding—don’t mask inconsistency. They reveal it. That’s exactly why trainers and riders use them for precision, softness, and better signal timing.
Learning how to make split reins isn’t just a DIY project. It’s a way to understand leather behavior, rein weight, balance, and responsiveness—the same variables that shape how your horse interprets every cue.
From a training and recovery perspective, small details matter. The right length, leather type (latigo or harness), and conditioning can improve clarity, reduce tension, and create more consistent contact.
In this guide, you’ll learn how to make split reins step by step—while building a tool that supports clearer communication, better control, and long-term durability.

What Are Split Reins? – Quick Answer
Split reins are two separate, unattached leather straps used primarily in Western riding. Unlike loop reins, they allow independent movement of each side, giving the rider more nuanced control, clearer cues, and the ability to adjust length fluidly—even mid-ride.
From the saddle, they feel less like equipment and more like an extension of your hands. There’s a quiet conversation happening through them—pressure, release, timing. And split reins translate that conversation with remarkable clarity.
For riders coming from recovery work—whether rehabbing a horse or rebuilding your own feel—this independence matters. Each rein becomes its own signal channel, allowing you to correct imbalance without overcorrecting the whole system.
Why Make Your Own Split Reins? (Cost, Customization, Performance)
You can buy split reins. Plenty of good ones exist. But making your own? That’s where things shift from ownership to craftsmanship.
A decent pair of store-bought reins can run anywhere from $40 to $150+. But the real limitation isn’t price—it’s compromise. Pre-made reins are built for the “average rider,” the “average horse,” and the “average feel.” None of which truly exist.
When you make your own, you control:
- Length that matches your arm reach and riding discipline
- Weight that influences signal timing (heavier reins = slower, steadier communication)
- Grip feel—slick, tacky, or somewhere in between
From a trainer’s perspective, especially in recovery scenarios, customization becomes more than preference—it becomes a tool. A slightly heavier rein can help stabilize inconsistent hands. A softer leather can forgive tension while you rebuild timing.
And then there’s the intangible part:
When you ride with something you’ve made, you ride differently. More aware. More accountable. Less mechanical.
Materials Needed to Make Split Reins
This is where most beginners either overcomplicate things—or cut corners they shouldn’t.
Think of materials like choosing a horse. Temperament matters. Strength matters. Longevity matters.
Core Material: Leather (Your Foundation)
Not all leather behaves the same under pressure, sweat, and weather.
Best options:
- Latigo leather
Durable, slightly flexible, naturally grippy. Ideal for all-around use. - Harness leather
Heavier, smoother, more polished feel. Preferred for experienced riders who want consistency. - Braided/rawhide
More specialized—beautiful, but less forgiving for beginners.
If you’re rebuilding feel or working with a sensitive horse, latigo is often the safest starting point.
Hardware Components
Keep it simple. Over-accessorizing can interfere with function.
- Chicago screws or ties (for bit attachment)
- Conchos (optional, aesthetic)
- Water loops (traditional attachment method)
Each piece should serve a purpose. If it doesn’t improve balance, durability, or communication—it’s decoration.
Essential Tools
You don’t need a full workshop, but you do need precision.
Basic setup:
- Sharp utility knife or rotary cutter
- Leather punch
- Measuring tape
- Edge beveler (for comfort and finish)
Advanced setup (optional):
- Strap cutter (for consistent width)
- Burnishing tools
- Stitching groover
A Note From the Saddle
Cheap leather saves money upfront—and costs you later in inconsistency, stretching, and even safety.
A rein snapping under pressure isn’t just inconvenient. It’s a breakdown in communication at the worst possible moment.
In training, we talk about “clean signals.” Your materials are the first place those signals are either preserved—or lost.
Transition to Next Phase
Now that you understand what split reins are—and why making them matters—the next step is getting the dimensions right and setting yourself up with the proper tools and structure.
Because even the best leather in the world won’t fix poor sizing or imbalance.
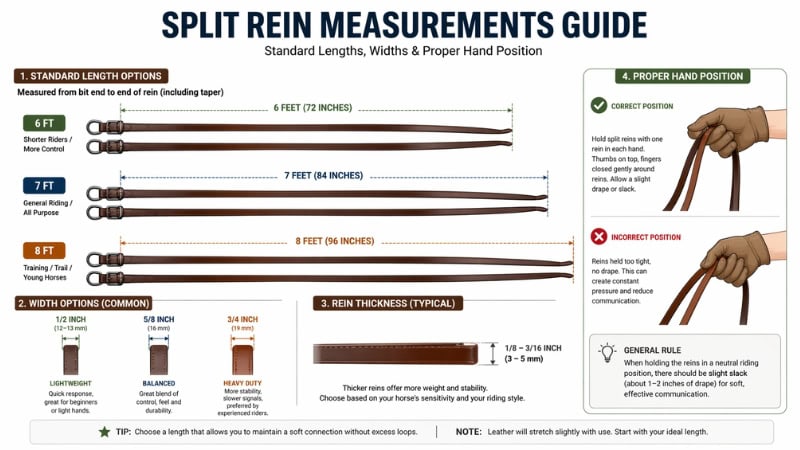
Ideal Split Rein Measurements (Length, Width & Weight)
There’s no universal “perfect” rein length. There’s only what creates balanced communication between your hands and your horse’s mouth.
And that balance shifts depending on your discipline, your horse’s sensitivity, and your own feel.
Standard Length Guidelines
| Rider Type / Use Case | Recommended Length |
| General riding | 7 feet |
| Trail riding | 7.5–8 feet |
| Training/young horse | 8 feet |
| Shorter riders | 6–6.5 feet |
Here’s the nuance most guides miss:
- Longer reins give you room—but demand discipline. Too much slack becomes noise.
- Shorter reins create quicker contact—but can amplify tension if your hands aren’t steady.
From a recovery trainer’s lens, I often recommend slightly longer reins for retraining phases. They give both rider and horse space to make mistakes without immediate escalation.
Width & Thickness (The Feel Factor)
- ½ inch (12–13 mm): Lightweight, responsive, beginner-friendly
- ⅝ inch: Balanced control and durability
- ¾ inch+: Heavier, slower signal delivery, preferred by experienced riders
Think of rein width like tone of voice:
- Thin reins = whisper (quick, sharp cues)
- Thick reins = calm conversation (steady, deliberate cues)
Weight: The Hidden Variable
This is where craftsmanship becomes horsemanship.
Heavier reins naturally:
- Hang straighter
- Reduce accidental signals
- Encourage softer, more deliberate hands
Lighter reins:
- Require more control
- React instantly
- Can magnify inconsistency
If your hands are still learning softness, a slightly heavier rein acts like a stabilizer, much like adding weight to a rehabilitation exercise to slow it down and improve control.
Quick Rule of Thumb
The ideal split rein length allows a soft drape with slight slack when your hands are in a neutral riding position, without excess loop that interferes with clear communication.
Tools Required (Beginner vs Professional Setup)
You don’t need a saddle shop full of tools. But you do need clean cuts and consistency—because uneven reins don’t just look bad… they ride uneven.
Beginner Setup (Minimal, Effective)
If you’re just starting:
- Sharp utility knife
- Measuring tape
- Leather hole punch
- Straight edge or ruler
That’s enough to build functional, safe reins.
But here’s the catch—your margin for error is smaller. Every cut has to be intentional.
Intermediate to Pro Setup (Precision & Efficiency)
When you want consistency across the entire rein:
- Strap cutter (for uniform width)
- Edge beveler (smooths edges for comfort)
- Burnishing tool (polished finish)
- Stitching groover (if reinforcing ends)
These tools don’t just improve aesthetics—they improve feel in the rider’s hands and durability over time.
A Trainer’s Perspective
In recovery work, we often say:
“Clarity beats complexity.”
The same applies here.
A perfectly cut rein with basic tools will always outperform a poorly executed rein made with expensive equipment.
Step-by-Step: How to Make Split Reins (Start of Build Process)
Now we begin the actual build—the part where intention meets material.
Don’t rush this.
Leather remembers every mistake you make.
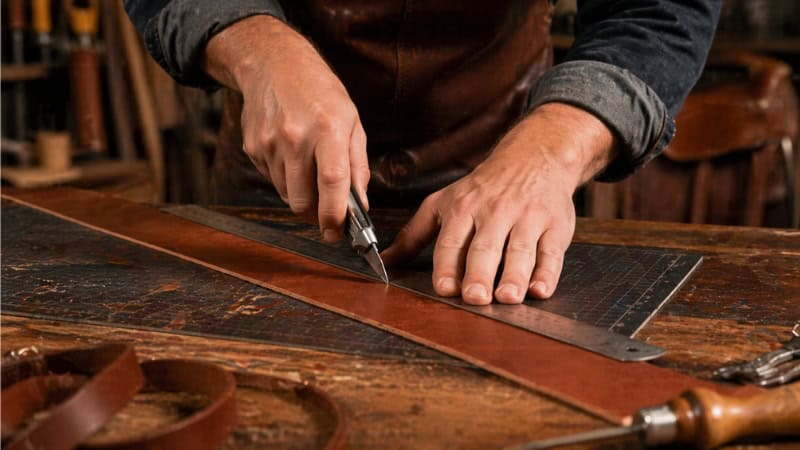
Step 1 – Cutting the Leather Strips
This is your foundation. If this step is off, everything downstream compensates—and not in a good way.
What to do:
- Measure your desired length (e.g., 7–8 feet)
- Mark both strips carefully—precision matters here
- Cut using a steady, continuous motion
Key Insight: Avoid “stop-start” cutting. It creates uneven edges that translate into inconsistent feel.
What Most Beginners Miss
Even a slight width variation—just a few millimeters—can create uneven weight distribution between the two reins.
And that imbalance?
Your horse feels it before you do.
Pro Tip: Before cutting your final strips, test on scrap leather to dial in your motion and pressure. Think of it like warming up before a ride—you’re calibrating your hands.
Transition to Next Steps
Now that your leather is cut clean and true, the next phase is where function starts to take shape:
- Tapering the ends for better grip and control
- Attaching hardware safely and securely
- Conditioning the leather so it moves—not fights—you
Because right now, you don’t have reins yet.
You just have potential.
Now we move into the part where raw leather starts behaving like a communication tool—not just a strip of hide.
Step 2 – Shaping & Tapering the Ends
Right now, your reins are uniform strips. Functional—but not yet intuitive in the hand.
Tapering changes that.
It creates a natural transition from strength (main body) to finesse (the ends). Think of it like softening your fingers after establishing contact—you’re not losing control, you’re refining it.
What to do:
- Mark the last 8–12 inches of each rein
- Gradually narrow the width toward the ends
- Keep both reins symmetrical—this matters more than perfection
Why it matters:
- Improved grip: Your fingers close more naturally around a tapered end
- Better balance: Less bulk reduces drag and swing
- Cleaner cues: The horse feels a more precise release
Where Riders Go Wrong
They rush the taper.
A sudden drop in width creates a weak point—both structurally and functionally. Under pressure, that’s where leather can stretch unevenly or fail.
Instead, aim for a long, gradual taper. It should feel almost invisible when you run your hand along it.
Pro Insight: If you’re working with a horse that tends to brace or lean, a slightly longer taper can help soften your release timing. It reduces abrupt pressure changes and encourages a more elastic feel in your hands.
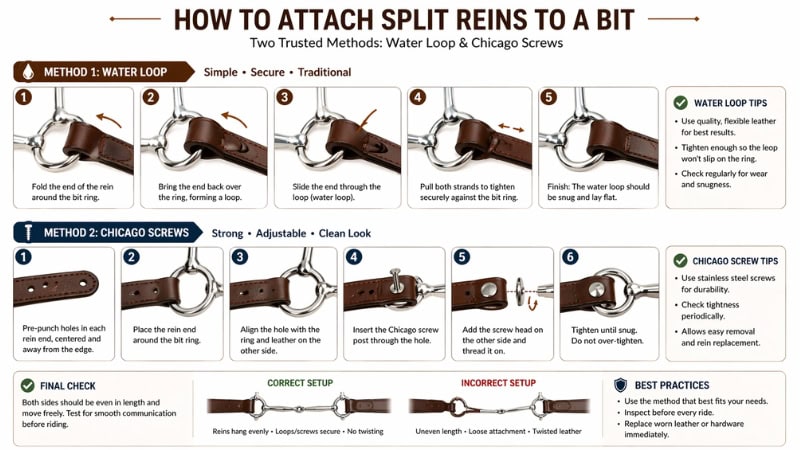
Step 3 – Punching Holes & Attaching Hardware (Without Weak Points)
This is where your reins connect to the bit—and where failure is not an option.
A weak attachment doesn’t just break gear.
It breaks trust, timing, and sometimes safety.
Attachment Options
- Water Loop (Traditional & Reliable)
- Leather loop that feeds back through itself
- Strong, flexible, time-tested
- Chicago Screws (Modern & Convenient)
- Easy to install and adjust
- Requires periodic checking to avoid loosening
What to do:
- Mark hole placement evenly on both reins
- Punch clean, centered holes (avoid jagged edges)
- Attach hardware securely, ensuring no twisting in the leather
Critical Detail Most People Miss
The grain direction of the leather matters.
If your holes are too close to the edge—or cut against the leather’s natural strength—you create stress points. Over time, those points stretch, crack, or fail.
Safety Check (Highly Practical)
Before you ever ride with them:
- Pull firmly on each attachment point
- Twist slightly to test flexibility
- Check for any uneven tension
If something feels off in your hands, it will feel worse at speed.
A Trainer’s Lens
In rehabilitation work, we talk about load-bearing patterns—where stress accumulates over time.
Your rein attachments are exactly that.
Build them like they’ll be tested—because eventually, they will be.
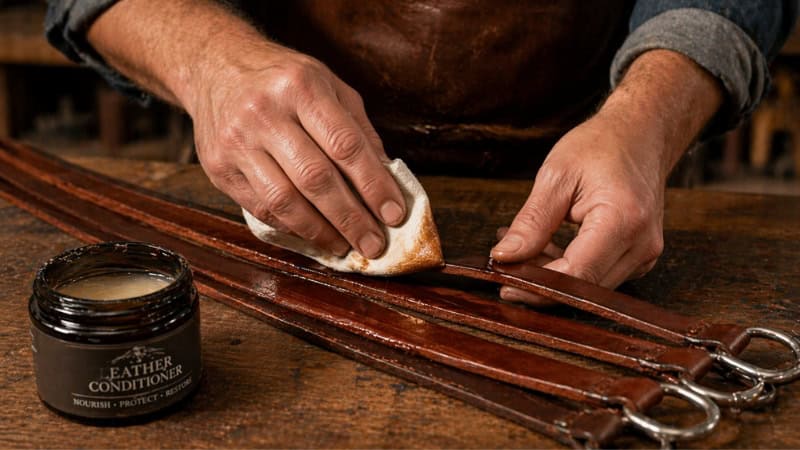
Step 4 – Conditioning the Leather (Creating That Broken-In Feel)
Fresh-cut leather is like a green horse—capable, but stiff, reactive, and not yet in sync with you.
Conditioning is where the transformation happens.
What to Use
- Neatsfoot oil (deep conditioning)
- Leather balm or conditioner (surface protection)
What to do:
- Apply a light coat of oil evenly across both reins
- Let it absorb fully (don’t rush this stage)
- Flex and work the leather gently with your hands
- Repeat lightly if needed—avoid oversaturation
The Goal
You’re not just softening leather.
You’re creating responsiveness without collapse.
- Too dry → stiff, delayed signals
- Too soft → floppy, unclear communication
You’re aiming for that middle ground where the rein:
- Falls naturally
- Moves with minimal resistance
- Returns clear feedback to your fingers
Sensory Check (Rider-Focused Insight)
Close your eyes and run the rein through your hands.
It should feel:
- Smooth, not sticky
- Flexible, not limp
- Alive, not rigid
If it feels like something you’d trust in a sensitive moment—you’re there.
Mistake to Avoid
Over-oiling.
It’s tempting, especially when chasing that “broken-in” feel quickly. But too much oil weakens the fibers over time and reduces durability.
Think of it like overtraining a recovering horse—you might get short-term softness, but you sacrifice long-term strength.
Transition to Final Build Phase
At this point, your reins are shaped, secured, and beginning to come alive in your hands.
What’s left is refinement and real-world readiness:
- Final adjustments and balance checks
- Testing under movement and pressure
- Avoiding the subtle mistakes that only show up once you ride
Because a rein isn’t finished when it looks right.
It’s finished when it feels right in motion.
Step 5 – Final Adjustments & Testing
Up to now, everything has been controlled. Clean cuts. Measured steps. Predictable outcomes.
Riding won’t be.
So before these reins ever touch a bit, you test them—not like a craftsperson, but like a rider who knows things can go wrong.
Static Testing (Before You Ride)
Start on the ground.
- Hold both reins together—do they hang evenly?
- Let them drop—do they fall straight or twist subtly?
- Run them through your hands—does one feel heavier or stiffer?
Even a small imbalance here becomes amplified once movement enters the equation.
Load Testing (Simulating Real Use)
Apply pressure deliberately:
- Pull each rein independently
- Then apply even pressure to both
- Add slight twisting force
You’re looking for:
- No slipping at attachment points
- No stretching at weak spots
- Consistent resistance across both reins
If one side responds faster than the other, your horse will feel that as mixed signals.
Saddle Testing (Where Truth Shows Up)
Once mounted:
- Let the reins drape naturally
- Pick up contact slowly
- Ask for a simple turn or stop
Pay attention to:
- How quickly the rein “comes alive” in your hand
- Whether the release feels clean or delayed
- If your horse responds evenly left vs right
A Rider’s Reality Check
If something feels slightly off, don’t ignore it.
In recovery work, we say:
“Small inconsistencies become patterns.”
And patterns—good or bad—are what horses learn.
Common Mistakes to Avoid When Making Split Reins
Most mistakes don’t show up immediately.
They reveal themselves weeks later—under sweat, repetition, and pressure.
Let’s head them off early.
1. Uneven Length or Width
It sounds minor. It isn’t.
Even a slight mismatch creates uneven weight distribution, which leads to:
- One rein signaling faster than the other
- Subtle rider compensation (often unnoticed)
- Confusion in the horse
2. Choosing the Wrong Leather
Too stiff → delayed communication
Too soft → muddy signals
Cheap leather often stretches unpredictably, especially under humidity and repeated use.
And once that stretch sets in, there’s no resetting it.
3. Weak Attachment Points
This is the failure that matters most.
- Holes too close to the edge
- Poorly secured screws
- Thin taper near hardware
These don’t just fail—they fail when pressure spikes.
That’s usually when you need reliability the most.
4. Over-Conditioning the Leather
It feels counterintuitive, but more isn’t better.
Too much oil:
- Weakens leather fibers
- Reduces responsiveness
- Creates a “dead” feel in your hands
You want life in the rein—not limp compliance.
5. Ignoring Balance During Use
Even well-made reins need monitoring.
Over time:
- One side may stretch more
- Conditioning may absorb unevenly
- Usage patterns may create bias
Check your reins periodically like you check your horse—subtle changes matter.
A Trainer’s Perspective
Most rein issues aren’t equipment problems.
They’re communication problems amplified by equipment.
Good reins don’t fix bad hands.
But bad reins can absolutely sabotage good ones.
How to Customize Split Reins – Advanced Techniques
Once you’ve built a solid, functional pair, customization becomes less about looks—and more about refining communication.
This is where craftsmanship meets personal riding style.
1. Weighted Ends (For Stability & Timing)
Adding slight weight near the ends helps the reins:
- Hang straighter
- Reduce accidental movement
- Slow down signal delivery
This is especially useful if you’re working on softer hands or retraining a reactive horse.
It’s like adding resistance in rehab—it stabilizes the motion so you can control it better.
2. Grip Optimization (Feel in the Fingers)
You can subtly change how the reins interact with your hands:
- Light texturing or tooling
- Slightly rougher finish for grip
- Smooth finish for quick sliding adjustments
Each choice affects how quickly you can adjust and how securely you can hold.
3. Decorative Tooling & Stamping
This is where expression comes in—but it should never interfere with function.
- Keep tooling shallow to avoid weakening the leather
- Avoid excessive decoration near stress points
Done right, it adds identity without compromising integrity.
4. Rein Length Adjustments Over Time
As your riding evolves, so should your equipment.
You might:
- Shorten reins for more refined work
- Lengthen for training younger horses
- Adjust weight for different disciplines
Your reins shouldn’t lock you into one style—they should evolve with you.
A Subtle Truth Most Riders Learn Late
The best reins don’t feel like something you’re holding.
They feel like something that disappears—
until the exact moment you need them.
Transition to Final Phase
At this point, you don’t just have reins.
You have a tool shaped by intention, tested under pressure, and tuned to your hands.
But one final piece remains—keeping them that way.
Because even the best-made reins can lose their edge without proper care and perspective.
Maintenance Tips to Make Split Reins Last Longer
Leather is alive in a way synthetic gear never is. It responds, adapts, and—if neglected—quietly deteriorates.
Maintaining your split reins isn’t a chore. It’s part of the same rhythm as grooming your horse or checking your tack before a ride.
Regular Cleaning (After Real Work)
After rides—especially in heat, dust, or sweat:
- Wipe reins down with a slightly damp cloth
- Remove dirt buildup before it settles into the fibers
Dirt acts like sandpaper over time. You won’t notice it immediately, but your reins will lose smoothness—and eventually strength.
Conditioning Schedule
- Light conditioning every 2–4 weeks (depending on climate and use)
- Adjust frequency if leather feels dry or overly stiff
Apply lightly. Let the leather absorb, not drown.
Storage Matters More Than You Think
Where your reins rest between rides shapes how they perform during them.
- Avoid direct sunlight (dries and cracks leather)
- Keep in a cool, dry place
- Hang them naturally—don’t fold tightly
A rein stored poorly develops memory in the wrong places—kinks, stiffness, uneven drape.
Periodic Integrity Checks
Every few weeks, run a quiet inspection:
- Check attachment points for stress or stretching
- Look for thinning near tapered ends
- Feel for changes in flexibility between reins
This isn’t paranoia—it’s awareness.
A Rider’s Habit Worth Keeping
Before every ride, take a second.
Run the reins through your fingers.
You’ll feel changes before you see them. And catching those changes early is the difference between adjustment and failure.
DIY vs Buying Split Reins (Which Is Better?)
This isn’t really about better or worse.
It’s about what you value—and how you ride.
Cost Comparison (Realistic View)
| Option | Typical Cost | Long-Term Value |
| DIY Split Reins | $20–$60 | High (if made well) |
| Store-Bought (Mid-Range) | $40–$150 | Moderate |
| Premium Handmade | $150+ | High |
Where DIY Wins
- Customization: Built for your hands, your horse, your style
- Cost efficiency: Especially if you already have tools
- Connection: You understand every inch of what you’re using
Where Buying Wins
- Time-saving: Immediate use
- Consistency (if high-quality): Especially from reputable makers
- No learning curve: Ideal if you don’t want to craft
The Real ROI (Beyond Money)
Return on investment isn’t just dollars.
It’s:
- Better feel
- Clearer communication
- Fewer inconsistencies in training
If making your own reins improves even one of those—it pays for itself faster than any price tag suggests.
A Perspective from the Saddle
Riders often look for better equipment to fix communication.
But the truth is quieter:
The best equipment doesn’t fix your riding—it reveals it.
DIY reins simply remove the middle layer. There’s no guessing how they were made. No unknown variables.
Just you, your hands, and what you’ve built.
Quicks Answers to FAQs
How long should split reins be?
Split reins are typically 6 to 8 feet long, depending on the rider’s height, discipline, and preference. A proper length allows a slight drape when holding the reins without excessive slack. Longer reins offer more flexibility, while shorter reins provide quicker contact and control, especially for beginners or riders with shorter reach.
What leather is best for split reins?
Latigo leather is widely considered the best choice for split reins due to its durability, flexibility, and natural grip. Harness leather is another strong option, offering a smoother finish and slightly heavier feel. Beginners often prefer latigo because it balances responsiveness and forgiveness, making it easier to maintain consistent communication.
Are split reins better than loop reins?
Split reins offer more flexibility and independent control compared to loop reins, making them ideal for Western riding and training scenarios. They allow riders to adjust length quickly and communicate more precisely. However, loop reins can be simpler for beginners, as they reduce the risk of uneven handling or accidental dropping.
Can beginners make split reins?
Yes, beginners can make split reins with basic tools and careful attention to measurement and cutting. Starting with quality leather and following a step-by-step process is key. While the first attempt may not be perfect, functional and safe reins are achievable, and the process helps build both craftsmanship and riding awareness.
How much does it cost to make split reins?
Making split reins typically costs between $20 and $60, depending on the quality of leather and hardware used. This is often cheaper than buying mid-range reins. However, investing in better materials slightly increases cost but significantly improves durability, performance, and long-term value.
Conclusion
Well-made split reins don’t draw attention—they support it.
When length, weight, and leather are balanced correctly, your cues become cleaner, more consistent, and easier for the horse to understand. That’s where real progress happens—through repeatable, reliable communication.
Making your own split reins gives you control over:
- Material quality
- Fit and balance
- Long-term performance
More importantly, it builds awareness—of how equipment affects timing, pressure, and release.
The goal isn’t just to create reins.
It’s to create a setup that improves how you ride—quieter signals, better feel, and more precise control.
