
Leather crafting is one of the most satisfying DIY hobbies you can try. It combines creativity, precision, and patience to produce something both beautiful and practical. Starting small makes the process less intimidating and more enjoyable.
A simple handmade pouch is a perfect beginner’s project. It doesn’t require complex tools, and the result is something you can actually use—ideal for holding coins, cards, or small essentials.
This guide walks you through every step with clarity and ease. You’ll learn the materials, cutting techniques, and stitching methods needed to create your very own stylish, durable piece of leatherwork.
Recommended Read: The Ultimate Leatherworking Tools List for Everyone
Materials and Tools You’ll Need
Before you begin crafting, it’s important to have all your materials and tools ready. Working with leather is much easier when your workspace is organized and everything is within reach. These basic items will help you measure accurately, cut cleanly, and stitch neatly from start to finish.
- Leather piece: Choose soft or vegetable-tanned leather that’s easy to cut and stitch.
- Waxed thread: Strong and durable, ideal for holding the seams securely.
- Leather needles: Slightly blunt with a large eye, perfect for stitching through thick material.
- Ruler or measuring tape: Ensures precise cutting and symmetrical edges.
- Scissors or rotary cutter: Helps achieve clean, straight cuts without fraying.
- Hole punch or awl: Used to make evenly spaced holes for stitching.
- Snap, button, or drawstring: For closing and securing your pouch neatly.
- Edge beveler (optional): Rounds off sharp edges for a smoother finish.
- Burnishing tool (optional): Polishes and seals edges for a professional look.
Choosing the Right Leather
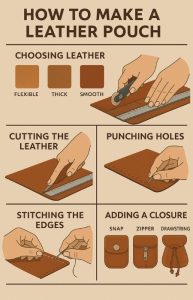
The type of leather you choose sets the tone for the entire project. Beginners often find soft or medium-weight leather easiest to handle—it cuts smoothly, folds easily, and doesn’t require heavy tools. For a sturdier pouch, vegetable-tanned leather offers a clean, structured look and ages beautifully over time.
When selecting leather, pay attention to thickness, texture, and flexibility. A piece around 1.5 to 2 millimeters thick works well for small pouches—it’s strong yet manageable. Avoid overly thick hides at first, as they can be hard to sew by hand.
If you’re just starting out, consider buying leather scraps or offcuts from local craft stores or online suppliers. These are affordable, beginner-friendly, and perfect for practicing your cuts and stitches before working on a full piece.
Cutting the Leather
Once you’ve chosen your material, it’s time to shape it into the design you want. Start by measuring and marking the dimensions of your pouch using a ruler and a pencil or silver pen (which shows clearly on darker hides). Keep your lines straight and double-check measurements before cutting—precision here ensures a clean, balanced result later.
Using sharp scissors or a rotary cutter, carefully follow your markings to cut the leather. Apply even pressure and make smooth, continuous motions rather than short snips. This helps prevent jagged edges.
After cutting, inspect the edges for any rough spots. You can lightly sand or trim them to even things out. A neat, accurate cut sets the foundation for every step that follows.
Recommended Read: How to Punch a Hole in a Leather Belt: Master Belt Resizing Simply
Punching the Holes
With your leather pieces cut and ready, the next step is to prepare for stitching. Begin by marking where the holes will go—usually about 3 to 5 millimeters from the edge. Consistent spacing keeps the stitching neat and professional-looking. Use a ruler or stitching template to guide your marks.
Once marked, use a hole punch or awl to create the holes. Hold the tool firmly and press straight down to avoid tearing or widening the marks unevenly. If you’re using thicker leather, place a cutting mat or scrap piece underneath to protect your surface.
Take your time during this stage. Evenly spaced holes not only make sewing easier but also give the finished pouch a clean, polished appearance.
Stitching or Lacing the Edges
Now comes the most satisfying part—joining the pieces together. If you’re using thread, the saddle stitch is a reliable choice for strength and style. Thread two needles onto each end of your waxed thread, insert one needle through the first hole from each side, and pull tight. Continue this pattern along the edge, keeping your tension even for a smooth finish.
Alternatively, you can lace the edges using a thin leather cord or decorative string. This method adds a rustic, handmade touch. Simply weave the lace through the holes in a crisscross or running pattern until you reach the end.
When you’re done stitching or lacing, tie off the thread securely and trim any excess. Press the seams gently with your fingers to flatten them. A steady hand and consistent stitching make all the difference in achieving a clean, durable result.
Adding a Closure
A secure closure enhances both the look and function of your handmade creation. Here are a few practical and stylish options to consider:
- Button or Snap: Mark the placement carefully before attaching. Punch a small hole, then fix the hardware using a hand press or gentle hammer tap. Ensure both parts align perfectly when the flap folds for a clean, professional finish.
- Zipper: Ideal for a modern, secure style. Measure the opening, trim the zipper to fit, and stitch it along the top edge before sewing the sides. This option gives your pouch a sleek, structured appearance.
- Drawstring: Great for a rustic touch. Punch two holes near the opening, thread a cord or leather lace through, and tie the ends. It’s simple, adjustable, and adds casual charm.
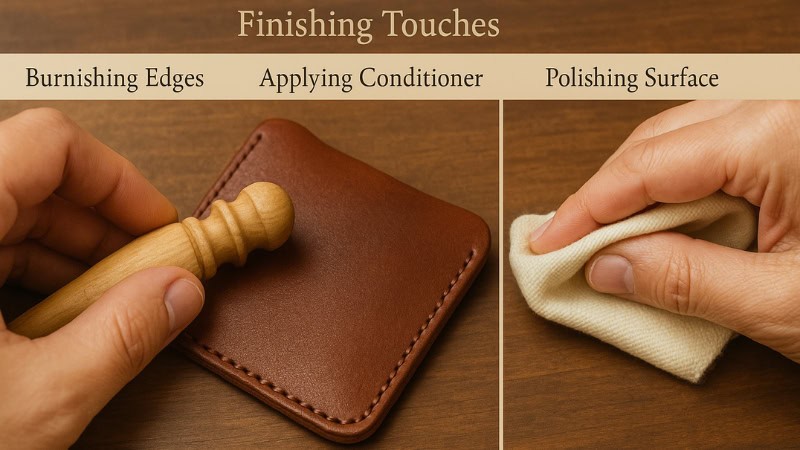
Finishing Touches
Now that your pouch is assembled, it’s time to refine the details that make it look polished and durable. Start by trimming any loose threads or uneven edges. Clean cuts and smooth lines instantly elevate the final appearance.
Next, use an edge beveler or fine sandpaper to round off sharp corners. Then, burnish the edges by rubbing them with a smooth tool or piece of cloth—this seals the fibers and adds a professional shine.
Finally, apply a small amount of leather conditioner or beeswax to protect the surface and bring out its natural texture. These simple finishing touches ensure your handmade piece feels soft, sturdy, and ready for everyday use.
Tips and Variations
Once you’ve completed your first piece, experiment with small changes to make each one unique. Simple adjustments in size, color, or stitching pattern can completely transform the design.
Try dyeing the leather before assembly to achieve rich, custom shades. You can also add a decorative stitch or engraved initials for a personal touch. For a rustic look, use contrasting thread or a braided lace instead of standard stitching.
As your skills grow, explore different shapes and functions—from compact coin holders to larger travel pouches. Each variation teaches a new technique, helping you build confidence and creativity in leathercraft.
Wrap Up
Creating your own small leather piece is a rewarding project that combines creativity, patience, and skill. From choosing the right hide to stitching the final seam, each step helps you appreciate the craftsmanship behind handmade goods.
Even if your first attempt isn’t perfect, every cut and stitch builds your confidence. The process teaches precision and problem-solving while giving you something practical to use or gift.
With time, you’ll find yourself exploring new designs and techniques. What starts as a simple craft can easily grow into a lasting passion for making beautiful, functional items by hand.
