
Installing a zipper in a leather bag is one of the most important steps in leathercraft because it directly affects the bag’s durability, functionality, and overall finish. Unlike fabric, leather is thicker, less forgiving, and requires specialized tools and techniques to achieve a clean zipper installation.
Whether you’re making a handmade leather bag, repairing an old one, or improving your leatherworking skills, understanding the correct zipper installation process is essential. From choosing the right zipper type to stitching it securely into the leather panels, every step contributes to the bag’s final quality.
This guide walks you through the tools, materials, and professional techniques used by leatherworkers to install zippers properly while avoiding common mistakes.
Tools and Materials Needed to Install Zippers in Leather Bags
Before installing a zipper into a leather bag, it’s important to gather the correct leatherworking tools and materials. Leather is tougher than most fabrics, which means ordinary sewing tools often aren’t sufficient. Using the right equipment ensures precise stitching, prevents leather damage, and produces a professional-looking zipper installation.
Essential Leatherworking Tools
Leather zipper installation requires tools designed specifically for working with thick materials. These tools help you mark, cut, and stitch leather accurately without weakening the bag’s structure.
Key tools include:
- Leather sewing machine or heavy-duty sewing machine – Necessary for stitching through thick leather and zipper tape.
- Stitching chisels – Used to punch evenly spaced stitching holes for hand sewing.
- Leather needles – Strong needles designed to pass through thick leather without bending.
- Edge groover – Creates a groove in the leather so stitches sit flush with the surface.
- Rotary cutter or leather knife – Allows precise cutting of the zipper opening.
- Binder clips or leather clamps – Hold the zipper in place without puncturing the leather.
- Measuring ruler and scratch awl – Used to mark zipper placement accurately.
These tools help ensure the zipper is properly aligned and stitched securely.
Materials Required
In addition to tools, the quality of your materials significantly affects how well the zipper holds up over time.
Common materials used in leather bag zipper installation include:
- Leather panels – The main bag pieces where the zipper opening will be installed.
- Metal zipper or nylon coil zipper – The closure mechanism for the bag.
- Zipper tape – Fabric edges attached to zipper teeth that allow stitching.
- Bonded nylon or polyester thread – Strong thread designed for leather stitching.
- Contact cement or leather adhesive – Helps temporarily secure the zipper before stitching.
- Reinforcement strips – Thin leather pieces that strengthen the zipper area.
High-quality materials help prevent tearing, uneven stitching, and zipper misalignment.
Types of Zippers Used in Leather Bags
Not all zippers perform equally well in leather bags. Different zipper types offer varying levels of durability, flexibility, and visual appeal. Choosing the right zipper depends on the bag’s style, the leather’s thickness, and how often the bag will be used.
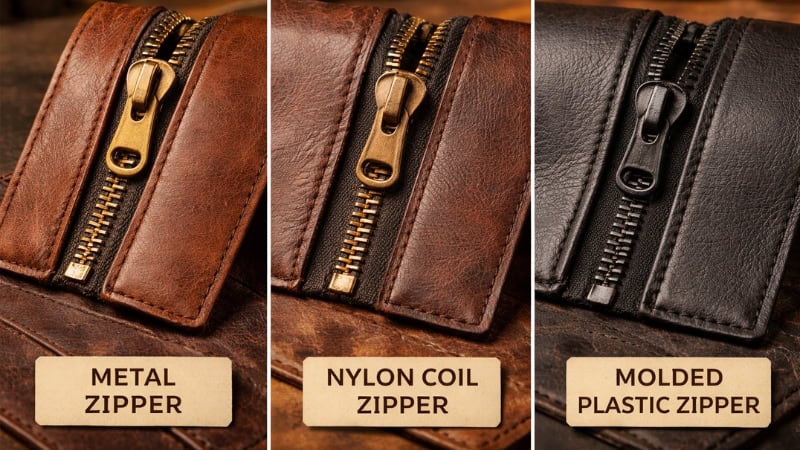
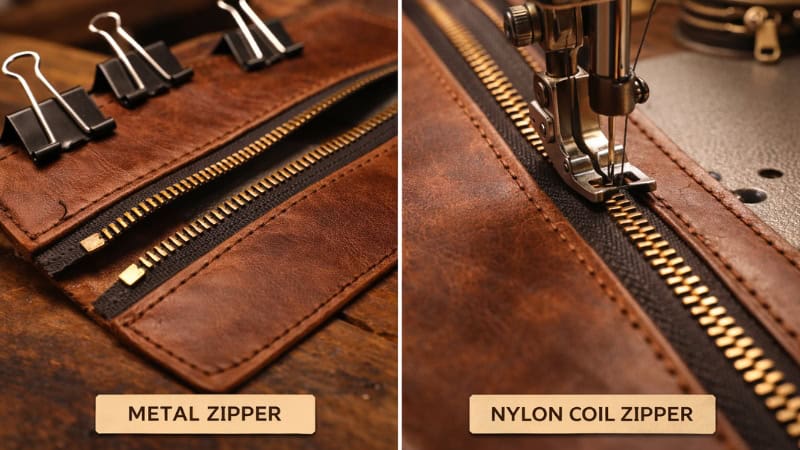
Metal Zippers
Metal zippers are one of the most popular choices for high-quality leather bags. They are typically made from brass, nickel, or aluminum and are known for their durability and classic appearance.
These zippers work especially well in premium leather products such as handbags, messenger bags, and briefcases. The metal teeth provide excellent strength, which makes them resistant to wear and repeated use.
However, metal zippers are less flexible than other types. They work best on straight openings rather than curved designs.
Nylon Coil Zippers
Nylon coil zippers feature synthetic coil teeth stitched onto the zipper tape. These zippers are lighter and more flexible than metal zippers, making them ideal for bags with curved openings or soft leather panels.
Because of their flexibility, nylon zippers are commonly used in backpacks, travel bags, and soft leather handbags.
They also tend to run more smoothly than metal zippers, especially in longer zipper tracks.
Molded Plastic Zippers
Molded plastic zippers feature molded resin teeth attached to the zipper tape. They are typically used in casual bags or lightweight leather accessories.
While they are affordable and lightweight, molded plastic zippers are generally less durable than metal or nylon coil options. High-end leather bags are used less frequently.
Choosing the Right Zipper
When selecting a zipper for a leather bag, consider the following:
| Zipper Type | Best Use | Durability |
| Metal zipper | Luxury leather bags | Very high |
| Nylon coil zipper | Flexible openings | High |
| Molded plastic zipper | Casual bags | Medium |
For most leather bags, metal zippers or nylon coil zippers provide the best balance of durability and performance.
Preparing the Leather Before Installing a Zipper
Before attaching the zipper, the leather must be properly prepared. This preparation stage ensures the zipper sits evenly, the stitches hold securely, and the leather does not stretch or tear over time. Many zipper installation problems actually begin during preparation, especially when the opening is cut inaccurately or the leather edge is left unsupported.
Taking time to measure, mark, and reinforce the zipper area results in a cleaner installation and improves the leather bag’s long-term durability.
Marking the Zipper Placement
Accurate placement is essential for a professional-looking zipper installation. Begin by measuring the zipper length and marking the centerline of the bag opening with a ruler and a scratch awl.
Use light marks rather than deep cuts to keep the leather surface intact. The zipper opening should be slightly shorter than the zipper itself to allow space for reinforcement tabs at the ends.
Leatherworkers often create guidelines along the stitch path to maintain consistent spacing between the zipper teeth and the stitch line. This prevents crooked stitching and ensures the zipper remains centered.
Cutting the Zipper Opening
Once the placement is marked, the zipper opening can be cut into the leather panel. A rotary cutter or sharp leather knife is typically used because it produces clean, straight edges without tearing the leather fibers.
Cut slowly along the marked line while maintaining even pressure. If the opening requires corners, small, rounded cuts can help prevent stress points that may lead to tearing.
After cutting the opening, inspect the edges to ensure they are smooth and even. Uneven cuts can cause the zipper tape to sit incorrectly, leading to alignment problems later.
Reinforcing the Leather Edge
The leather around the zipper opening experiences frequent stress during use. Reinforcing this area helps prevent the leather from stretching or tearing over time.
A common technique is to glue a thin leather reinforcement strip along the inside edge of the zipper opening with contact cement. This layer strengthens the stitching area and distributes tension more evenly.
Some leatherworkers also fold a narrow seam allowance along the opening to create a stronger stitched edge. Reinforcement is particularly important when working with softer leathers such as lambskin or chrome-tanned leather.
Proper reinforcement ensures the zipper remains stable even after repeated use.
Step-by-Step Guide to Installing a Zipper in a Leather Bag
Once the leather has been prepared, the zipper can be installed. This stage requires careful alignment and secure stitching so the zipper opens smoothly and remains firmly attached to the leather panels.
Professional leatherworkers typically combine adhesive positioning and stitching to achieve the most reliable results.
Step 1 – Prepare the Zipper
Start by examining the zipper to ensure it moves smoothly along the track. If necessary, trim the zipper tape to fit the opening length.
Many leatherworkers lightly seal the trimmed ends of nylon zipper tape to prevent fraying. If the zipper includes metal stops, verify they are firmly attached before installation.
Preparing the zipper first helps avoid alignment issues later in the process.
Step 2 – Attach Zipper with Leather Tape or Glue
Position the zipper beneath the leather opening so that the zipper teeth are centered within the cutout. A small amount of contact cement or double-sided leather tape can be used to hold the zipper tape temporarily in place.
Apply the adhesive carefully along the edges of the zipper tape, then press it firmly against the underside of the leather panel.
This temporary bond keeps the zipper from shifting during stitching and ensures precise alignment.
Step 3 – Secure the Zipper Temporarily
Instead of pins, which can leave permanent holes in leather, leatherworkers typically use binder clips or leather clamps to secure the zipper before sewing.
Place clips along the zipper tape to hold the layers together while you check the alignment.
At this stage, test the zipper movement by sliding the pull along the track. If the zipper catches or misaligns, adjust its position before stitching.
Step 4 – Stitch the Zipper in Place
Once the zipper is secured, stitch along the zipper tape to permanently attach it to the leather.
Two common stitching methods are used:
Machine stitching
A heavy-duty sewing machine with a walking foot can sew through leather and zipper tape efficiently. Use bonded nylon or polyester thread for strength. Stitch slowly along the zipper edge while maintaining consistent spacing from the zipper teeth.
Hand saddle stitching
For traditional leathercraft projects, saddle stitching is often preferred. Stitching chisels are used to create evenly spaced holes along the stitch line. Two needles and waxed thread are then used to create a strong interlocking stitch pattern.
Both methods create durable seams, but saddle stitching is often considered stronger for thick leather projects.
Step 5 – Reinforce the Zipper Ends
The ends of the zipper receive the most stress during use. Reinforcing these areas prevents the stitching from loosening over time.
Leatherworkers often add small leather zipper tabs at the ends of the zipper. These tabs cover the zipper tape ends and provide additional support.
Bar-tack stitching or additional reinforcement stitches can also be added to strengthen the zipper ends.
Step 6 – Finish the Edges
After stitching is complete, the edges around the zipper opening can be finished to improve the bag’s appearance.
Common finishing techniques include:
- Edge burnishing
- Edge paint application
- Light sanding for smoother edges
These finishing steps give the zipper installation a clean, professional look.
Machine Sewing vs Hand Stitching Zippers in Leather
When installing a zipper into a leather bag, leatherworkers can choose between machine sewing and hand stitching. Each method has its own advantages depending on the type of project, available tools, and desired level of craftsmanship.
Understanding the differences between these methods helps you choose the best approach for your leather bag.
| Method | Advantages | Limitations |
| Machine sewing | Faster stitching, consistent stitch length | Requires a heavy-duty sewing machine |
| Hand saddle stitching | Extremely strong and durable | Slower and more labor-intensive |
Machine sewing is commonly used in commercial leather bag production because it allows faster assembly while maintaining consistent stitch spacing. A walking foot sewing machine is often preferred because it feeds thick leather evenly.
Hand saddle stitching, on the other hand, is widely used in traditional leathercraft. The interlocking stitch pattern created by two needles produces exceptional durability. Even if one thread breaks, the seam usually remains intact.
For high-end handmade leather bags, many artisans prefer saddle stitching because it reflects traditional craftsmanship and offers superior strength.
Common Mistakes When Installing Zippers in Leather Bags
Even with the right tools and materials, zipper installation in leather bags can go wrong if certain details are overlooked. Leather behaves differently from fabric, and small mistakes during cutting, alignment, or stitching can affect the zipper’s functionality and durability.
Understanding these common issues helps prevent uneven stitching, zipper misalignment, and premature wear.
Some of the most frequent mistakes include:
- Using pins instead of clips
Pins leave permanent holes in leather. Binder clips or leather clamps should be used to hold layers together. - Sewing too close to the zipper teeth
If the stitch line is too close to the zipper teeth, the zipper pull may catch on the thread. - Skipping leather reinforcement
Without reinforcement strips or folded edges, the leather around the zipper opening can stretch or tear. - Misaligning the zipper during installation
Even slight misalignment can cause the zipper to twist or open unevenly. - Using a weak thread
Standard sewing thread may break under stress. Bonded nylon or polyester thread is recommended. - Not testing the zipper before stitching
Always slide the zipper pull along the track before sewing to ensure smooth movement.
Avoiding these mistakes helps ensure the zipper remains secure and functional throughout the leather bag’s life.
Pro Leatherworker Tips for Perfect Zipper Installation
After installing zippers in many leather bags, experienced leatherworkers develop techniques that speed up and improve the reliability of the process. These small adjustments can significantly improve the final appearance and durability of the zipper installation.
Here are several professional tips used in leather workshops:
- Install the zipper before assembling the bag body
Sewing the zipper into flat leather panels is much easier than attaching it after the bag is constructed. - Use double-sided leather tape for precise positioning
This tape holds the zipper in place while stitching and prevents shifting. - Choose the correct zipper length
The zipper should be slightly longer than the opening to allow space for reinforcement tabs. - Add leather zipper tabs for durability
Tabs protect the ends of the zipper and reduce stress on the zipper tape. - Use a walking foot sewing machine when possible
Walking foot machines feed thick leather and zipper tape evenly. - Practice on scrap leather first
Testing stitch spacing and alignment on scrap pieces prevents costly mistakes. - Check zipper movement repeatedly during installation
Periodically testing the zipper ensures the track remains properly aligned.
These practical techniques help produce cleaner stitching lines and professional-looking leather bags.
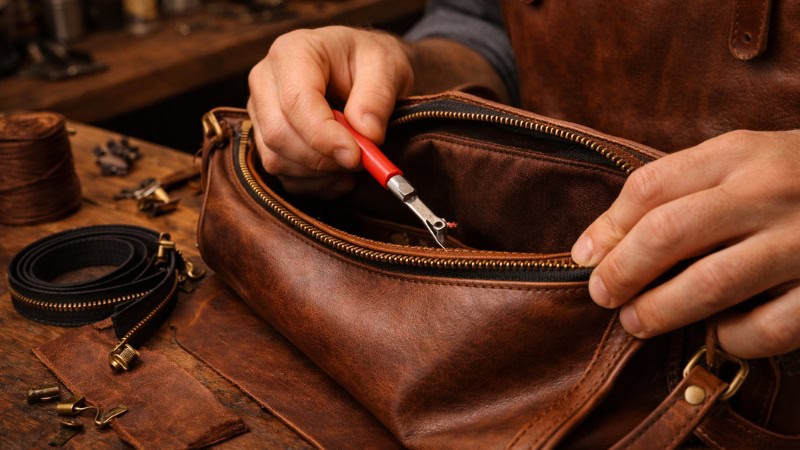
How to Replace or Repair a Zipper in a Leather Bag
Sometimes a zipper may wear out, break, or stop functioning properly after years of use. Fortunately, replacing a zipper in a leather bag is possible if the surrounding leather is still in good condition.
The repair process usually begins by carefully removing the existing stitches using a seam ripper or small knife. Work slowly to avoid damaging the leather panels.
Once the old zipper is removed, clean the stitching area and check the leather for stretching or weakened sections. If necessary, reinforcement strips can be added before installing the new zipper.
The replacement zipper should be aligned with the original stitch line to maintain the bag’s structure. After securing the zipper with adhesive or clips, stitch it using the same method used during the original installation.
If the leather is delicate or the bag is expensive, professional leather repair services may provide the safest option.
Frequently Asked Questions
How do you sew a zipper into thick leather?
To sew a zipper into thick leather, first position the zipper beneath the leather opening and secure it with double-sided tape or clips. Then stitch along the zipper tape using a heavy-duty sewing machine, or hand-saddle-stitch with bonded nylon thread for strong, durable seams.
What is the best zipper for leather bags?
The best zipper for leather bags is usually a metal zipper, such as brass or nickel, because it offers superior durability and a premium appearance. Nylon coil zippers are also popular for softer bags or curved openings because they are flexible and run smoothly.
Can you glue a zipper to leather instead of sewing?
You can temporarily glue a zipper to leather with contact cement or double-sided leather tape, but glue alone is not strong enough for long-term use. For durable results, the zipper should always be stitched to the leather using machine stitching or saddle stitching.
What thread should be used for leather bag zippers?
The best thread for sewing zippers into leather bags is bonded nylon or bonded polyester thread. These threads have high tensile strength, resist abrasion, and can withstand repeated zipper movement without breaking, making them ideal for leatherworking and bag construction.
Installing Zippers in Leather Bags with Confidence
Installing a zipper in a leather bag requires careful preparation, precise alignment, and strong stitching. From selecting the right zipper type to reinforcing the leather opening, each step contributes to the bag’s durability and appearance.
By using proper leatherworking tools, high-quality materials, and reliable stitching methods such as saddle stitching or machine sewing, you can create a secure zipper installation that lasts for years. Avoiding common mistakes and following professional tips will also improve the overall quality of your work.
With practice and attention to detail, installing zippers in leather bags becomes a valuable skill in leathercraft and bag making.