
Braiding leather isn’t just a skill—it’s an experience. The smell of the leather, the texture between your fingers, and the satisfaction of a neat, even weave make it a craft that pulls you in.
Are you aiming for a simple strap or a complex mystery braid? Want to craft a belt or stylish leather accessories?
Know the right steps to turn the tricky job into a relaxing, creative process.
Read on to master the art of making leather braid – easy and simple.
Choosing & Preparing Your Leather
Before we even pick up a knife or clamp, the journey starts with picking the right leather. Think of this step as setting the stage for a performance—if your material isn’t right, the show won’t go smoothly. The right type, thickness, and preparation will make braiding easier, neater, and far more enjoyable.
Pick the right leather type
- Vegetable-tanned leather: Firm yet pliable once dampened, making it excellent for shaping into structured braids like the mystery braid. It also takes dye well, so you can customize your project after braiding. Avoid if you need a super-soft drape.
- Chrome-tanned leather: Naturally soft and flexible, which makes it a breeze for bracelets and decorative braids. However, it doesn’t mold as well as veg-tan, so it’s not ideal for braids requiring shape retention.
Choose the right thickness
- 3–5 oz (1.2–2 mm): Thin enough for jewelry and light straps; bends easily without cracking. Great for beginners practicing control and tension.
- 6–9 oz (2.4–3.6 mm): Heavier and more durable, suited for belts, leashes, or bag handles. Requires stronger hands and a bit more patience to keep the braid tight.
Cutting your strips
- Use a strap cutter for consistent widths—this ensures your braid doesn’t look lopsided. Hand-cutting with a utility knife works if you have a steady hand, but always use a metal ruler to avoid uneven edges.
- Plan your length carefully. Braids shorten by 20–25% once completed, so always cut longer than your target finished size.
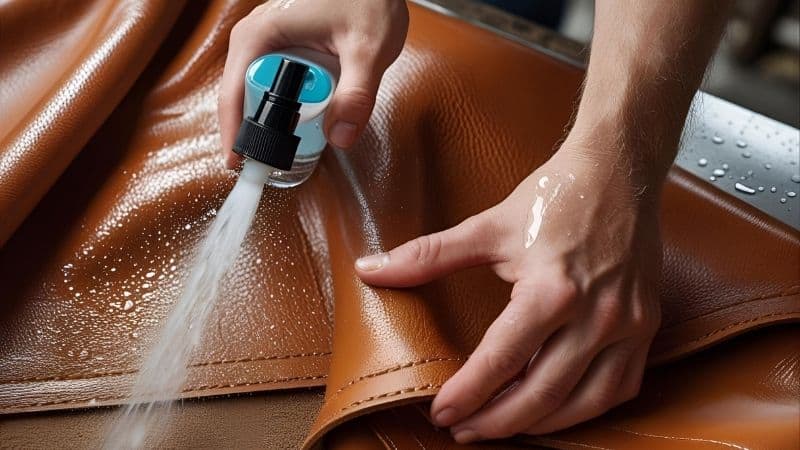
Prepping the leather
- For veg-tan: Lightly dampen the leather with a spray bottle to make it more pliable and reduce cracking while braiding.
- For chrome-tan: Apply a thin coat of leather conditioner if it feels dry, which will help it glide smoothly during braiding.
Basic Braid Types & How to Master Them
Every braider has to start somewhere, and these techniques form the building blocks for more advanced designs. Some are straightforward and great for beginners, while others require a bit of ah-ha thinking to unlock their secrets. We’ll start with the simplest and work our way up.
3-Strand Traditional Braid
The 3-strand braid is the bread-and-butter of leatherwork. If you can do this well, every other braid will feel easier because you’ve already learned control, tension, and the over-under rhythm. It’s also the most versatile, showing up in everything from keychains to belts.
You’ll need:
- A pre-cut strip of leather (or three separate strands) cut to a consistent width to avoid a lumpy braid.
- A clamp, heavy book, or even painter’s tape to secure one end so it doesn’t slip as you work.
Steps:
- Secure one end of your leather so it stays in place—slippage here causes uneven tension later.
- Lay your three strands flat, ensuring they’re untwisted and all grain sides are facing up.
- Take the right strand, cross it over the center strand, and adjust tension slightly so it’s snug but not bending.
- Take the left strand, cross it over the new center strand, keeping your hands close to the braid as you work for control.
- Repeat this right-over-center, left-over-center pattern until you reach the end.
- Tie off, glue, or wrap the end with another thin strip of leather for a clean finish.
Image cue: Overhead shot labeling right, center, and left strands in position.
Closed / Mystery Braid
This braid looks like a magic trick—how do you braid something without loose ends? The secret is in the untangling method, which lets you weave and then “free” the strands. Once you get the hang of it, it’s addictive.
Why it’s loved:
- No raw ends to finish—both ends stay intact.
- Adds a professional, intricate look without complex tools.
Steps:
- Take a single leather strip and cut three parallel slits along most of its length, leaving at least 1–2 inches uncut at each end. This keeps the piece as one connected strip.
- Hold the strip vertically with the grain side facing you.
- Begin a normal 3-strand braid for about six cross-overs.
- When the strands begin to twist, stop and untangle by carefully feeding the bottom through the nearest slit—this realigns the braid without undoing your work.
- Continue braiding and untangling until you reach the bottom.
- Flatten gently with your fingers to set the braid shape.
Image cue: Before-and-after of tangled vs. untangled stage.
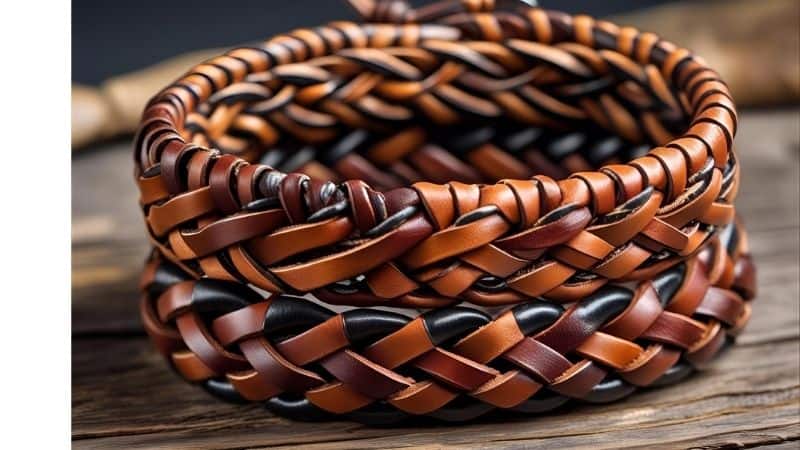
4-Strand Flat Braid
Adding a fourth strand gives you a wider, more intricate braid. It’s a step up in complexity, but the pattern is predictable once you understand the sequence. This braid works beautifully for belts and bag straps.

Steps:
- Secure the strands side-by-side, labeling them 1 to 4 from left to right.
- Cross strand 1 over strand 2 and then under strand 3—keep movements smooth to prevent twists.
- Take strand 4 and move it under strand 3 and then over strand 2.
- Repeat the process, always working from the outermost strand inward.
- Keep an eye on spacing; a 4-strand braid can easily look uneven if one strand is pulled tighter than the others.
4-Strand Round Braid
This is your go-to for strong, rope-like braids that can handle weight and tension. The round profile comes from wrapping strands around a central core.
Steps:
- Tie your strands to a round core (leather cord or synthetic rope) for added thickness and stability.
- Work each strand in an over-under sequence, rotating the braid slightly after each move to keep the shape symmetrical.
- Pull strands tight at each rotation—loose tension here will collapse the round form.
- Continue until desired length, then secure ends with a stitched or wrapped finish.
Image cue: Close-up of round braid forming around core.
Tools & Workspace Essentials
Your tools and setup can make braiding effortless—or painfully frustrating. A stable, well-lit space not only improves precision but also helps maintain your focus and rhythm. Let’s make sure you have everything ready.
Must-haves:
- Strap cutter: Cuts leather to perfect, repeatable widths for even braids.
- Cutting mat: Protects your table and extends blade life.
- Metal ruler: Won’t get sliced up like plastic, keeps your cuts perfectly straight.
- Hole punch: For adding snaps, rivets, or hardware to your finished braid.
- Binder clips or clamps: Holds your work steady, freeing both hands for braiding.
- Gripfid or awl: Handy for untangling mystery braids or guiding strands through tight spots.
Troubleshooting: Common Braiding Problems
Mistakes happen, but in leather braiding, they’re usually fixable. Recognizing and correcting problems early saves time and prevents ruining your work. Think of this section as your braiding first-aid kit.
Common issues & fixes:
- Tangling mid-braid: Stop immediately, loosen the last few passes, untangle gently, and re-tighten.
- Grain side flipping: Pause after every few passes to check—flip back before tightening further.
- Too loose: Adjust your grip to work closer to the braid; this keeps tension consistent.
- Too tight: Over-tightening shortens the braid excessively and can crack veg-tan leather—ease off on the pull.
Finishing Your Braid
The finish is your project’s handshake—it’s the first thing people notice up close. Clean, secure ends signal quality craftsmanship and keep your braid from unraveling.
Finishing options:
- Tie off: Wrap with waxed thread or a thin leather strip, knot securely, and tuck the ends neatly.
- Glue: Leather cement offers a permanent bond—apply sparingly to avoid seepage onto the braid surface.
- Hardware: Snaps, rivets, or metal caps not only secure ends but add a polished, professional touch.
Creative Styles & Customizations
Once you’ve mastered the fundamentals, you can let your creativity run wild. Braiding isn’t just about structure—it’s also a canvas for color, texture, and design flair.
Custom ideas:
- Alternate colors for each strand for striking patterns.
- Pre-dye strips in complementary shades for a gradient effect.
- Incorporate beads or charms into the braid for added personality.
- Mix flat and round braids in a single project for textural contrast.
Projects to Practice On
Practice makes perfect, and the best practice is making items you actually want to use. Start with smaller projects to build confidence before tackling larger ones.
- Mystery braid bracelet: Quick, stylish, and uses minimal leather.
- 4-strand lanyard: Great for learning tension control.
- Braided belt: A weekend project that will showcase your skills.
- Braided dog leash: Strong and practical, plus a great gift idea.
Final Thoughts
Braiding leather is addictive—in the best way. The more you do it, the more you’ll want to try new patterns, colors, and projects. The magic lies in starting simple, building skill, and then letting your creativity take over.
Whether it’s your first mystery braid bracelet or your tenth custom leash, each project will carry the mark of your hands, your patience, and your style.
