
A leather work apron is more than just protection—it’s your armor and your style statement. Whether you’re welding sparks, shaping wood, hammering metal, crafting by hand, or brewing coffee, a sturdy apron keeps you safe and clean.
Woodworkers need it for flying chips, welders for heat and sparks, blacksmiths for hammering near hot metal, and baristas for spills and stains.
Making your own leather apron beats buying one off the shelf: it fits perfectly, reflects your style, lasts longer, and gives the satisfaction of wearing something you created with your own hands.
Why Make a DIY Leather Apron?
Making your own leather apron is more than just a weekend project—it’s about creating gear that fits, works, and looks exactly the way you want. Off-the-shelf aprons rarely hit the sweet spot between comfort, durability, and style.
A DIY apron lets you take full control of every detail, from leather type to pocket placement.
- Perfect Fit: Store-bought aprons are one-size-fits-all; DIY lets you tailor every strap, pocket, and length to your body and workflow.
- Personalization: Choose leather type, color, pockets, and hardware to match your style and craft needs.
- Durability: Hand-selected leather and reinforced stitching create an apron that lasts decades, not months.
- Functionality: Design pockets and straps exactly where you need them for maximum efficiency.
- Satisfaction: There’s unmatched pride in wearing something you created yourself—it’s craftsmanship you can wear.
Making Leather Apron: Step-by-Step Process
Making leather apron isn’t about rushing—it’s about crafting something that reflects both function and pride. With the right tools, patience, and a bit of determination, you’ll create gear that works as hard as you do.
Ready? Let’s dive in.
Choosing the Right Leather – Types, Thickness, Qualities
Here’s the deal—your apron is only as good as the leather you choose. Go too thin, and it won’t hold up to sparks or sharp edges. Go too thick, and it’ll feel like strapping on medieval armor.
Obviously, the trick is finding the sweet spot that balances comfort with protection.
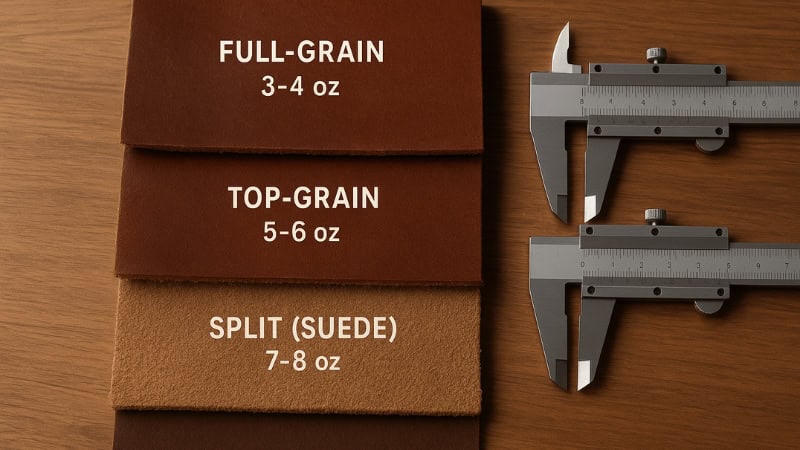
- Full-Grain Leather – The toughest of them all. It keeps the natural grain, making it rugged, durable, and able to take a beating. Perfect for welding, blacksmithing, or heavy woodworking.
- Top-Grain Leather – Slightly refined, a bit smoother, and more flexible. Great for artisans or baristas who need durability without the bulk.
- Split Leather (Suede) – Softer and more affordable, but less durable than full-grain. Works for lighter tasks where comfort is key.
Thickness matters too:
- 3–4 oz (1.2–1.6 mm) – Light, flexible, good for baristas or craftwork.
- 5–6 oz (2–2.4 mm) – Medium weight, a versatile pick for woodworkers and artisans.
- 7–8 oz (2.8–3.2 mm) – Heavy-duty, built for welders and blacksmiths who face heat, sparks, and grit daily.
Bottom line? Pick leather that matches the punishment your apron will take. Go too light, and you’ll regret it. Go too heavy, and you might dread wearing it.
Pattern Design & Layout
Here’s where your apron truly starts taking shape. A good pattern saves you from wasted leather and awkward fits later.
Using an old apron or templates
If you’ve got a worn-out apron lying around, don’t toss it—use it as a pattern. Trace it directly onto your leather, adjusting for fit where needed. No old apron?
No problem. Downloadable templates are everywhere online, giving you a head start without reinventing the wheel.
Measuring for the right coverage
- Bib-style aprons: Great for baristas or woodworkers—protects your chest down to the thighs.
- Waist aprons: Light and practical, perfect for artisans who don’t need full coverage.
- Full shop aprons: Heavy-duty champs. Welders and blacksmiths swear by them for complete front-body protection.
Think of it this way—your apron’s pattern should match your work style. Too small, and you’ll regret it; too big, and you’ll feel like you’re swimming in leather.
Recommended Read: Leather vs. Leatherette – Which is the Better Choice?
Gathering Task-Specific Tools
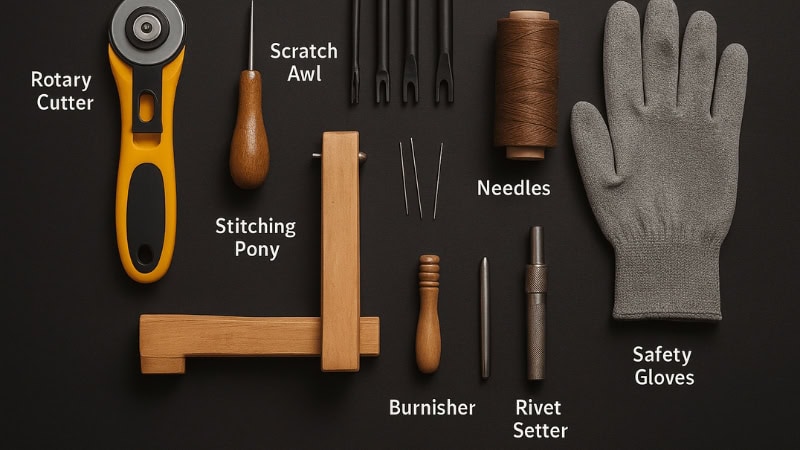
Before you even touch the leather, you need your battlefield laid out. The right tools make all the difference. Think of this step as setting yourself up for victory—you don’t want to pause mid-project hunting for a mallet or a punch.
- Cutting Tools: A sharp utility knife or rotary cutter is non-negotiable. Add a straight edge and a scratch awl, and you’ll be cutting clean, precise lines every time.
- Punching Tools: Round punches, hole chisels, and a sturdy mallet will make strap holes and rivet points neat and professional.
- Stitching Essentials: A groover to guide your stitches, harness needles, waxed thread, and optionally a stitching pony—these make hand-stitching smoother and more consistent.
- Hardware Tools: Rivet setters, snap setters, pliers, and D-ring buckles. These little pieces turn your apron from flat leather into functional, wearable gear.
- Optional Refinements: Edge bevelers, burnishers, and leather cement or glue. They give your apron that polished, professional finish.
- Safety Gear: Don’t skip gloves, eye protection, and a cutting mat. Trust me, it’s better to be safe than sorry when cutting thick leather or hammering rivets.
Set everything out, double-check, and you’re ready to move from tools to leather. With this arsenal at your side, the project will flow smoothly and your apron will come together like a pro’s.
Cutting & Preparing Leather
Now comes the first hands-on step: turning that beautiful hide into the base of your apron. This is where precision meets creativity, and a little focus goes a long way.
- Marking: Start by transferring your pattern onto the leather. Use a scratch awl or a silver pen—something that shows up but won’t damage the hide. Take your time here; a sloppy outline means a sloppy apron.
- Cutting: Use a sharp utility knife or rotary cutter along your straight edge for clean cuts. For a rugged, natural look, you can tear along scored lines—but make sure it’s intentional, not accidental!
- Edge Prep: Decide if you want smooth, burnished edges or raw, rustic ones. Smooth edges need a little sanding and burnishing for that polished finish. Raw edges keep things rugged and artisanal.
Pro tip:
Always cut slowly and steadily. Leather fights back if you rush, and a mistake here is hard to fix. Nail this step, and the rest of the apron practically makes itself.
Recommended Read: How to Punch a Hole in a Leather Belt: Master Belt Resizing Simply
Punching Holes for Straps & Hardware
This is where your apron starts taking shape. Holes might seem small, but their placement is everything. Mess them up, and your straps won’t sit right—or worse, your apron will pull awkwardly when you wear it.
- Strap Placement: Plan carefully for the neck, waist, and any cross-back configurations. Measure twice, punch once. Remember, comfort comes first—straps should support the apron without digging into your shoulders or sides.
- Punching Tools: Use a round punch, hole chisel, or awl with a sturdy mallet. Keep the leather flat and firm, and punch cleanly in one strike to avoid tearing.
Best Practices:
- Space holes evenly to prevent stress points.
- Reinforce areas that will take the most strain, like where the waist strap connects.
- Avoid stretching or pulling the leather as you punch—it will warp the fit.
Pro tip:
If you’re adding D-rings, buckles, or rivets, mark those spots carefully before punching. A little patience here makes the difference between a pro-looking apron and a frustrating one.

Pockets, Stitching & Assembly
Now your apron is starting to look like something you’ll actually wear—and it’s time to add function. Pockets aren’t just decoration; they’re the difference between fumbling for tools and having everything right where you need it.
- Designing Pockets: Think about your workflow. Hammer, pens, chisels, soapstone, or even coffee tools for baristas—plan pocket sizes accordingly. Bigger tools need reinforced edges, while smaller ones should be snug to avoid slipping.
- Gluing Before Stitching: A dab of leather cement keeps pockets from shifting while you stitch. It’s a small step that saves a lot of frustration later.
- Hand-Stitching: The saddle stitch is your best friend. Strong, durable, and it won’t unravel if one stitch breaks. Take your time, maintain even tension, and watch your apron come together stitch by stitch.
- Rivets: For extra strength, especially on heavy-duty aprons, add rivets at stress points like pocket corners or strap connections. They’re small, but they pack a big punch in durability.
Pro tip: Measure twice, stitch once. A few extra minutes now ensures your apron will last for years and survive the toughest workshops, forges, or cafés.
Adding Hardware (D-rings, Buckles, Rivets)
Hardware transforms your leather piece from flat leather into a functional, wearable apron. This step is where your apron starts to feel like yours—adjustable, sturdy, and ready for action.
- Installing Straps: Whether it’s cross-back, over-the-neck, or adjustable waist straps, D-rings and buckles make your apron fit perfectly. Position them carefully, so the apron sits comfortably on your shoulders and around your torso.
- Rivets: Add them to high-stress areas—pocket corners, strap connections, and other points that take repeated tugging. Rivets reinforce the leather and prevent wear and tear before it starts.
- Adjustability: Buckles or snaps give you flexibility. You can loosen or tighten your apron depending on the task, clothing layers, or personal comfort.
Pro tip:
Make sure all hardware is seated properly and hammered or pressed firmly. Loose rivets or misaligned buckles can turn a well-crafted apron into an uncomfortable one fast.
Task-Specific Leather Aprons
Not all aprons are created equal. The best leather apron fits your craft like a glove—literally. Let’s break down the popular types so you can pick or design one that works perfectly for your tasks.
- Welding Aprons: Heavy split cowhide, Kevlar stitching, full coverage. Sparks, heat, and flying debris don’t stand a chance. Every strap and rivet is reinforced for safety.
- Woodworking Aprons: Lighter leather for mobility, with chest and waist pockets for pencils, rulers, and chisels. Cross-back straps keep it comfortable during long shop sessions.
- Blacksmith Aprons: Thick leather with reinforced chest and thigh protection. Rivets strengthen the stress points, letting you work near hot metal without worry.
- Artisan Aprons (crafts/leatherwork): Mid-weight leather, multiple tool pockets, mobility-friendly cut. Perfect for creators who need function without bulk.
- Barista Aprons: Lightweight, stylish, and practical. Minimal pockets for pens, thermometers, or a small notebook. Comfort and aesthetic are the priorities here, because you’re on your feet all day.
Pro tip: Think about your daily workflow before customizing. A little planning ensures your apron works as hard as you do—without slowing you down.
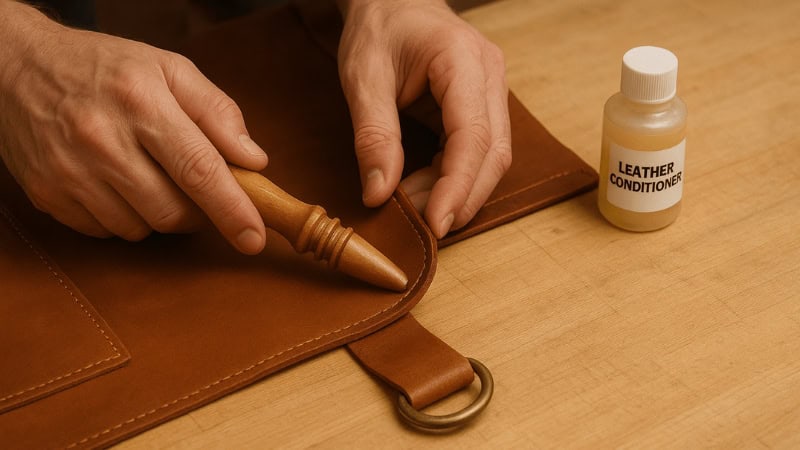
Finishing Touches
You’ve cut, stitched, and riveted. Now it’s time to make your apron shine—and last. These final touches elevate a good apron to great.
- Burnishing or Sealing Edges: Smooth out rough edges for a professional look. Burnishing adds a polished feel and prevents fraying over time.
- Leather Finishes: Apply a light leather conditioner or finish for durability and water resistance—or leave it natural for that rugged, artisanal vibe.
- Personalization: Emboss initials, logos, or decorative rivets to make it unmistakably yours. A small detail here turns a functional tool into a statement piece.
Pro tip: Take your time with finishing. A well-finished apron not only looks better but lasts years longer, proving every stitch, rivet, and cut was worth it.
Practical Tips & FAQs
Making a leather apron is rewarding, but a few extra insights can save you time, frustration, and mistakes.
- Balance weight and comfort: Choose leather thickness based on your activity.
- Plan pocket placement thoughtfully: Position pockets for the tools you use most.
- Edge protection matters: Burnish or seal edges to prevent fraying.
- Condition and maintain regularly: Keep leather supple and durable with periodic care.
- Hardware placement counts: Measure carefully to avoid discomfort or uneven tension.
- Test fit before final stitching: Adjust straps and pockets temporarily for the perfect fit.
- Safety first: Always use gloves and eye protection when working with tools.
Wrap Up
Making a leather work apron is more than a project—it’s a craft. From selecting the right leather to stitching and finishing touches, each step gives you a durable, personalized tool that fits your workflow perfectly.
Take pride in your creation. Customize it, personalize it, and wear it like armor. And once it’s done, share your masterpiece—because a handmade leather apron deserves to be shown off.
